Employee Web Portal (EWP)
The Employee Web Portal is your personal self-service workspace. It's where you check in on your projects and tasks, log the hours you work, request time off, keep your documents in order, and stay on top of what's happening — all in one place. This guide walks through every screen, step by step, and explains what happens after you click each button (including who reviews and approves your requests).
Employee Portal19 min read12 sections
On this page12 sections
Note: The EWP is separate from the admin Company Dashboard your managers and HR team use. You only see your own work and information here. Some approvals you request in the EWP are actioned by managers or HR inside the Company Dashboard.
#Signing in
Where to find it: Your company has its own web address for the portal, usually in the form yourcompany.ewp.apixonn.com. Your HR or IT team will share the exact link. Bookmark it.
What you can do here
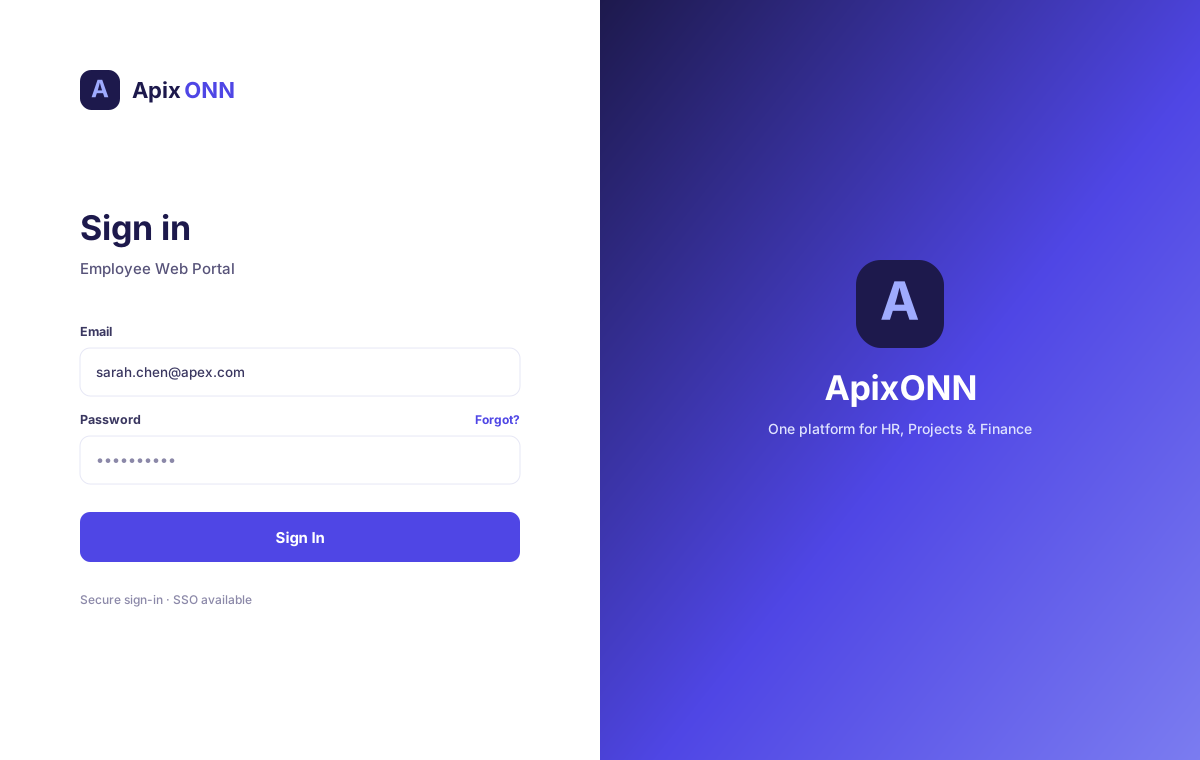
- Sign in with your work email and password.
- Show or hide your password while typing.
How to sign in
- Open your company's EWP web address in your browser.
- Type your work Email Address (for example,
you@company.com). - Type your Password. Click the eye icon on the right if you want to check what you typed.
- Click Sign In.
Once you're in, you land on your Dashboard.
Field guide
| Field | What it means | Notes |
|---|---|---|
| Email Address | Your work email | The same address HR set up for you |
| Password | Your personal password | Minimum 8 characters |
Tips & FAQ
- I'm on the wrong company's page. Each company has its own portal address. Double-check the web address matches your employer, then sign in again.
- "Invalid email or password." Check for typos and caps lock. If it still fails, your account may not be set up yet or may be inactive — contact your HR or IT administrator.
- Forgot password? The portal doesn't reset passwords by itself. Contact your HR or IT administrator to have it reset. (You can change a password you already know from your Profile — see Profile.)
- You stay signed in on the device you use until you sign out. Always sign out on shared or public computers using the Sign out icon at the bottom of the sidebar.
#Getting around
Everything is reached from the sidebar on the left. It's split into two groups:
- Workspace — Dashboard, My Projects, My Tasks, Timesheets, Org Chart, HR Requests, Documents.
- Personal — Notifications and Profile.
Your name and department (or your job title, if no department is set) show at the bottom, along with the Sign out button.
Tip: Click the small arrow on the edge of the sidebar to collapse it to icons only — handy on smaller screens. A red badge on the Notifications bell shows how many unread items you have.
Note: My Projects, My Tasks, and Timesheets only appear if your company has the project & time-tracking features switched on. If you don't see them, your company hasn't enabled that area — that's expected, not a problem with your account.
#Dashboard
Where to find it: Sidebar → Dashboard (this is your home screen after signing in).
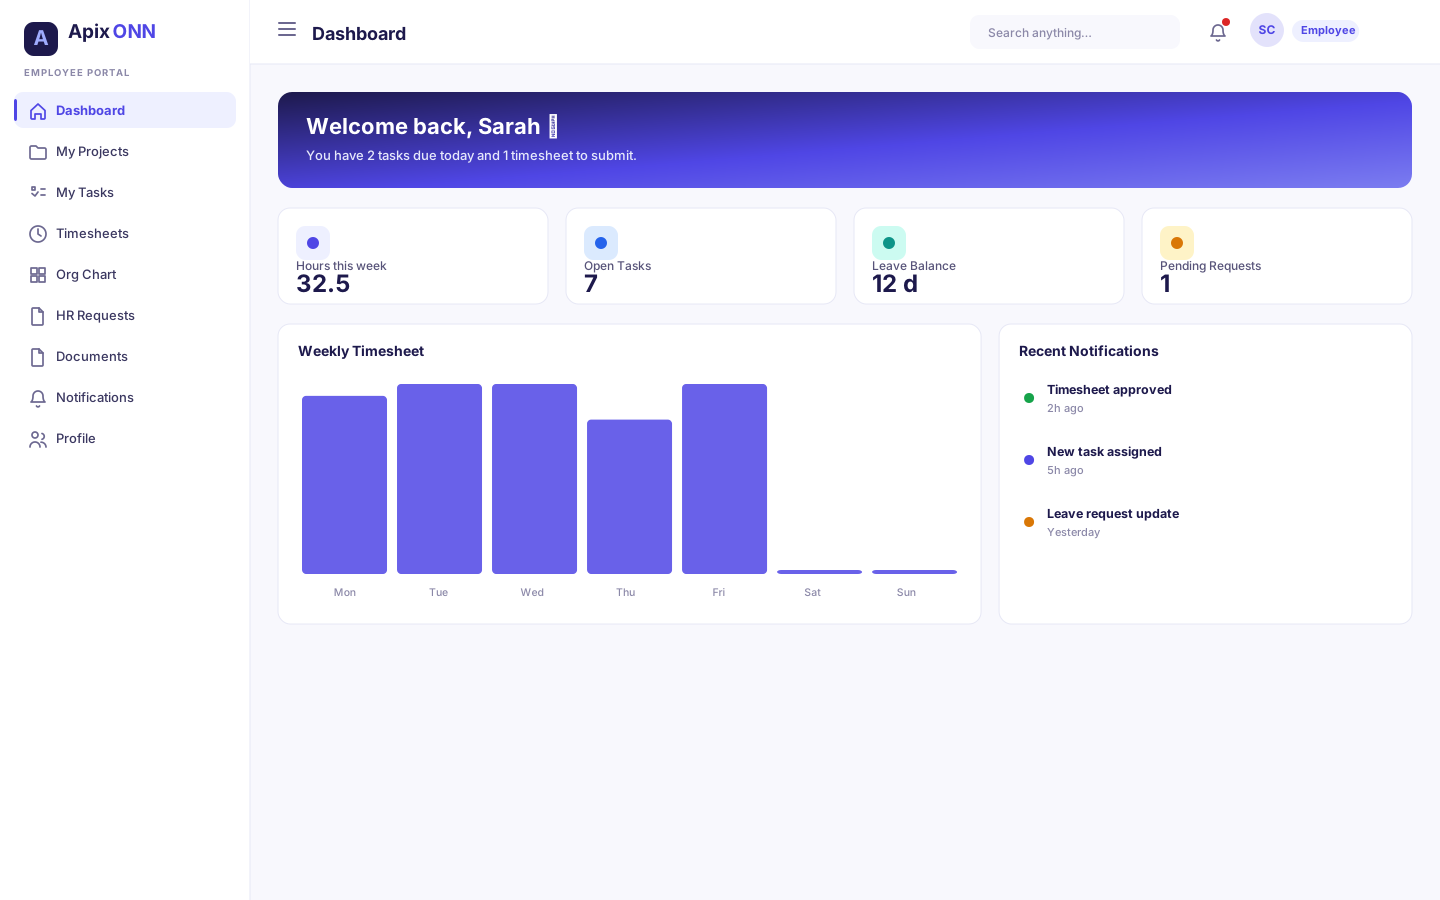
Your Dashboard is a personal summary — a friendly "here's where things stand" view that pulls together your tickets, hours, leave, and latest notifications.
What you can do here
- See a welcome banner with today's date, your overdue tickets, hours logged today, and how many active projects you're on.
- Check four quick stat cards: Active Tickets, Hours This Week, Leave Remaining, and Notifications.
- Glance at your weekly timesheet progress bar and a day-by-day mini chart.
- See your leave balances at a glance.
- Review your most recent unread notifications.
- Jump into any of your active projects.
How to use it
- Read the welcome banner at the top for today's highlights.
- Click any stat card to jump straight to that area — for example, click Hours This Week to open Timesheets, or Leave Remaining to open HR Requests.
- Under My Projects Overview, click a project card to open its workspace.
- Click a notification in Recent Notifications to open it, or All to see every notification.
Field guide
| Card | What it means | Where it takes you |
|---|---|---|
| Active Tickets | Tickets currently assigned to you that aren't done | My Projects |
| Hours This Week | Hours you've logged this week and how close you are to your weekly target | Timesheets |
| Leave Remaining | Annual leave days you have left | HR Requests |
| Notifications | Unread notifications | Notifications |
Tips & FAQ
- The dashboard shows a weekly target of 40 hours. That's the standard full-time target used to measure your progress bar.
- Numbers look empty right after joining. Once you're assigned to projects and start logging time, the cards fill in automatically.
#My Projects
Where to find it: Sidebar → My Projects.
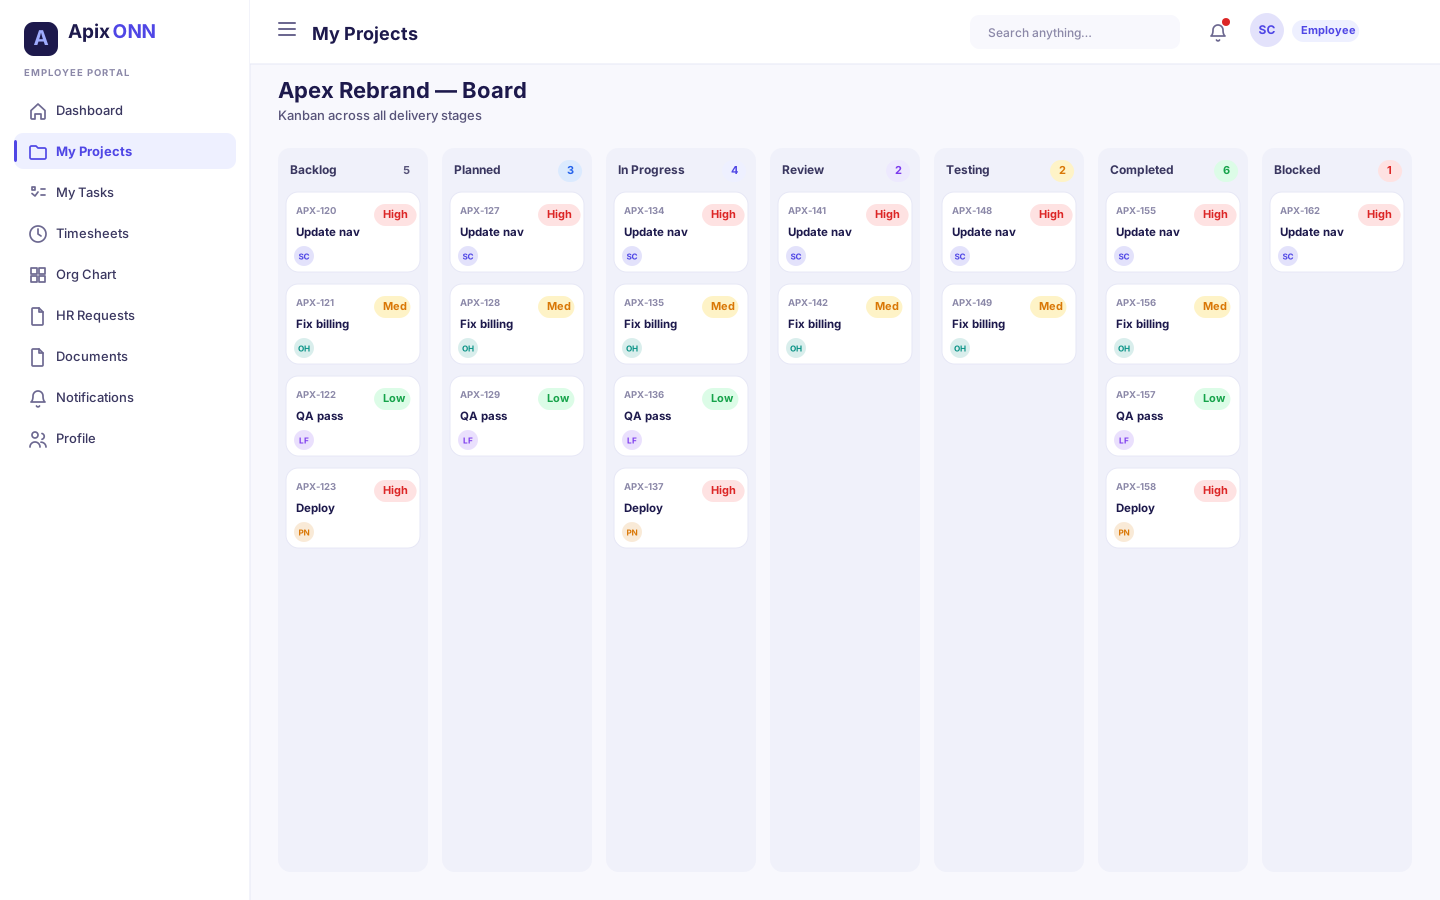
This is the list of every project you're a member of. From here you open a project to see its task board.
What you can do here
- Browse your projects as cards (grid) or as a table (list).
- Search projects by name or code.
- Filter by status: All, Active, On Hold, Completed.
- Open any project to see its board, members, and files.
How to open a project
- Go to My Projects.
- (Optional) Type in the Search projects… box, or click a status filter.
- Click a project card (grid view) or the Open button (list view).
Statuses
| Status | What it means |
|---|---|
| Active | The project is currently running |
| On Hold | Temporarily paused |
| Completed | Finished |
| Cancelled | Stopped and won't continue |
| Planning | Being set up, not started yet |
#Inside a project
When you open a project you get a workspace with three tabs:
- Board — all the project's tickets (tasks), shown as a kanban board or a list.
- Members — everyone allocated to the project and their role.
- Files — files attached to the project's tickets.
How to move a ticket across the board
- Open the project and stay on the Board tab.
- Make sure you're in kanban view (the board icon, top right of the toolbar).
- Drag a ticket card from one column to the next (for example, from In Progress to Review). It saves automatically.
How to create a ticket
- On the Board tab, click New Ticket (top right), or the small + at the top of any column to create it directly in that column.
- Enter a Title (required).
- Optionally add a Description.
- Choose a Type and Priority (both required).
- Optionally pick an Assignee, a Due Date, and Estimated Hours.
- Tick Billable if time logged on this ticket should count toward the project's billable cost.
- Click Create Ticket.
Field guide — New Ticket
| Field | What it means | Notes |
|---|---|---|
| Title | Short summary of the work | Required |
| Description | More detail about what's needed | Optional |
| Type | Task, Bug, Feature, Improvement, Change Request, or Issue | Required |
| Priority | Low, Medium, High, Urgent, or Critical | Required |
| Assignee | The project member responsible | Optional; defaults to unassigned |
| Due Date | When it should be finished | Optional |
| Estimated Hours | How long you expect it to take | Optional |
| Billable | Whether time on this ticket is costed to the project | Off by default |
Tips & FAQ
- "Members" shows the number of people on the project. Open the Members tab to see who they are and their roles.
- The Files tab is empty until files are attached to tickets in that project.
#My Tasks
Where to find it: Sidebar → My Tasks.
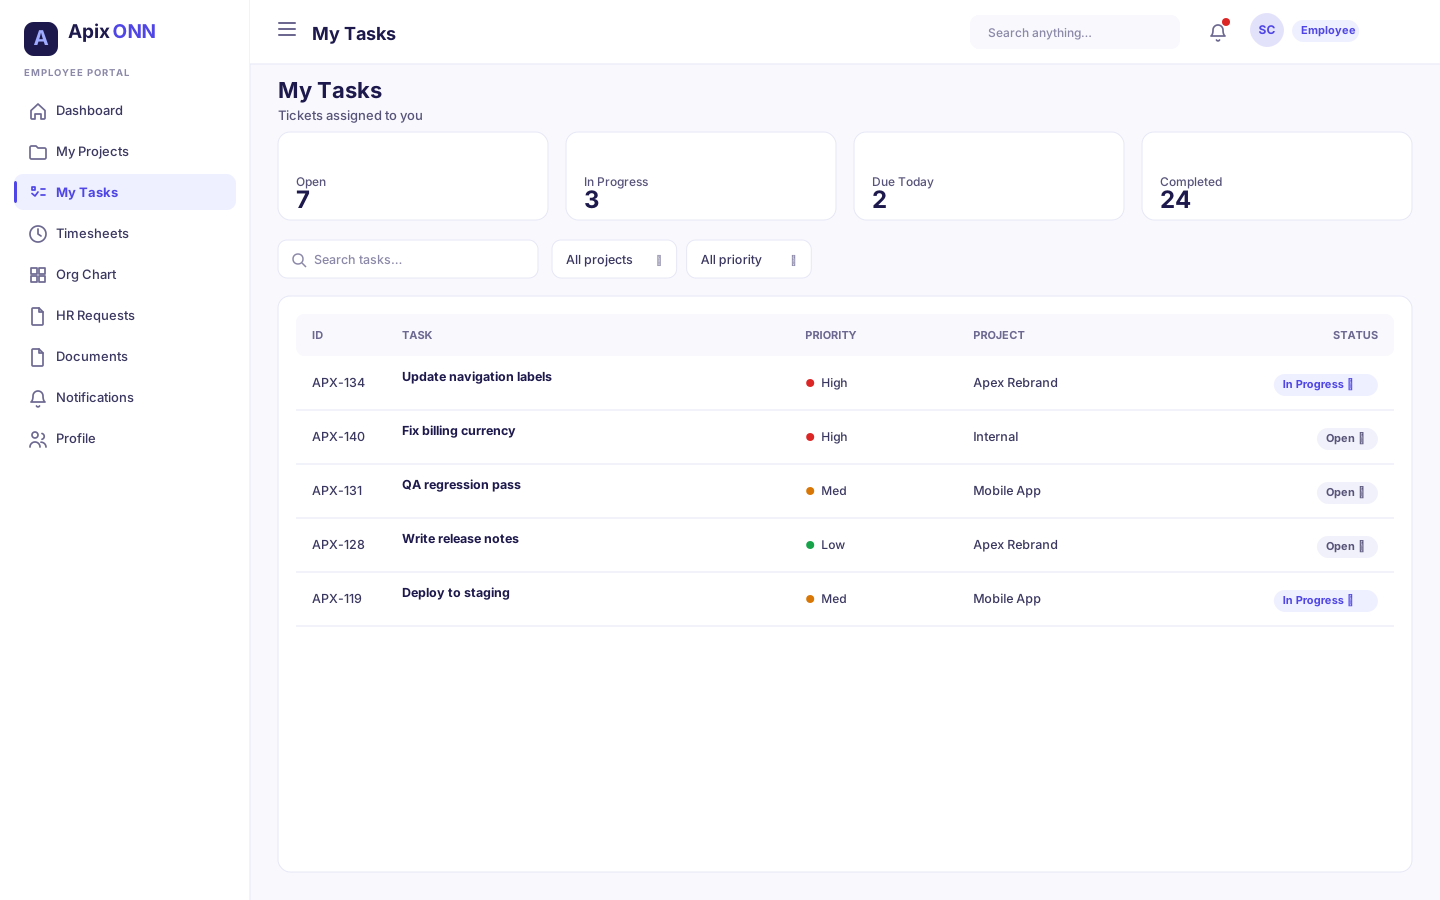
My Tasks gathers every ticket assigned to you, across all your projects, into a single list — so you never have to open each project to find your work.
What you can do here
- See a summary of your tasks: Total, In Progress, In Review, Blocked.
- Search by title or ticket number.
- Filter by status and by priority.
- Toggle Show completed to include or hide finished tasks.
- Change a task's status right from the list.
- Open any task to see its full detail.
How to update a task's status
- Go to My Tasks.
- Find the task (use search or the filters if needed).
- Click the coloured status button on the right of the task.
- Pick the new status from the dropdown. It saves immediately.
How to open a task
- Hover over the task and click the open icon on the right, or open it from within its project.
Statuses
| Status | What it means |
|---|---|
| Backlog | Captured but not scheduled |
| Planned | Scheduled to be worked on |
| In Progress | Being worked on now |
| Review | Waiting for someone to review it |
| Testing | Being tested |
| Completed | Finished and signed off |
| Blocked | Can't move forward until something is resolved |
Tips & FAQ
- Overdue tasks are highlighted in red with an "Overdue" tag when the due date has passed and the task isn't done.
- Completed tasks are hidden by default. Turn on Show completed to see them.
- A task with no project link shows its status as a plain label you can't change from here — open it inside its project instead.
#Working inside a ticket
Where to find it: Open any ticket from My Tasks or a project board.
What you can do here
- Move the ticket through its workflow stages.
- Read the description and see priority, assignee, creator, due date, and whether it's billable.
- Add comments and read the discussion.
- Log time against the ticket and see estimated vs. logged hours.
- Review the ticket's activity history.
How to log time on a ticket
- Open the ticket.
- Open the Time Log tab (or click Log time in the sidebar).
- Enter the Hours spent and the Work date.
- Optionally add Notes describing what you did.
- Click Log Time.
How to comment
- On the Comments tab, type your message in the box.
- Click the send icon (or press Ctrl/Cmd + Enter).
Tips & FAQ
- Changing the workflow status here is the same as changing status in My Tasks — click a stage in the "Workflow Status" bar.
- Billable ticket time flows into your weekly Timesheet automatically. When you log time on a billable ticket, a matching entry appears in that week's timesheet — so it's costed once and you don't enter it twice. Time logged on non-billable tickets is tracked on the ticket only and won't appear in your weekly grid.
#Timesheets
Where to find it: Sidebar → Timesheets.
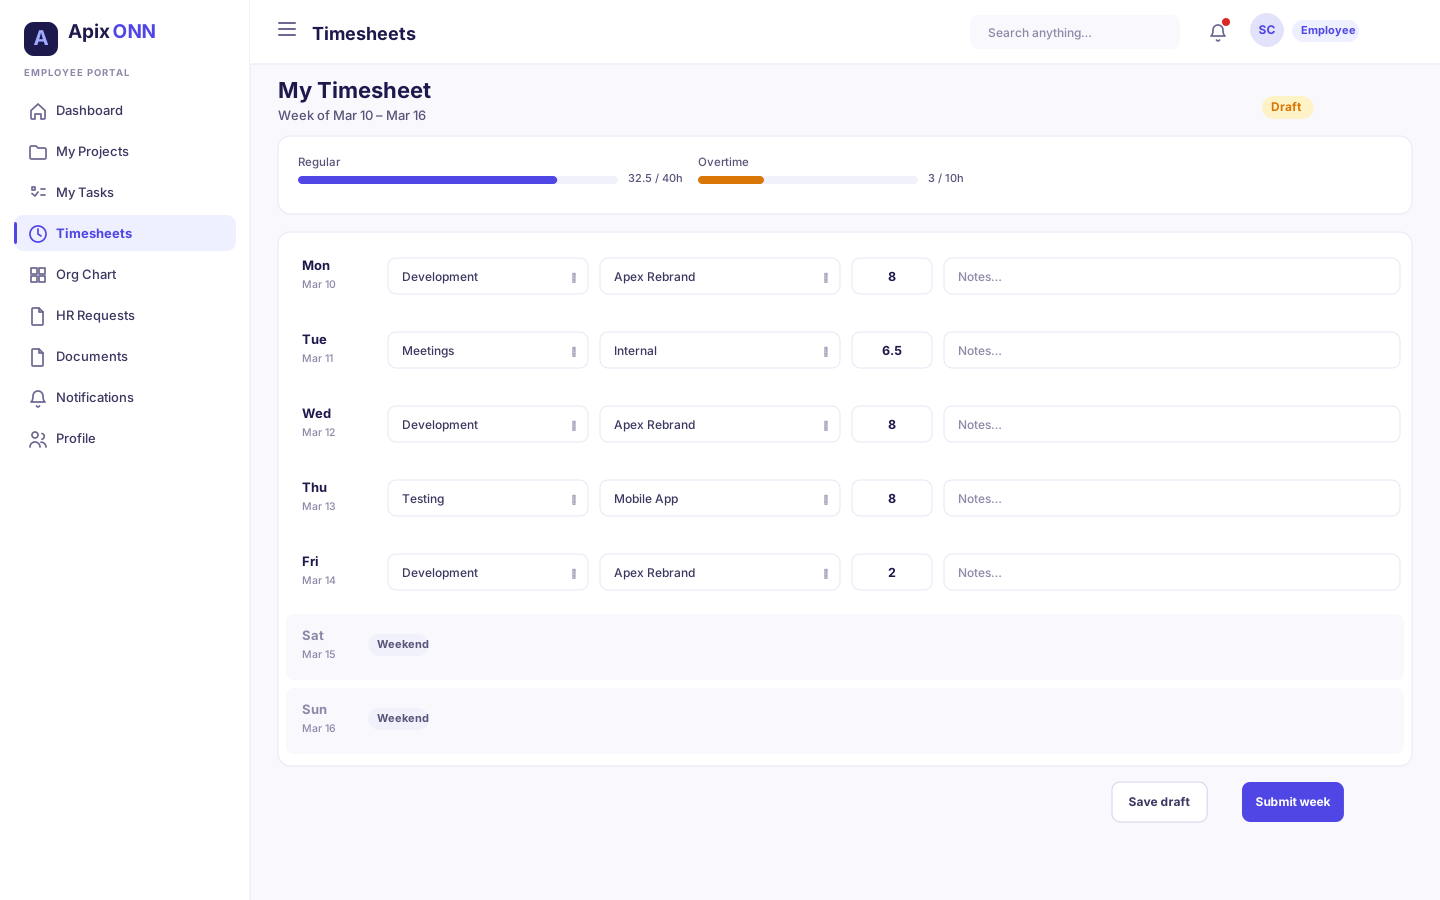
Timesheets is where you record the hours you work each week and submit them for approval. Your week is laid out as a grid — one row per day — and you add your hours straight into each day.
What you can do here
- Move between weeks and jump back to the current week.
- Add one or more time entries to any day, each tagged with an activity category (and a project, when the category is project work).
- Track your progress toward the week's minimum required hours, with overtime counted separately.
- Save the week as a draft and come back later, or submit it for approval.
- See non-working days (weekends, public holidays, and approved leave) clearly marked — and still log overtime on them.
How to log time
- Go to Timesheets. Use the ◀ / ▶ arrows to reach the week you want, or This week to jump back to the current one.
- On the day you worked, click Add (on a non-working day the button reads Log overtime). A new entry row appears on that day.
- Choose a Category — this is required. Your company sets up the list (for example project work, internal/department time, bench, or overtime).
- If the category is project work, a project picker appears — choose the project (only the projects you're allocated to are listed).
- Enter the Hours (in half-hour steps, up to 24) and, optionally, a short note.
- Repeat for each block of work — a day can hold several entries. Remove a row with the × button.
- Click Save draft to keep your changes, or Submit week to send the whole week for approval.
Note: You don't pick a date or a ticket here. The date comes from which day-row you add the entry to, and time is tracked against a category (and a project, for project work) — not against individual tickets.
Reading the week header
- A status pill shows where the week stands (Draft, Pending approval, Approved, Rejected, or Locked).
- A progress bar shows your regular hours against the week's minimum — for example, "32h regular · min 40h". Overtime appears separately (e.g. "+ 4h OT") and does not count toward the minimum.
- If you're short, a hint reminds you to log at least the required regular hours before submitting — and notes that holidays and leave lower that requirement, with any remainder able to go to Bench.
- When a week is submitted, an approval banner shows which step it's on and who it's waiting for.
Field guide — a time entry
| Field | What it means | Notes |
|---|---|---|
| Category | The type of work (project, department/internal, bench, overtime…) | Required; your company configures the list |
| Project | Which project the time is for | Shown only for project categories; lists projects you're allocated to |
| Hours | How many hours you worked | Required; half-hour steps, up to 24 |
| Notes | What you worked on | Optional but helpful for your approver |
Statuses
| Status | What it means | What happens next |
|---|---|---|
| Draft | Logged but not yet submitted | Keep adding entries; submit when ready |
| Pending approval | Sent for approval | Your approver (and any further approvers) review it |
| Approved | Fully signed off | Nothing more needed from you |
| Rejected | Returned for changes | Read the reason, fix your entries, and re-submit |
| Locked | Closed for the period | The week is read-only and can't be edited |
Your weekly target
- Your target is the week's required regular hours. A standard full week is 40, but holidays and approved leave lower it for that week. The bar shows it as "min Xh".
- Only regular (non-overtime) hours count toward the target — overtime is tracked on top.
Tips & FAQ
- You can't submit an empty week. Submit week only works once you've logged some hours.
- Save draft vs. Submit week. Save draft stores your entries without sending them; Submit week sends the whole week for approval. Both save whatever you've entered.
- Weekends, holidays, and leave show as marked rows (with the holiday or leave name). You can still log overtime on them with Log overtime.
- Approved or rejected? You'll get a notification. Rejected weeks can be corrected and submitted again.
- Who approves my timesheet? It routes to your approver — typically your manager or team lead — through the Company Dashboard. Multi-step approval is supported, and the header shows the current step and who it's with.
#Org Chart
Where to find it: Sidebar → Org Chart.
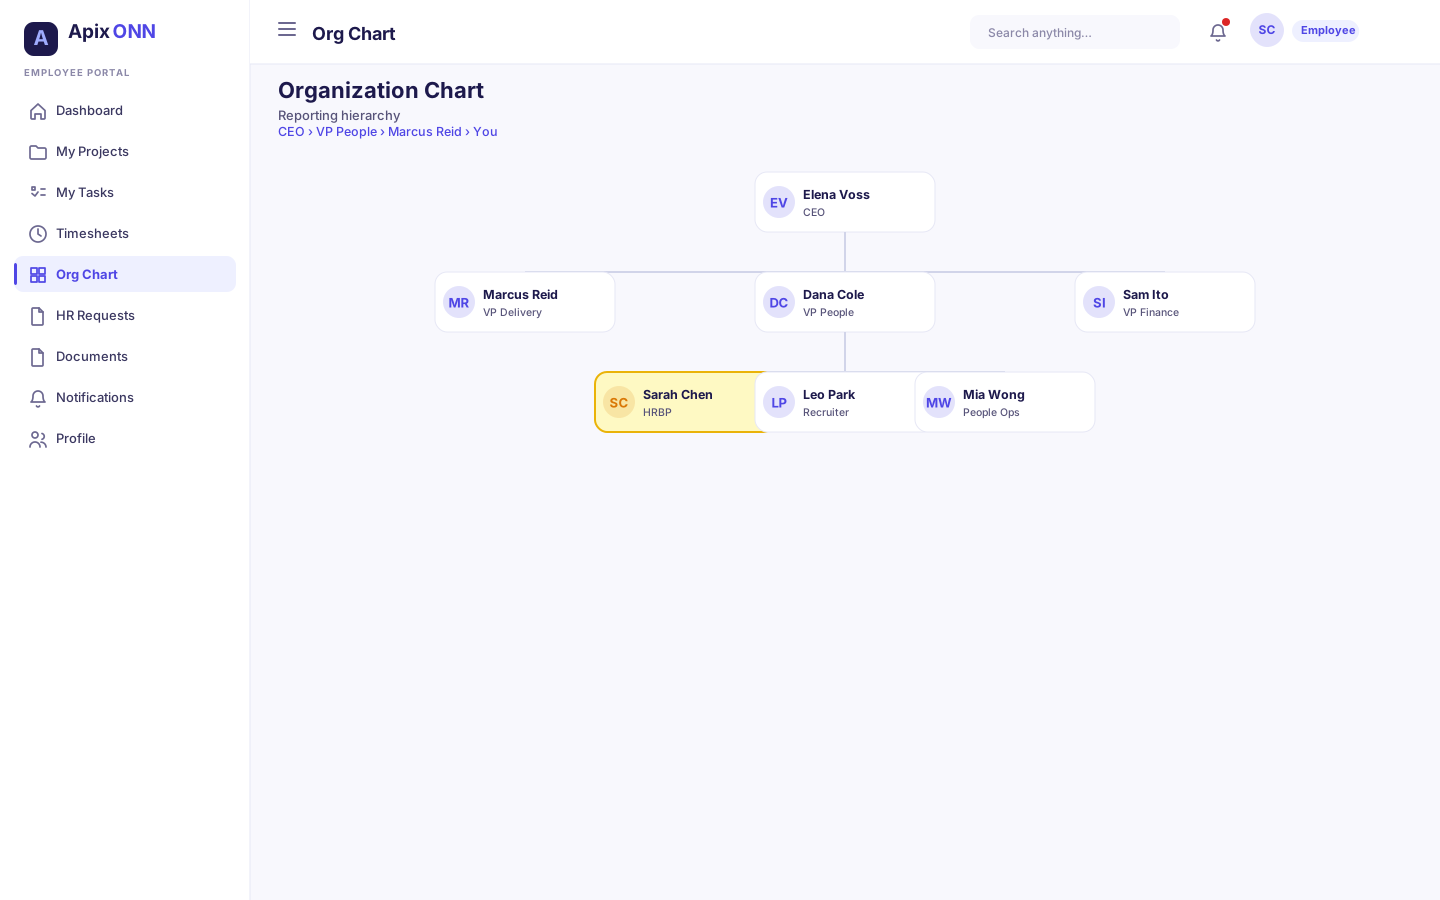
The Org Chart is a visual map of your company — who reports to whom. Your own card is highlighted so you can quickly see where you sit.
What you can do here
- See the whole reporting structure as a tree of cards.
- Find your own position instantly (your card glows and is tagged You).
- See your reporting line as a breadcrumb ("Your position: … › … › You").
- Search for any colleague by name.
- Expand or collapse any manager's team.
How to find someone
- Go to Org Chart.
- Type a name in the Find employee… box. Matching cards are highlighted.
- Click the small arrow under a card to expand or collapse that person's team.
Tips & FAQ
- Each card shows a person's name, job title, department, and employee number.
- Your team automatically expands so you can see your part of the org without hunting for it.
#HR Requests
Where to find it: Sidebar → HR Requests.
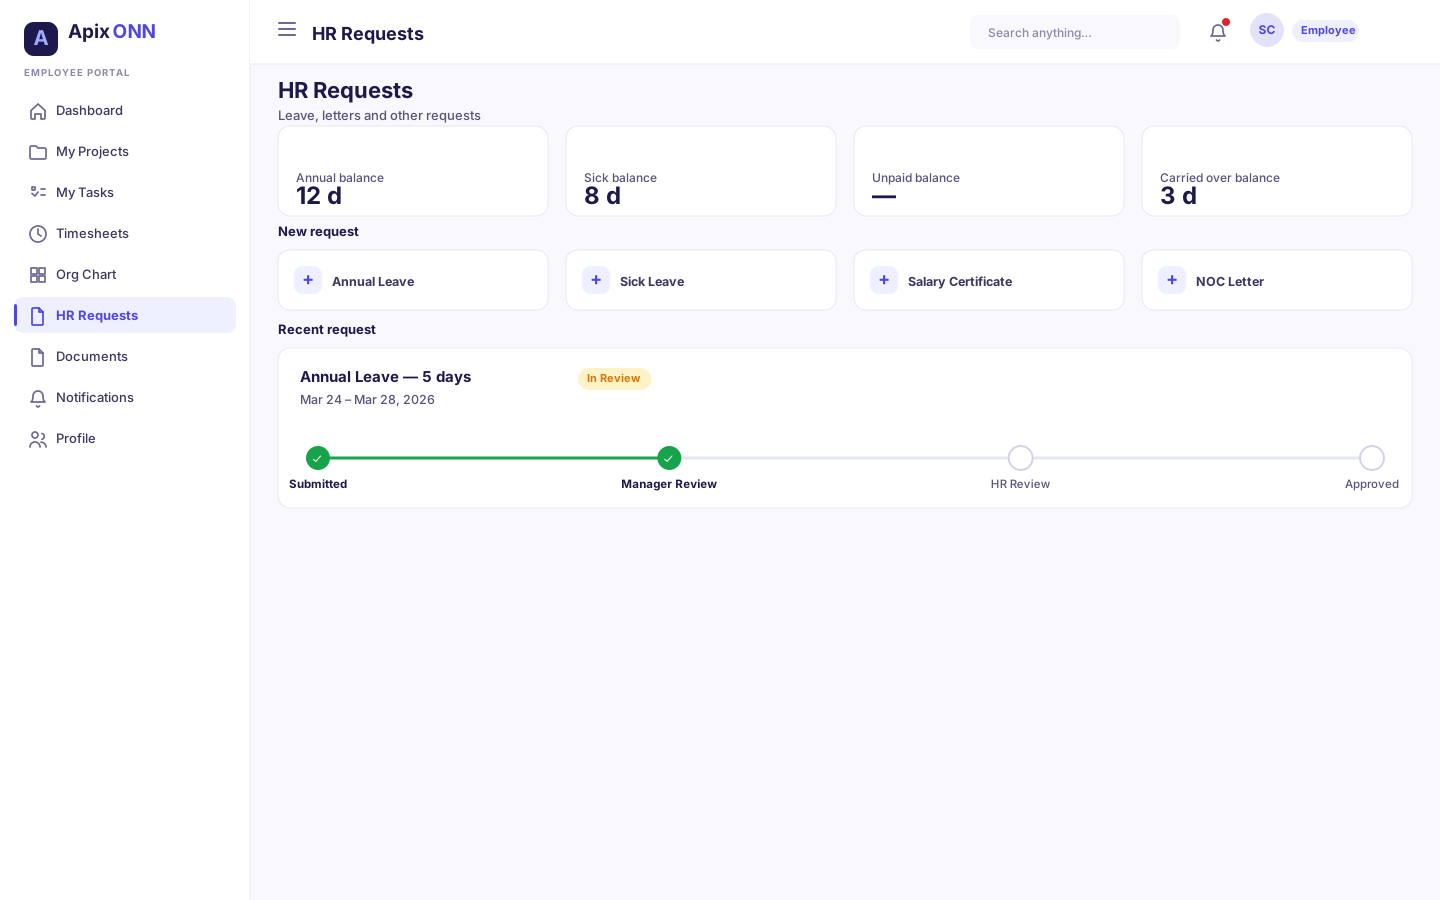
This is where you ask for time off and other HR-related things — vacation, sick leave, remote work, overtime, shift changes, and training — and track exactly where each request is in the approval process. It's also where you check your leave balances.
What you can do here
- See your leave balances (Annual, Sick, Emergency, Unpaid).
- Submit a new request of any of the six types.
- Track each request through a visual approval track.
- Read notes left by your manager or HR.
- Cancel a request that hasn't been actioned yet.
How to submit a request
- Go to HR Requests.
- Click New Request (top right), or click one of the coloured type shortcuts (Vacation, Sick Leave, Remote Work, Overtime, Shift Change, Training).
- Choose the Request Type.
- Enter a Title (required) — a short summary.
- For date-based types (Vacation, Sick Leave, Remote Work, Shift Change), pick a Start Date and End Date.
- Add Details / Reason if helpful.
- Click Submit Request.
How to check leave balance before requesting
- Your balances are shown as cards at the top of the page. When you pick Vacation in the request form, it also reminds you how many annual leave days you have left.
Field guide — New Request
| Field | What it means | Notes |
|---|---|---|
| Request Type | Vacation, Sick Leave, Remote Work, Overtime, Shift Change, or Training | Required |
| Title | Short summary of your request | Required |
| Start Date / End Date | The period you're requesting | Shown for date-based types; End Date can't be before Start Date |
| Details / Reason | Context for your approver | Optional |
Leave balances
| Balance | Standard allowance |
|---|---|
| Annual Leave | 21 days |
| Sick Leave | 15 days |
| Emergency Leave | 3 days |
| Unpaid Leave | 30 days |
Note: For vacation and sick leave, the number of days is worked out automatically from your start and end dates (counting working days). Approved vacation and sick leave reduce your remaining balance for the year.
Statuses & the approval track
Every request moves through the same track: Submitted → Manager Review → HR Review → Approved.
| Status | What it means | Who's next |
|---|---|---|
| Pending | Just submitted, waiting for your manager | Your manager |
| Manager Approved | Your manager approved; waiting on HR | HR team |
| HR Approved | HR has approved; waiting for final confirmation | Almost done — final sign-off |
| Approved | Fully approved — you're all set | No further action |
| Rejected | Turned down | Read the notes; talk to your manager or HR |
| Cancelled | You withdrew it | — |
How to cancel a request
- Find the request in My Requests.
- Click Cancel on the right.
Note: You can cancel a request any time before it's fully approved or rejected — that includes while it's Pending, Manager Approved, or HR Approved. Once it's fully Approved (or Rejected), the Cancel option is gone — contact HR if something needs to change after that.
Tips & FAQ
- Who approves my request? First your line manager, then the HR team — both act from the Company Dashboard. You'll be notified at each step.
- Where do manager/HR comments show up? Any notes they leave appear on the request card under Manager and HR.
- Overtime and Training don't need dates — just a title and details.
- Filter your list using the tabs (All, Pending, Manager, Approved, Rejected) to focus on what matters.
#Documents
Where to find it: Sidebar → Documents.
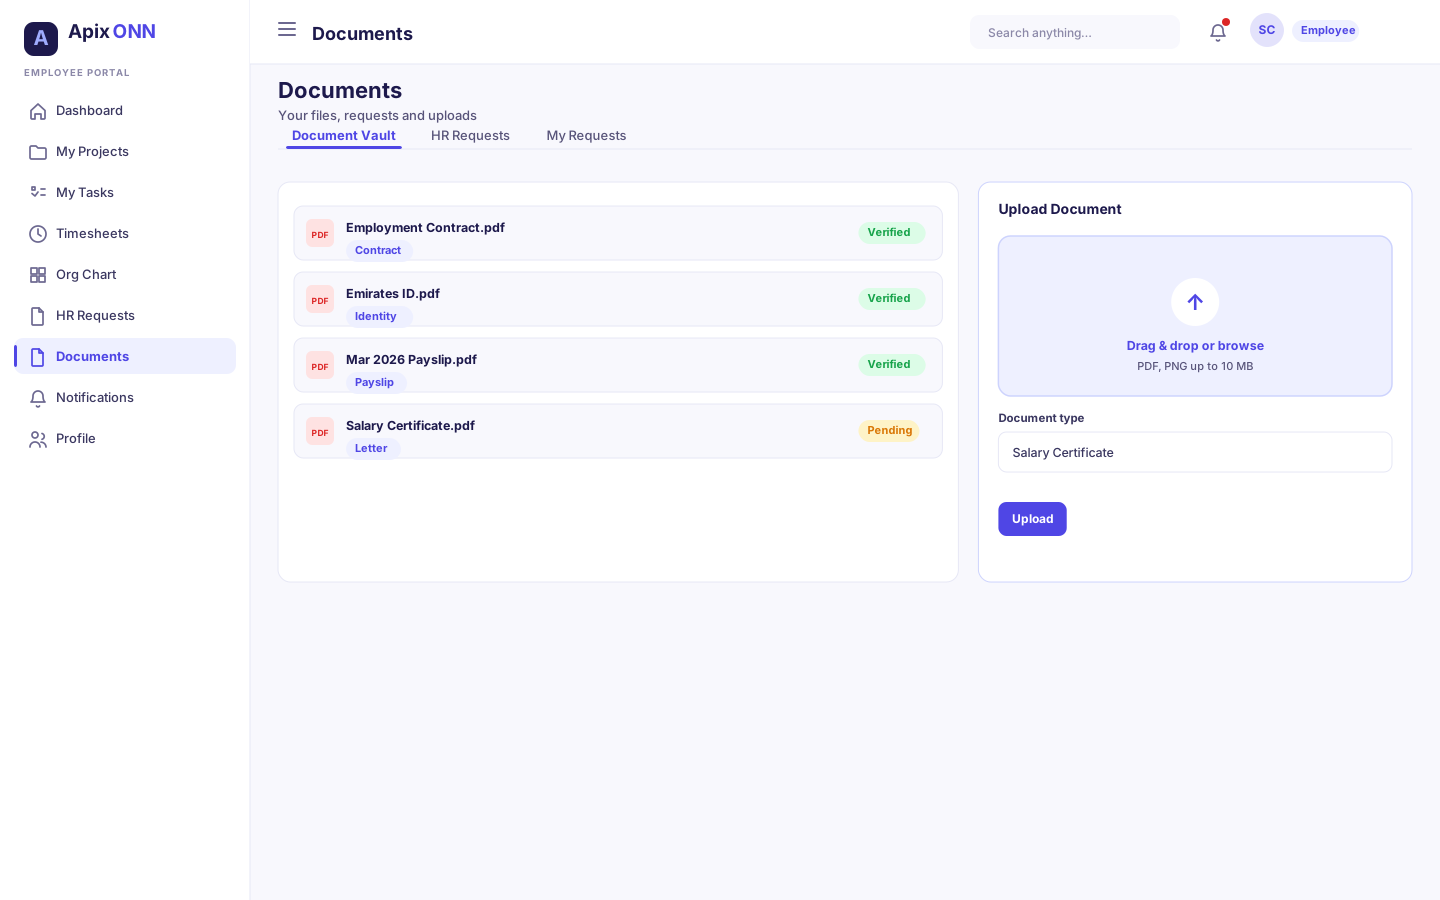
Documents is your personal file area. It has three tabs: your Document Vault (your files), HR Requests (documents HR has asked you to upload), and My Requests (official documents you've asked HR to prepare, like a salary certificate).
What you can do here
- View and download documents in your vault.
- Upload your own documents (passport, contract, certificates, and more).
- Respond to HR's requests for documents by uploading the file they need.
- Request official documents from HR and download them when ready.
#Document Vault tab
How to view or download a document
- Go to Documents → Document Vault.
- (Optional) Search by name.
- Click Download on the document you want.
How to upload a document
- Click Upload Document (top right).
- Click the upload area and select your file (PDF, DOC, JPG, or PNG — up to 10 MB).
- Enter a Document Name and choose a Document Type.
- Optionally add an Issue Date, Expiry Date, and Notes.
- Click Upload.
Vault statuses
| Status | What it means |
|---|---|
| Verified | HR has checked and confirmed the document |
| Under Review | Uploaded and waiting for HR to verify |
| Requested | HR has asked for this document (see the HR Requests tab) |
#HR Requests tab
When HR needs a specific document from you, it appears here marked Awaiting Upload, along with any note explaining what they need.
How to fulfill an HR upload request
- Go to Documents → HR Requests.
- Find the requested document (it shows who requested it and when).
- Click Upload next to it.
- Select your file and click Upload.
Once uploaded, the document moves into your vault as Under Review for HR to verify.
#My Requests tab
Use this to ask HR for an official letter or record.
How to request a document from HR
- Go to Documents and click Request from HR (or open the My Requests tab and click New Request).
- Choose the document type you need.
- Add any Additional Notes (for example, which month's payslip).
- Click Submit Request.
- When it's marked Ready, come back and click Download.
Documents you can request from HR
| Document | What it's for |
|---|---|
| Salary Certificate | Official letter confirming your salary |
| Experience Letter | Official record of your experience |
| Bank Letter | For bank loans and financial applications |
| NOC Letter | No-objection certificate for various purposes |
| Employment Verification | Confirms your employment status |
| Payslip Request | A copy of your payslip for a specific month |
Request statuses
| Status | What it means |
|---|---|
| Submitted | HR has received your request |
| Processing | HR is preparing the document |
| Ready | Done — you can download it |
| Delivered | Provided to you |
Tips & FAQ
- How long does an HR document take? Typically 2–3 business days.
- A number badge on the HR Requests tab means HR is waiting on documents from you — clear those first.
- File won't upload? Check it's a PDF, DOC/DOCX, JPG, or PNG and under 10 MB.
#Notifications
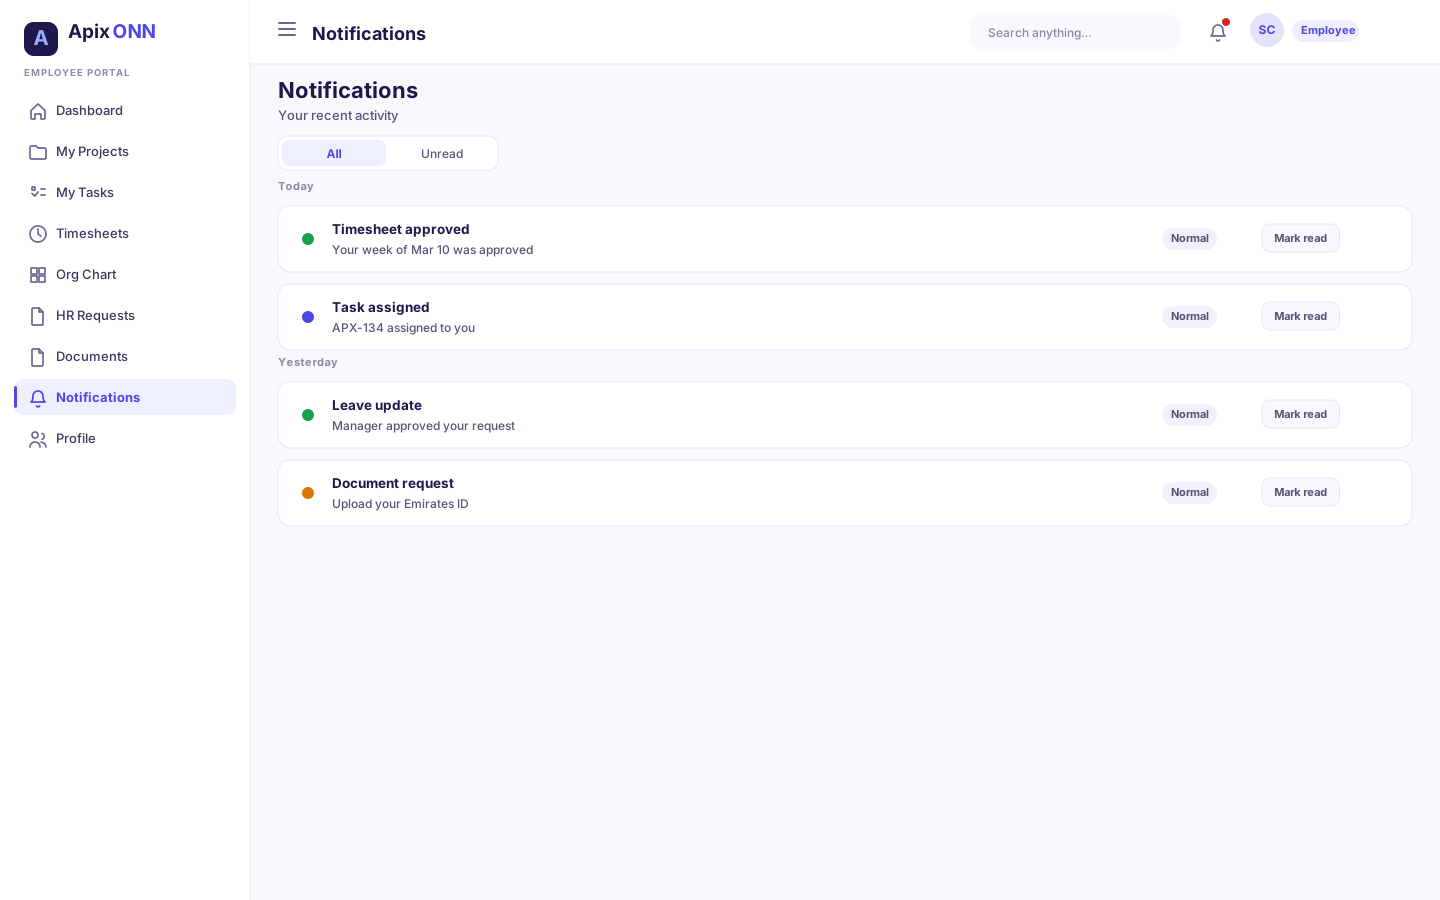
Where to find it: Sidebar → Notifications (the bell icon; a red badge shows unread count).
Notifications keep you informed about anything that needs your attention — a ticket assigned to you, a comment, an approved or rejected request, a document that's ready.
What you can do here
- See all notifications grouped by Today, Yesterday, This Week, and Older.
- Filter to show All or just Unread.
- Click a notification to mark it read; use its View → link to open the related item.
- Mark everything as read at once.
How to use it
- Open Notifications.
- Click a notification to mark it read, then click its View → link to jump to the related ticket, request, or document.
- Click Mark all as read (top right) to clear your unread count.
What you'll be notified about
| Notification | Meaning |
|---|---|
| Ticket assigned | A ticket was assigned to you |
| Comment / mention | Someone commented on a ticket you're involved in |
| Ticket / status updated | A ticket you're following changed |
| HR request approved / rejected | Your leave or HR request was actioned |
| Timesheet approved / rejected | Your submitted week was reviewed |
| Document ready | An HR document you requested is ready to download |
Tips & FAQ
- The bell badge in the sidebar always shows your current unread count, from any page.
- Click "View" on a notification to go straight to the ticket, request, or document it's about.
#Profile
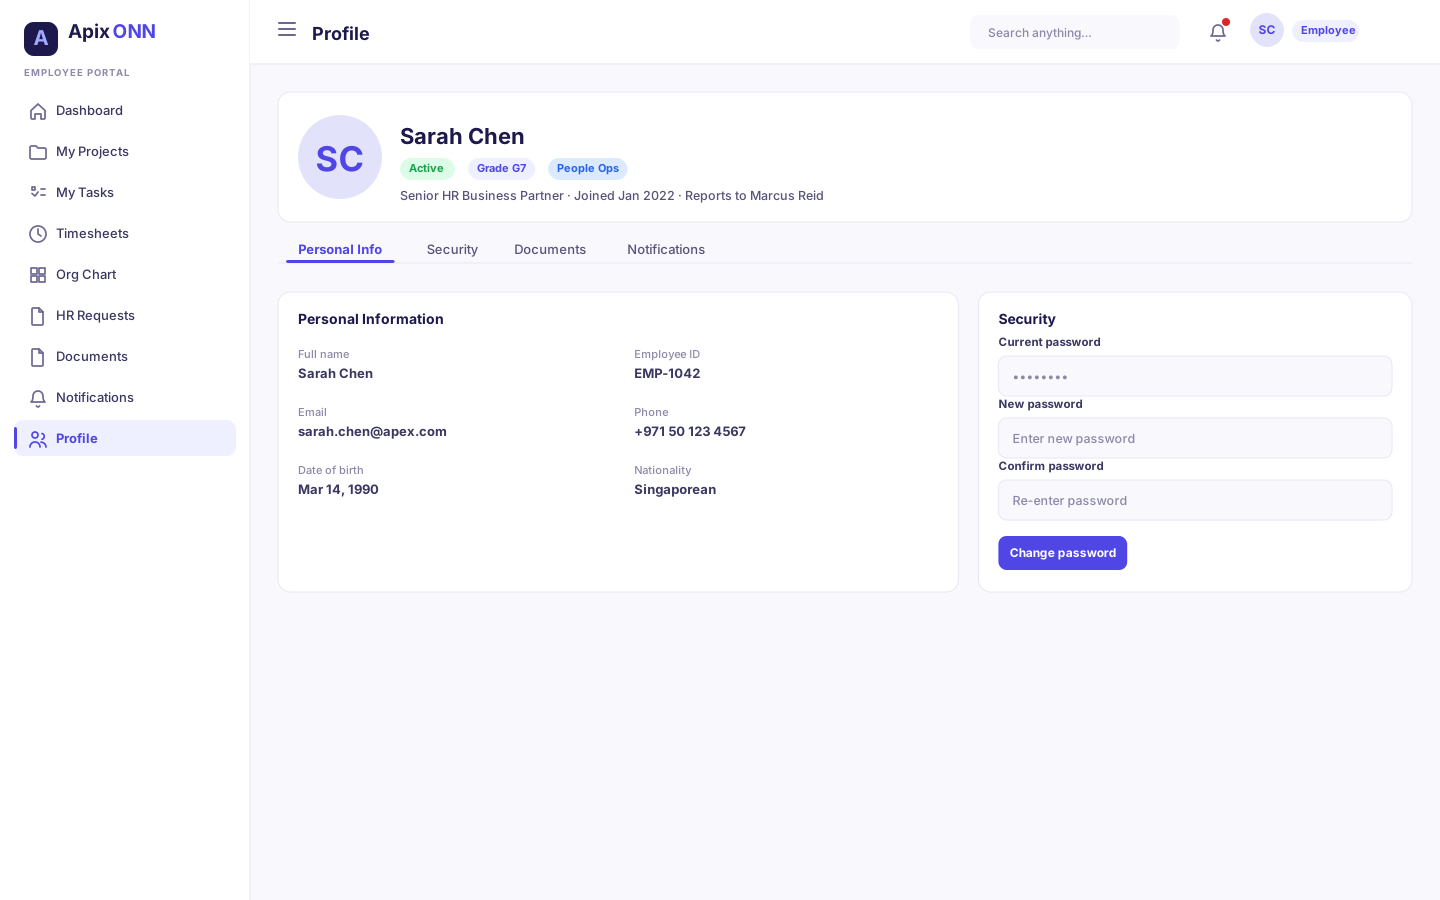
Where to find it: Sidebar → Profile.
Your Profile shows your personal and work details and lets you keep your phone number and password up to date. It has two tabs: Personal Info and Security.
What you can do here
- See your name, email, department, position, employee ID, role, status, and join date.
- Update your phone number.
- Change your password.
- See quick stats: projects, active tickets, and hours this week.
How to update your phone number
- Go to Profile → Personal Info.
- Click Edit.
- Update the Phone field.
- Click Save.
How to change your password
- Go to Profile → Security.
- Enter your Current Password.
- Enter your New Password (at least 8 characters).
- Re-enter it in Confirm New Password.
- Click Update Password.
Field guide — Personal Info
| Field | Editable? | Notes |
|---|---|---|
| Full Name | No | Managed by HR |
| Email Address | No | Managed by HR |
| Department | No | Managed by HR |
| Position / Title | No | Managed by HR |
| Phone | Yes | The one field you can update yourself |
| Employee ID | No | Managed by HR |
| Role | No | Managed by HR |
| Status | No | Active or Inactive, set by HR |
| Join Date | No | Managed by HR |
Tips & FAQ
- Only your phone number is editable here. If your name, department, title, or anything else is wrong, contact HR to have it corrected.
- New passwords must match and be at least 8 characters, or the update won't go through.
- Your role controls what you can see and do across the portal. Roles range from Employee and Contractor up to team and department managers — HR assigns yours.
#Quick reference: who approves what
| You do this | Where | Who reviews / approves it |
|---|---|---|
| Submit a weekly timesheet | Timesheets | Your project manager or team lead |
| Request leave or another HR request | HR Requests | Your manager first, then HR |
| Upload a document HR asked for | Documents → HR Requests | HR verifies it |
| Request an official HR document | Documents → My Requests | HR prepares and uploads it (2–3 business days) |
| Update your phone or password | Profile | Takes effect immediately — no approval needed |
Tip: Whenever something you submitted is approved, rejected, or ready, you'll get a notification — so you rarely need to keep checking back.