Getting Started & Core UI
Welcome to the ApixONN Company Dashboard — your company's control center for projects, people, finance, payroll, and clients. This guide is the front door: it shows you how to sign in, find your way around, switch between companies, read your home dashboard, and use the shared conventions (search, filters, badges, exports) that appear on every screen. Everyone uses this page, from HR and finance staff to project managers, admins, and employees checking their own info.
Company Dashboard15 min read13 sections
On this page13 sections
Note: What you see depends on your role and on which modules your company has turned on. If a section named below isn't in your sidebar, either your company hasn't enabled it or your role doesn't include it. That's expected — see Roles at a glance.
#Signing in
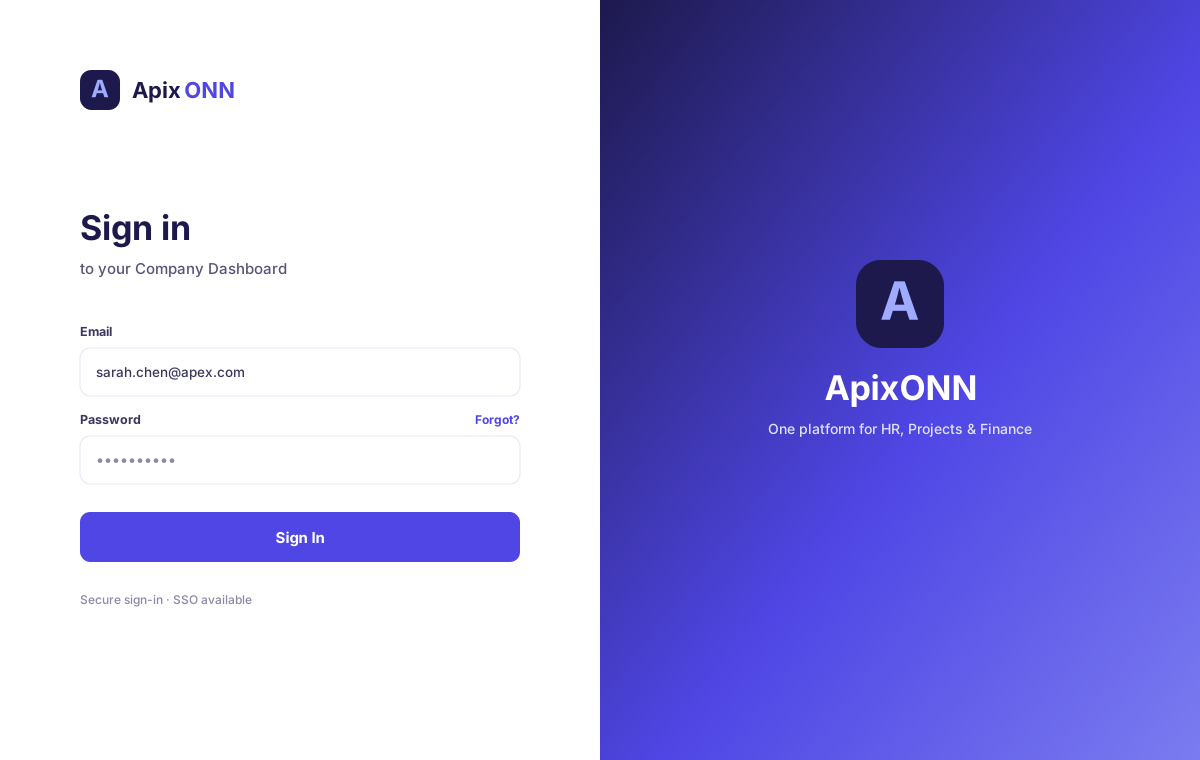
Where to find it: Your company has its own web address — a subdomain like yourco.apixonn.com. Always start there. The sign-in page automatically shows your company's logo and colors, so you'll know you're in the right place.
What you can do here
- Sign in with your work email and password.
- Stay signed in on a trusted device with Remember me.
- Switch the page language between English and Arabic before you even log in.
How to sign in
- Open your company's web address (for example,
yourco.apixonn.com). - In the Email address field, type your work email.
- In the Password field, type your password.
- (Optional) Tick Remember me if you're on your own device.
- Select Sign In.
If your details are correct, you land on the Dashboard. If the email or the password is wrong, a red box shows "Invalid email or password." The message is the same whichever of the two is wrong. Check for typos and caps lock, then try again.
Field guide
| Field | What it means | Notes |
|---|---|---|
| Email address | Your work email address | Same address your admin used to invite you. |
| Password | Your personal password | Case-sensitive. |
| Remember me | Keeps you signed in on this device | Leave unticked on shared or public computers. |
Forgot your password? There's no self-service reset. The sign-in page says so: "Forgot your password? Ask your administrator to reset it." Your Admin can reset it for you.
Tip: Bookmark your company's exact web address. Signing in at the wrong subdomain won't find your account — each company has its own separate front door.
Note: Creating accounts and resetting passwords are handled by your company administrator. If you can't get in, contact your Admin or HR Manager rather than trying to register a new account.
#The top bar
Where to find it: Runs across the top of every screen once you're signed in.
What you can do here
- Collapse or expand the sidebar to make more room.
- See the name of the screen you're on.
- Check for new notifications — a red dot on the bell shows unread ones; click it to open your inbox.
- See your current role (seat).
The parts, left to right
| Element | What it does |
|---|---|
| Menu button (three lines) | Collapses the left sidebar to icons only, or expands it back. Great on smaller screens. |
| Page title | Shows the name of the screen you're currently viewing. |
| Notifications bell | Click it to open your notifications inbox. A small red dot appears when you have unread notifications. |
| Seat indicator | A colored pill showing your role or access level (for example, "HR Manager"). This is your "seat" — it tells you what you're allowed to do. |
Note: Your profile and the Sign Out button live at the bottom of the left sidebar, not in the top bar. See Signing out.

#The left sidebar (navigation map)
Where to find it: Down the left side of every screen. This is how you move between areas of the app.
What's in the sidebar, top to bottom
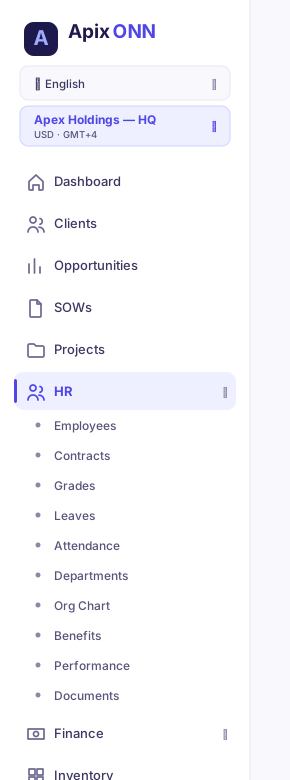
- Company logo & plan — your company's branding and current plan.
- Language switcher — toggles English ⇄ Arabic.
- Company switcher — appears only if your account covers more than one company or branch.
- Navigation menu — the sections listed below. Sections with a small arrow expand to reveal sub-items; select the arrow (or the section name) to open them.
- Your profile & Sign Out — pinned to the bottom.
Selecting a section that has sub-items expands it in place. Your current location is highlighted, and the parent section auto-expands so you always know where you are.
#Full navigation map
| Section | What lives under it |
|---|---|
| Dashboard | Your home overview with company-wide KPIs and health widgets. |
| Projects | The full project list and each project's details, milestones, and risks. |
| Resources | Allocations, Timesheets, Demands, ORF & Hiring, Capacity Planning, HR Requests, Document Requests. |
| HR | Employees, Contracts, Grades, Leaves, Attendance, Performance, Benefits, Skills, Departments, Positions, Job Titles, Org Chart, Doc Templates, Signatures. |
| Finance | Invoices, Receipts, Journals, Inventory, GL Accounts, AR Clients, AP Suppliers, Account Mappings, Fiscal Years, Bills, Purchase Orders, Bank Accounts, Bank Reconciliation, Expenses, Budgets, Fixed Assets, Credit Notes, Vendors, Tax Rates, Debit Notes. |
| Payroll | Cycles, Payslips, Loans, Tax Brackets, End of Service, Salary Components, Adjustments, Salary Changes, Bank Files, Payments, Payroll Reports, Payroll Settings. |
| Clients | Client List, Opportunities, SOWs, Contacts. |
| Reports | Dashboards, Financial, Financial Statements, Resources, HR Analytics, Project Analytics, Compliance. |
| Workflow Inbox | Items waiting for your approval or action (shows a count badge). |
| Notifications | Inbox (your alerts) and Preferences (how you want to be notified). |
| Settings | Company, Branches, Currencies & Rates, Companies · Access Control: Users & Roles, Roles & Permissions, Delegations, Audit Logs · System: Workflows, Billing. |
Tip: Use the menu button in the top bar to collapse the sidebar to icons when you want a wider working area. Hover over an icon to see its name.
Note: Some items may show a small colored dot indicating they're still being finished. If an item you expect is missing entirely, it's because of your role or your company's enabled modules — not a bug.
#The Company Switcher
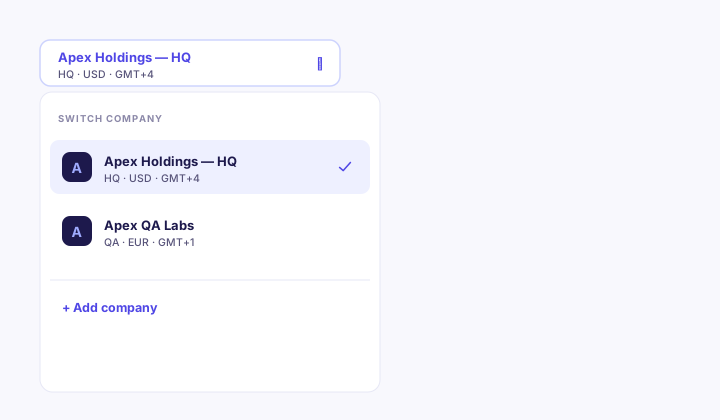
Where to find it: Near the top of the left sidebar — but only if your account spans more than one company or branch (for example, "HQ" and "QA"). If you belong to a single company, the switcher is hidden.
What you can do here
- See which company you're currently working in.
- Jump to another company or branch you have access to.
How to switch companies
- In the sidebar, select the company button (it shows the current company's name and short code).
- In the dropdown, review the list — each entry shows the company name, its short code, and its currency and time zone.
- Select the company you want to move to.
- Wait a moment while the page reloads with that company's data. A confirmation appears when the switch completes.
What changes when you switch
Everything on screen re-scopes to the company you selected. Your projects, employees, invoices, payslips, reports, and dashboards all reflect the new company. Amounts appear in that company's currency, and dates follow its time zone. Your login stays the same — you're not signing in again, just changing which company's books you're looking at.
Field guide
| Item | What it means | Notes |
|---|---|---|
| Company name | The company or branch you're viewing | Highlighted with a check mark when it's the active one. |
| Short code | A 2-letter tag (e.g. "HQ", "QA") | Used as a compact label in the collapsed sidebar. |
| Currency · Time zone | The company's money and clock settings | These drive how amounts and dates display. |
Tip: Always glance at the company button before creating or approving anything, especially invoices and payroll. It's easy to act in the wrong company if you switch often.
Note: The switcher only lists companies you've been granted access to. To be added to another company, ask your Admin or Super Admin.
#The Dashboard (home)
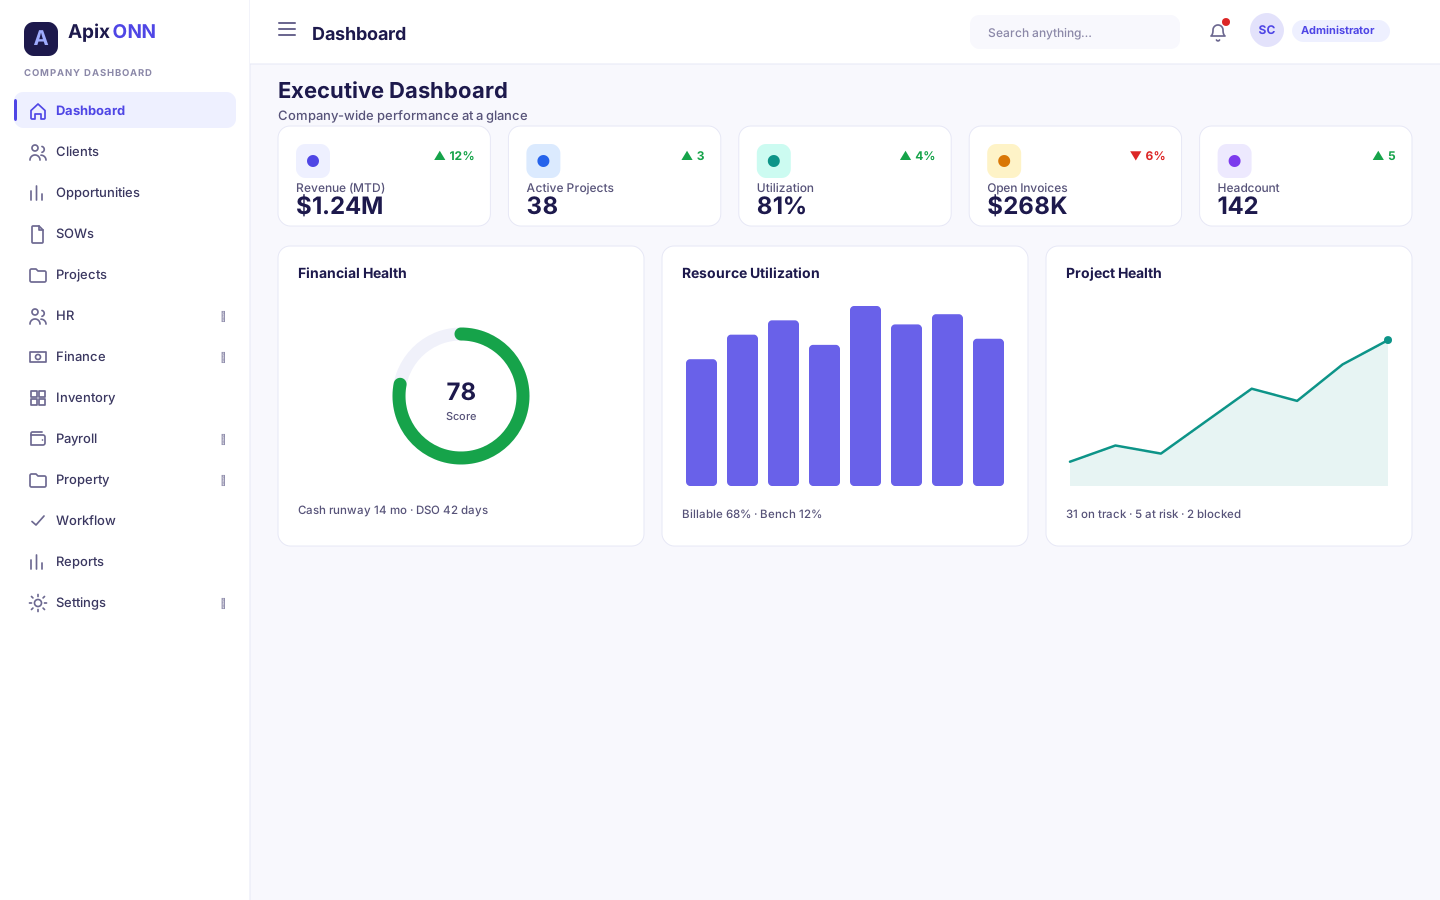
Where to find it: Dashboard — the first item in the sidebar. It's also where you land right after signing in.
What you can do here
- Get a one-glance read on the health of the company.
- Jump straight into any area that needs attention.
- Refresh the numbers on demand.
What you see depends on your role. The dashboard shows only the sections your role allows, and only for the company you have selected in the Company Switcher. Each group of widgets needs its own report permission:
| Widget | What it shows | Shown if your role has |
|---|---|---|
| KPI cards (top row) | Monthly Revenue, Active Projects, Utilization Rate, Headcount, and Open Demands. Colors turn orange when something needs attention. | reports.dashboards.view |
| Growth Trends — 6 Months | A month-by-month table of revenue, projects, headcount, and month-over-month growth. | reports.dashboards.view |
| Financial Health | Revenue, costs, and gross margin, with a bar showing progress toward your margin target. | reports.financial.view |
| Burn Rate — Last 6 Months | Spending versus budget over the last several months, flagged when you're over 90% or 100%. | reports.financial.view |
| Resource Utilization | Overall utilization rate plus how many people are allocated, on the bench, and total billable hours. | reports.resources.view |
| Project Health | A count of projects that are On Track (green), At Risk (yellow), and Critical (red), with the top few projects listed. | reports.projects.view |
| Upcoming Milestones | Milestones due soon, with days remaining (or an "overdue" flag). | reports.projects.view |
| Risk Summary | Open risks by severity (High, Medium, Low) with the highest-scoring risks listed. | reports.projects.view |
Most widgets have a View details link that takes you to the full screen for that area. Selecting a project or milestone jumps straight to it. With reports.dashboards.view you also get a Deep Analytics button.
If you have no report access, the dashboard shows a Welcome card instead of company figures ("Company dashboards are shown to people with access to reports."). It points you to your own work with a Workflow Inbox button and a Timesheets button, each shown if your role can open that screen. If you need company figures, ask your administrator for access.
How to refresh the dashboard
- Select Refresh in the top-right of the dashboard.
- The cards reload with the latest numbers.
Note: Finance Managers and Accountants have the financial report permission. Which other report permissions a role has is set under Settings → Roles & Permissions (see Reports).
#General conventions
These patterns repeat across nearly every screen, so learning them once pays off everywhere.
#Search and filters
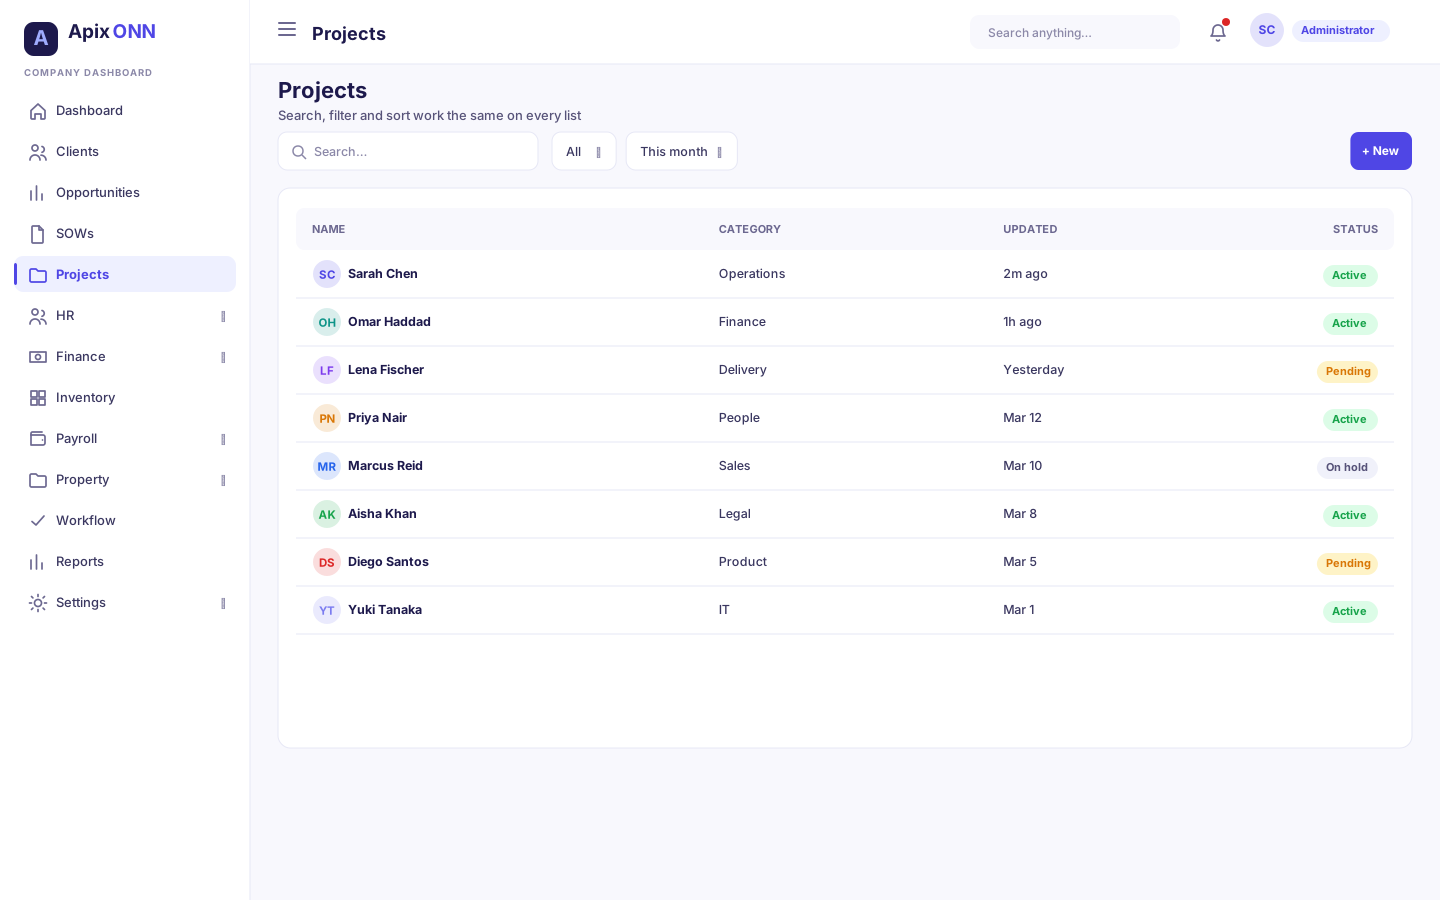
Most list screens have a search box and one or more filter controls above the table. Type to narrow a list by name or code; use the filter dropdowns to focus on a status, type, date range, or category. Filters combine — picking a status and a type shows only rows that match both.
#Picking a record in a form
You never type an ID number into a form. Wherever a form needs a project, skill, position, employee, client, payroll cycle, payslip, or bank account, you pick it from a searchable list.
- Click the search box and start typing a name or code. Each result shows the name, its code, and a detail such as the client or department.
- Use the arrow keys and Enter, or click, to pick one. Esc closes the list.
- To change your choice, select Change next to the picked record.
If the record doesn't exist yet, look for a + New … button next to the search box (for example + New project, + New skill, + New client, or + New tenant). It opens the create form in a pop-up, so you don't leave the page. When you save, the new record is selected for you. The button appears only if your role is allowed to create that kind of record.
Note: A few finance forms (such as Invoices and Purchase Orders) still use an Add Client or Add Supplier link instead. It opens that page in a new browser tab, and nothing is selected for you: add the record there, then come back and pick it.
#Status badges
Colored pills tell you the state of a record at a glance. The color meaning is consistent across the app:
| Color | Typical meaning |
|---|---|
| Green | Healthy, active, approved, on track, or paid. |
| Yellow / Amber | Needs attention, at risk, pending, or expiring soon. |
| Red | Blocked, overdue, critical, rejected, or read-only. |
| Blue | Informational or in progress. |
| Gray | Draft, inactive, or not started. |
Tip: The same green/yellow/red logic drives the dashboard's project and risk widgets, so a red badge means the same urgency wherever you see it.
#Tables
Lists appear as tables with column headers. Rows highlight as you hover, and clicking a row (or its action button) opens the record. Money is shown in the active company's currency, and dates follow its time zone.
#Pagination
Long lists are split into pages (commonly 20 rows at a time). Use the page controls at the bottom of the table to move between pages. Applying a search or filter resets you to the first page of results.
#Exporting to Excel, PDF, and CSV
Reports can be downloaded so you can share or archive them. From the Reports area you can export to PDF, Excel, or CSV. Some records also export individually — for example, an employee contract can be exported as a PDF.
How to export a report
- Open the report you want under Reports.
- Apply any filters or date ranges you need first.
- Select the export option (PDF, Excel, or CSV).
- The file downloads to your device.
Note: Exporting is generally available to roles that include reporting access. If you don't see an export option, your role may be view-only for that area.
#Notifications
Where to find it: The bell in the top bar, or Notifications → Inbox in the sidebar.
What you can do here
- See alerts about approvals, requests, and updates that involve you.
- Filter to All, Unread, or Read, and narrow by type or channel.
- Mark items as read.
- Set your Preferences for how and when you're notified.
The bell shows a red dot when you have unread notifications. Open the inbox to review them; use the All / Unread / Read tabs and the type and channel filters to focus, and mark items read as you handle them.
Tip: Visit Notifications → Preferences to choose which events reach you and through which channels, so your inbox stays relevant.
#Signing out
Where to find it: The bottom of the left sidebar, under your name and email.
How to sign out
- Look at the bottom of the sidebar, where your profile picture, name, and email appear.
- Select Sign Out.
Tip: Always sign out on shared computers, and leave Remember me unticked when you sign in on them.
#Subscription & read-only mode
Now and then a colored banner appears just under the top bar. It's about your company's subscription, not your personal account:
| Banner | What it means | What to do |
|---|---|---|
| Amber "trial ends in X days" | A free trial is ending soon. | An admin should choose a plan in Settings → Billing before it ends. |
| Blue "renews in X days" | An active subscription renews soon. | No action needed. The renewal invoice appears in Settings → Billing. |
| Red "read-only mode" | The trial ended, the subscription ended or was cancelled, the workspace is suspended, or an invoice stayed unpaid past its grace period. | You can still view everything but not add or change anything. Full access returns once the payment is confirmed. |
Note: Only roles with billing access (typically Admin or Super Admin) can pay or change the plan. If you hit read-only mode, contact them. How paying works, and the reminders that come before read-only, are explained in Subscription, plan & billing.
#Support sessions (when ApixONN support signs in)
Sometimes the quickest way for ApixONN support to fix a problem is to see exactly what one of your users sees. For that, support can open a support session: they use the dashboard as that user for a short, limited time.
How a support session works
- Support opens one only to help you, and must give a reason.
- A session lasts at most 15 minutes.
- Your administrators get an email when a session starts.
- A yellow Support session banner shows at the top of every screen for the whole session. It says who from ApixONN is signed in, as which user, why, and how much time is left. For example: "Sam (ApixONN) is signed in as Lina Haddad — 12 min left, ends at 14:30. Reason: checking a payslip total."
- The user or support can end the session at any time with End session on the banner. When it ends, or time runs out, the dashboard signs out to the sign-in page.
- Support can't change passwords or billing during a session.
- Everything done during the session is recorded in your audit log and marked as a support session. See Audit logs.
Tip: If you see the banner and weren't expecting it, read the reason, then ask your administrator. They received the email about it. You can select End session at any time.
#Language & direction
Where to find it: The language switcher near the top of the sidebar (and on the sign-in page).
Selecting it toggles the whole app between English and Arabic. Choosing Arabic also flips the layout to right-to-left so everything reads naturally. Your choice sticks on your device until you change it again.
#Roles at a glance
Your role decides which sections you see and what you can do. ApixONN has 13 roles:
| Role | Broadly can… |
|---|---|
| Super Admin | Full access to everything across all companies, including platform-level settings. |
| Admin | Administrative access to most features and settings within the company. |
| HR Manager | Manage employees, leaves, contracts, grades, attendance, skills, departments, benefits, and evaluations; view payroll. |
| Finance Manager | Manage invoicing, receipts, general ledger, journals, and clients; run and export financial reports. |
| Payroll Manager | Run payroll cycles, payslips, loans, and pay components; view HR for context. |
| Project Manager | Manage projects, allocations, demands, timesheets, and resources; approve items; view clients and HR. |
| Team Lead | Approve timesheets and leave requests for team members; view projects, allocations, and attendance. |
| Accountant | Handle day-to-day accounting: general ledger, journals, invoices, and receipts; run reports. |
| Resource Manager | Plan and manage resource allocation, demands, and capacity across projects. |
| Employee | Self-service: view own profile and payslips, submit leave requests, check in/out, and log timesheets. |
| Consultant | External, limited: view own profile and submit timesheets only. |
| Contractor | Submit timesheets and basic HR requests (like leave); view own profile. |
| Read Only | View most modules (HR, projects, timesheets, invoices, reports) without making changes. |
Note: Roles are assigned by your Admin under Settings → Users & Roles. If you need access you don't have, ask them — don't work around it.
#Glossary of ApixONN terms
| Term | Plain-language meaning |
|---|---|
| Tenant / Company | A company (or branch) whose data is kept completely separate from every other company. When you switch companies, you're switching tenants. |
| Module | A major capability your company can turn on or off — for example Projects & Resources, HR, Finance, Payroll, or Workflow. Disabled modules simply don't appear. |
| Workflow | An approval or routing process. Items needing your decision land in your Workflow Inbox. |
| Milestone | A key checkpoint or deliverable in a project, usually with a due date. |
| Allocation | Assigning a person to a project for a period of time and effort. |
| Demand | A request for people or skills a project needs but doesn't yet have — the "we need someone for this" signal. |
| ORF | Open Resource / hiring Request — the step where an unmet demand turns into a request to hire or bring someone on. |
| SOW | Statement of Work — the agreed scope, deliverables, and terms for a client engagement. |
| Opportunity | A potential deal or engagement being pursued with a client. |
| Timesheet | A record of hours worked, submitted for approval and used for billing and utilization. |
| Utilization | The share of your team's available time that's spent on billable work. |
| Bench | People who are available but not currently allocated to a project. |
| Burn rate | How fast a project or budget is spending money over time. |
| Delegation | Temporarily handing your approval authority to someone else (for example, while you're on leave). |
| Seat / Access level | Your role, shown as a pill in the top bar; it determines what you can see and do. |
| Support session | A time-limited visit by ApixONN support, signed in as one of your users to help with a problem. Shown by a yellow banner and recorded in the audit log. |
Need help? For access and account issues, contact your company Admin or HR Manager. For billing and renewals, contact whoever holds the Admin or Super Admin role.