Settings, Users & Permissions, Reports & Notifications
This is where you run the administrative side of your workspace: who can log in and what they can do, how your company appears and operates, which modules your plan unlocks, the reports that turn your data into insight, and the notifications that keep everyone in the loop. Administrators live in Settings, but every user has a Notifications inbox and preferences of their own.
Company Dashboard40 min read13 sections
On this page13 sections
- The Settings menu at a glance
- Users & access levels
- Assigning roles to a user
- Roles & Permissions
- Company profile & branding
- Branches
- Companies (multi-entity)
- Subscription, plan & billing
- Why some sections are hidden (plans & modules)
- Delegations & Audit Logs (administrator tools)
- Reports
- Consolidated Statements
- Notifications
Note: Most of the screens in this guide are gated by role. If you don't see a menu item described here, your plan may not include that module or your role may not grant access. See Roles & Permissions and Why some sections are hidden.
#The Settings menu at a glance
Where to find it: Settings in the left sidebar (the gear icon at the bottom).
The Settings menu is organized into three groups:
| Group | What's inside |
|---|---|
| Company | Company profile & branding, Branches, Currencies & Rates, Companies |
| Access Control | Users & Roles, Roles & Permissions, Delegations, Audit Logs |
| System | Workflows, Billing |
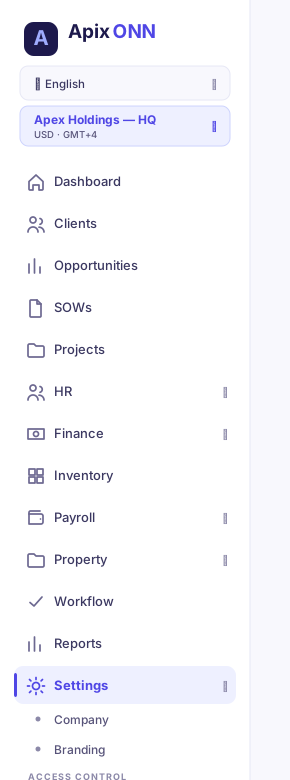
Tip: A colored dot next to some menu items indicates readiness — green means the feature is fully available, blue means it's still being rolled out, and red means it isn't ready yet.
Note: Workflows — who approves each kind of request — is explained on the Workflow & Approvals page: see Setting up approval chains.
#Users & access levels
Where to find it: Settings → Users & Roles
This is the control center for who can sign in and how much of the system they can touch. Every person here is an employee record first; giving them a login is a separate step you perform on this screen.
Note: Only users with the manage users permission (typically Super Admin, Admin, or HR Manager) can open this screen.
#Understanding access levels
Every employee sits at one of three access levels. This is the single most important concept on this page.
| Access level | What it means | Consumes a seat? |
|---|---|---|
| No Access | The employee exists in your records but cannot log in at all. | No |
| Portal Access | A limited login for viewing personal info and submitting requests (leave, expenses, timesheets, documents). | No — free |
| Full Access (Seat) | Complete access to the modules and actions granted by the person's assigned roles. | Yes — uses 1 paid seat |
What you can do here
- See every employee with their access level, roles, and status at a glance.
- Give an employee a login (portal or full seat).
- Upgrade a portal user to a full seat, or downgrade a seat back to portal.
- Assign roles to seat users.
- Deactivate a person's access entirely.
- Track how many paid seats you've used against your plan limit.
#The seat counter
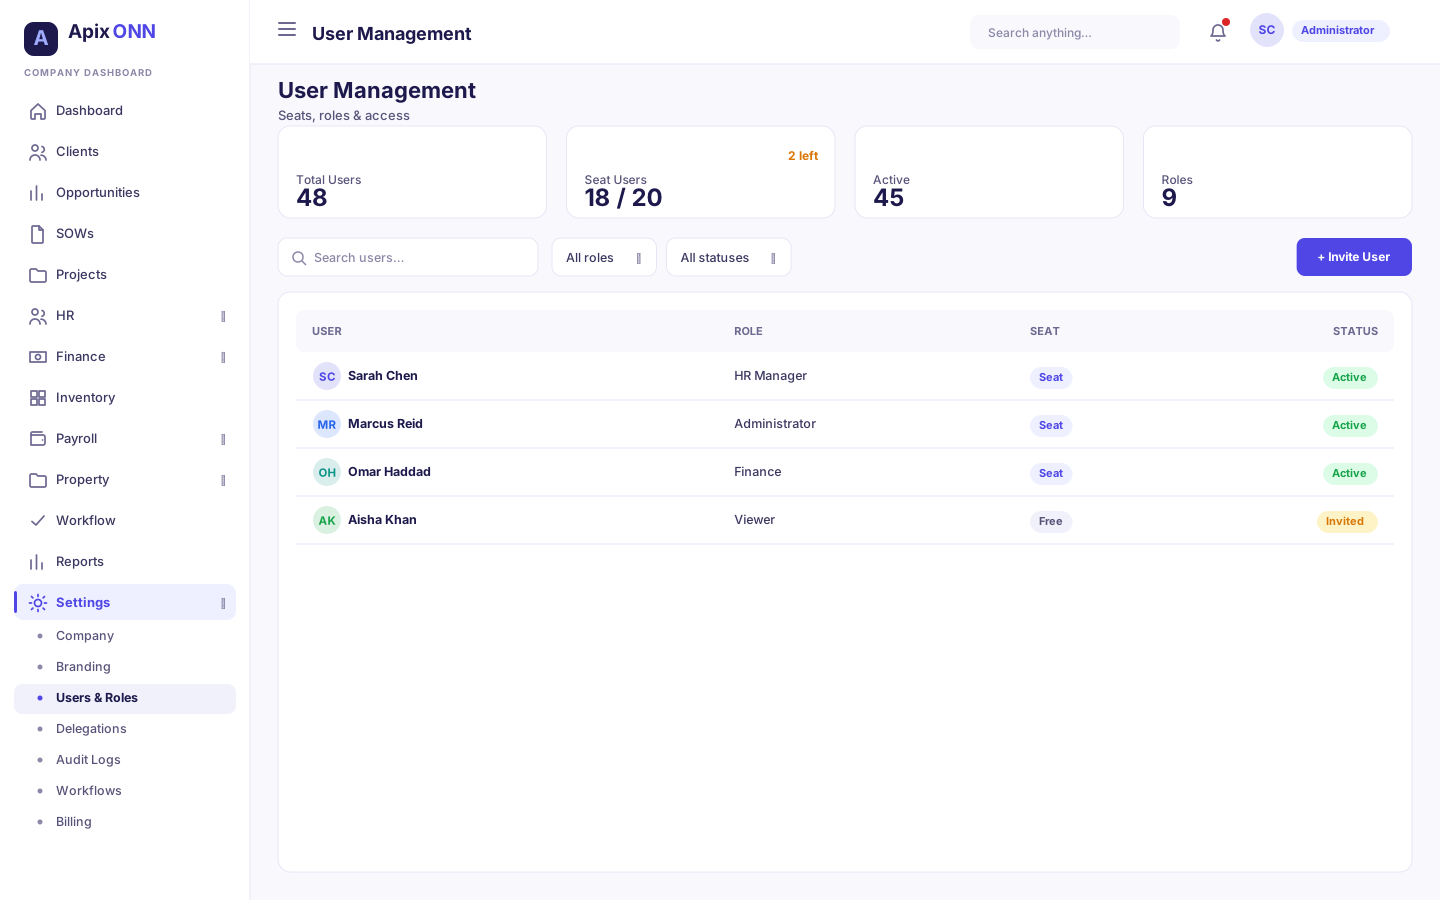
At the top of the page you'll see four summary cards: Total Employees, Seat Users, Portal Users, and No Access. The Seat Users card shows how many seats you've used out of your plan's total (for example, 8 / 10), with a progress bar and a badge telling you how many seats are left — or Limit reached in red when you're full.
Tip: When the seat limit is reached, the Upgrade to Seat and Create User (seat option) actions are blocked until you free up a seat, or add extra seats or upgrade your plan in Billing.
#How to give an employee a login
- Go to Settings → Users & Roles.
- Find the employee (use the Search box or the Access Level / Status filters).
- In their row, click Create User (this appears only for employees at No Access).
- In the dialog, choose an access level:
- Portal Access — free, no seat consumed.
- Full Access (Seat) — consumes 1 seat; you'll be asked to confirm.
- Leave Send welcome email checked so the person receives their login and setup instructions.
- Click Create User Account.
The account is created with a temporary password, and the person can log in with their email. You can assign roles afterward.
Note: Creating a seat user when you're at your limit is blocked. Choose portal access, or increase your seats first.
#How to upgrade someone to a full seat
- Find a Portal Access employee in the table.
- Click Upgrade to Seat.
- Confirm — this consumes 1 seat from your subscription.
#How to downgrade a seat back to portal
- Find a Full Access (Seat) employee.
- Click Downgrade.
- Confirm. The person keeps a login but loses full system access, and the seat is returned to your pool.
#How to deactivate access
- Find any employee who currently has portal or seat access.
- Click Deactivate.
- Confirm. The person can no longer log in. Their employee record and history remain intact.
Tip: Deactivating access is reversible — you can create a login for them again later. It is not the same as deleting the employee, which is done in the HR module.
Field guide — Create User dialog
| Field | What it means | Notes |
|---|---|---|
| Access Level | Portal (free) or Full Access/Seat (uses a seat) | Required. Seat choice asks for confirmation. |
| Send welcome email | Emails the person their login and setup steps | On by default; recommended. |
Statuses (Status column)
| Status | Meaning |
|---|---|
| Active | Normal, working employee. |
| Inactive | Employee is paused/on hold. |
| Terminated | Employee has left; kept for records. |
Tips & FAQ
- Why can't I click "Upgrade to Seat"? You've hit your seat limit. Free a seat by downgrading or deactivating someone, or add extra seats in Settings → Billing.
- The person didn't get a welcome email. Confirm the email address on their employee record is correct, and check that your workspace's email delivery is configured. Ask your administrator if unsure.
- I want to change what a seat user can do. That's roles — use Assign Roles (below), not the access-level buttons.
#Assigning roles to a user
Where to find it: Settings → Users & Roles → Assign Roles button (on any Full Access / Seat employee).
Roles decide what a seat user can see and do. A user can hold more than one role, and their permissions are the combination of all of them.
#How to assign roles
- On the Users page, find a seat user and click Assign Roles.
- Choose a Company Scope (see the table below).
- Tick each role you want the person to have. Use View permissions under any role to expand and inspect exactly what it grants.
- Click Assign Roles.
Field guide — Company Scope
| Option | What it means | Notes |
|---|---|---|
| Current company only | Roles apply just to the company you're currently working in. | The person can have different roles in other companies. |
| Select companies | Roles apply only to the specific companies you tick. | Handy for regional managers who cover a subset of entities. |
| All companies | Roles apply everywhere, including companies you create later. | Best for organization-wide administrators. |
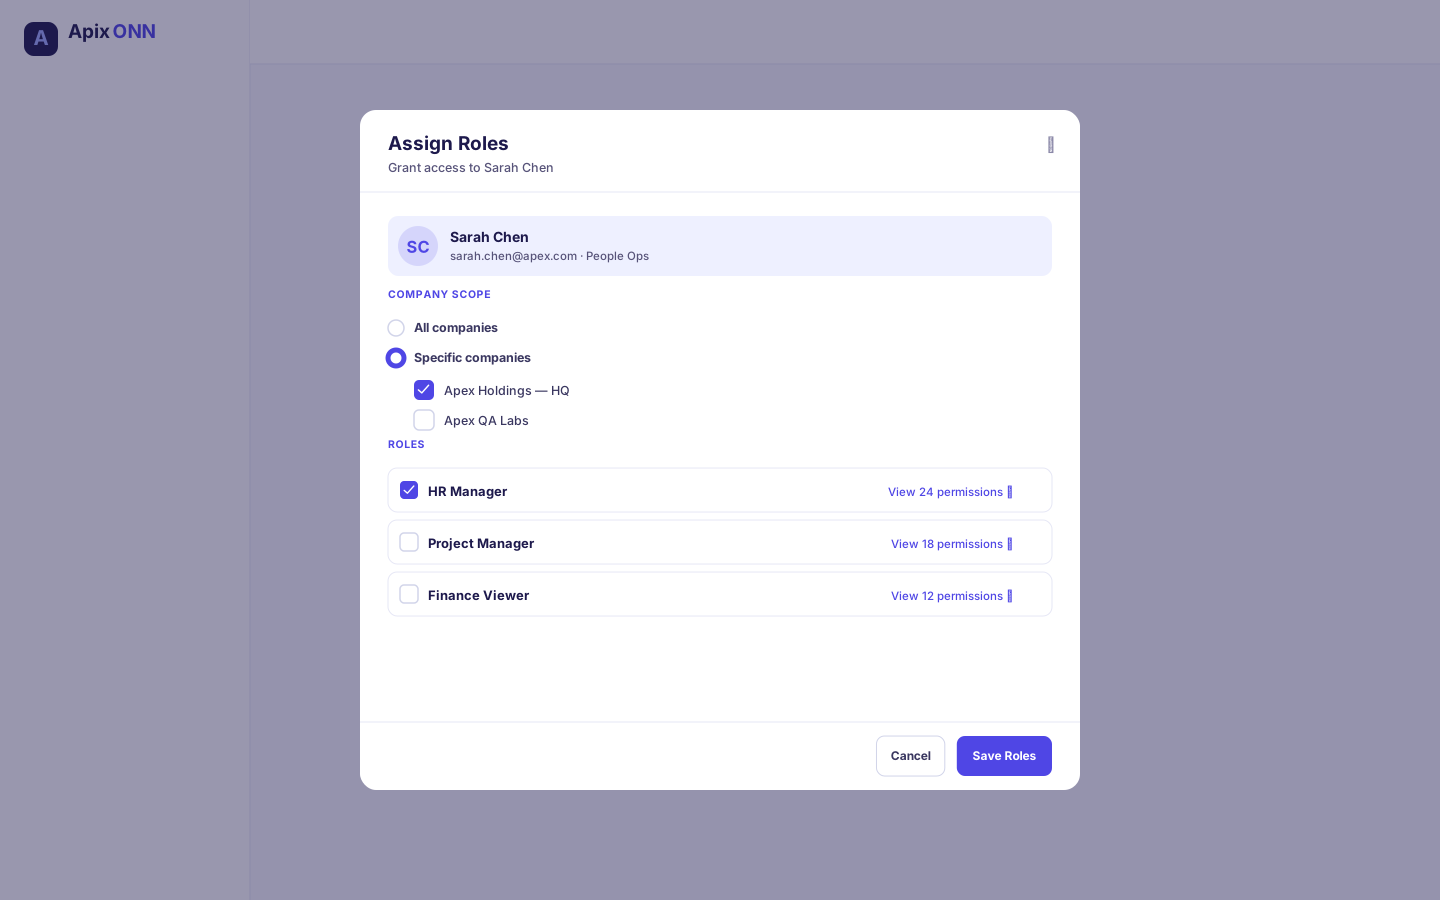
Note: Company scope only appears meaningful if your organization runs multiple companies. In a single-company workspace, Current company only is all you need.
Tips & FAQ
- A person needs access in two branches of the business but not a third. Use Select companies and tick only those two.
- Roles are greyed out / none appear. Roles must exist first. Ask a Super Admin to set them up.
- Portal users don't have an Assign Roles button. Correct — roles apply to seat users. Upgrade them to a seat first if they need module access.
#Roles & Permissions
Roles are named bundles of permissions. Instead of granting access one action at a time, you grant a role, and the role carries its permissions. Your workspace ships with a standard set of 13 roles.
#The standard roles
| Role | What it's for |
|---|---|
| Super Admin | Full, unrestricted access to every module and feature. |
| Admin | Administrative access to most features. |
| HR Manager | Manage HR operations — employees, leaves, contracts, attendance, evaluations. |
| Finance Manager | Manage financial operations, invoicing, and reporting. |
| Payroll Manager | Manage payroll processing and related operations. |
| Project Manager | Manage projects, allocations, and timesheets. |
| Team Lead | Approve timesheets and leave requests for their team members. |
| Accountant | Handle accounting operations and financial records. |
| Resource Manager | Manage resource planning and allocation. |
| Employee | Standard portal access — view own info and submit requests. |
| Consultant | External consultant with limited timesheet access (portal). |
| Contractor | Contractor with timesheet and basic HR access (portal). |
| Read Only | View-only access across most modules; cannot change anything. |
Note: Employee, Consultant, and Contractor are portal roles — they're designed for people who log in through the portal rather than consuming a full seat.
#The roles list
Where to find it: Settings → Roles & Permissions
The Roles page lists every role with how many Permissions it grants, how many Users hold it, and its Status. Use Search roles… to find one, and click View to open it. The Users & roles → link takes you to the screen where you give roles to people (Assigning roles).
#Viewing a role and its permissions
Where to find it: Settings → Roles & Permissions → View on a role.
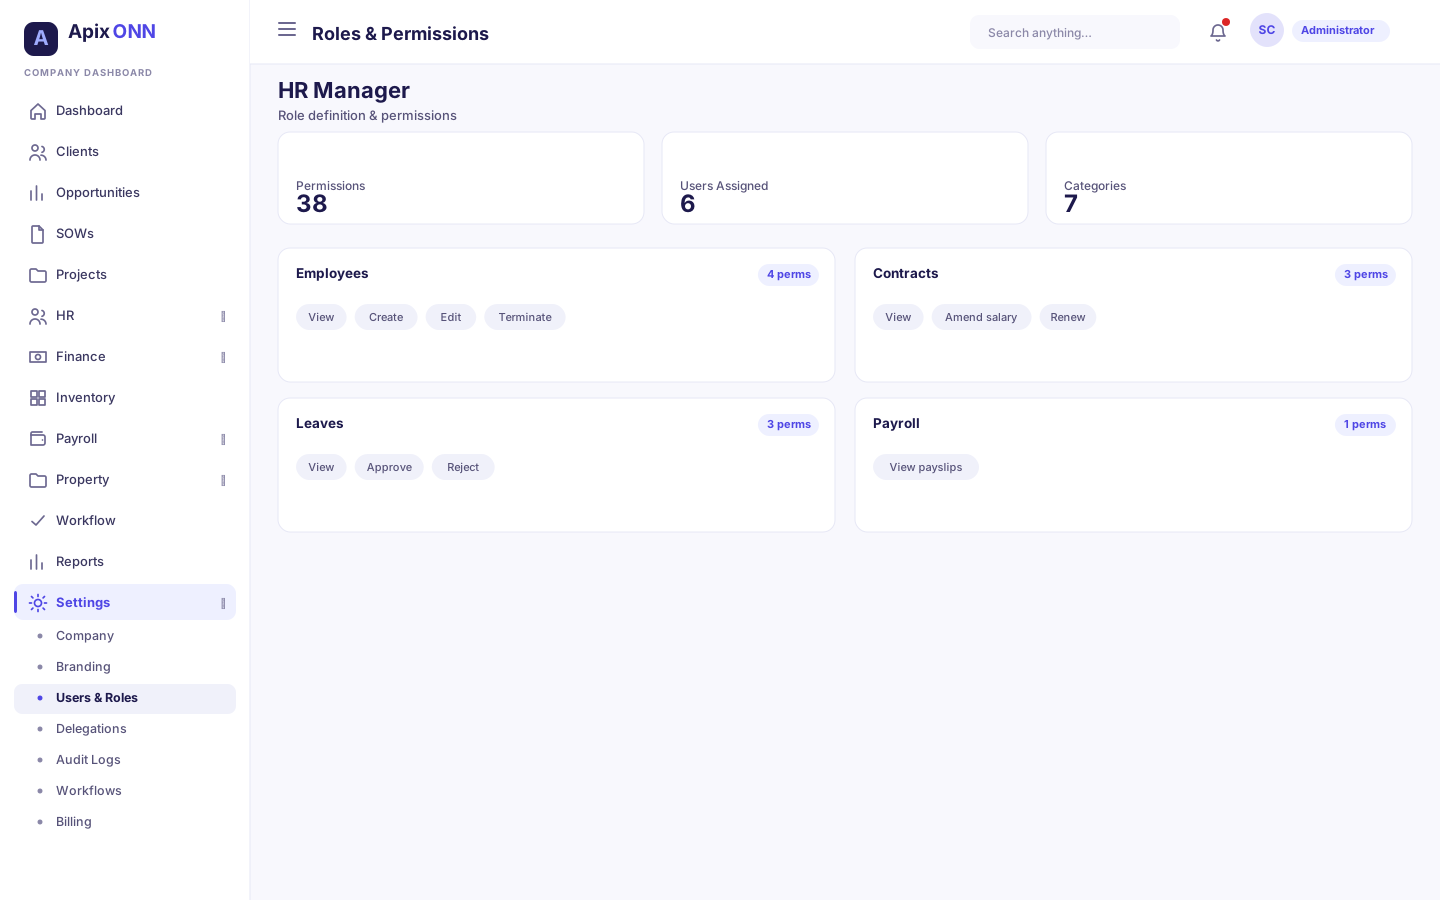
A role's detail page shows three summary cards — Permissions, Users with this role, and Areas — followed by What this role can do: every permission the role grants, shown by name and grouped by area (Administration, HR, Resource planning, Finance, Payroll, Workflows, Reports, Clients, Employee portal, Inventory, Property, Sales, Projects, Notifications).
Each permission is a view / create / edit / approve action on a specific area — for example, the ability to view employees, approve leaves, or create invoices. A role is simply the set of these switches turned on. Items tagged Built-in come with the role itself and can't be removed here.
#How to edit a role
You can change a role if your own role allows it. The buttons below only appear when it does.
To change its name, description, or status:
- Open the role and click Edit Role.
- Change the Name, Description, or Active tick.
- Click Save.
To change what the role can do:
- Open the role and click Manage Permissions (next to What this role can do).
- Find permissions with Search permissions…, or work area by area. Each area has Select all and Clear.
- Tick the permissions the role should grant and untick the ones it shouldn't. Built-in items are locked.
- Click Save Permissions. The change applies to everyone who holds the role.
Note: Editing a role needs the edit roles permission. Managing its permissions needs both the view permissions and assign permissions permissions. These are usually held only by Admin and Super Admin. There's no button to create or delete a role on this screen.
Statuses (role)
| Status | Meaning |
|---|---|
| Active | The role can be assigned to users. |
| Inactive | The role is retired and won't be offered when assigning. |
Tips & FAQ
- Can I create a brand-new role? Not from this screen. You can edit the existing roles and their permissions. If you need a bespoke role, contact your Super Admin.
- Someone can see too much / too little. Check the combination of roles they hold — permissions are additive, so an extra role may be widening their access. Also check what each of those roles grants under Settings → Roles & Permissions.
- Is a role change recorded? Yes. Role and permission changes appear in the Audit logs.
- What's the safest role for an auditor or observer? Read Only.
#Company profile & branding
Where to find it: Settings → Company
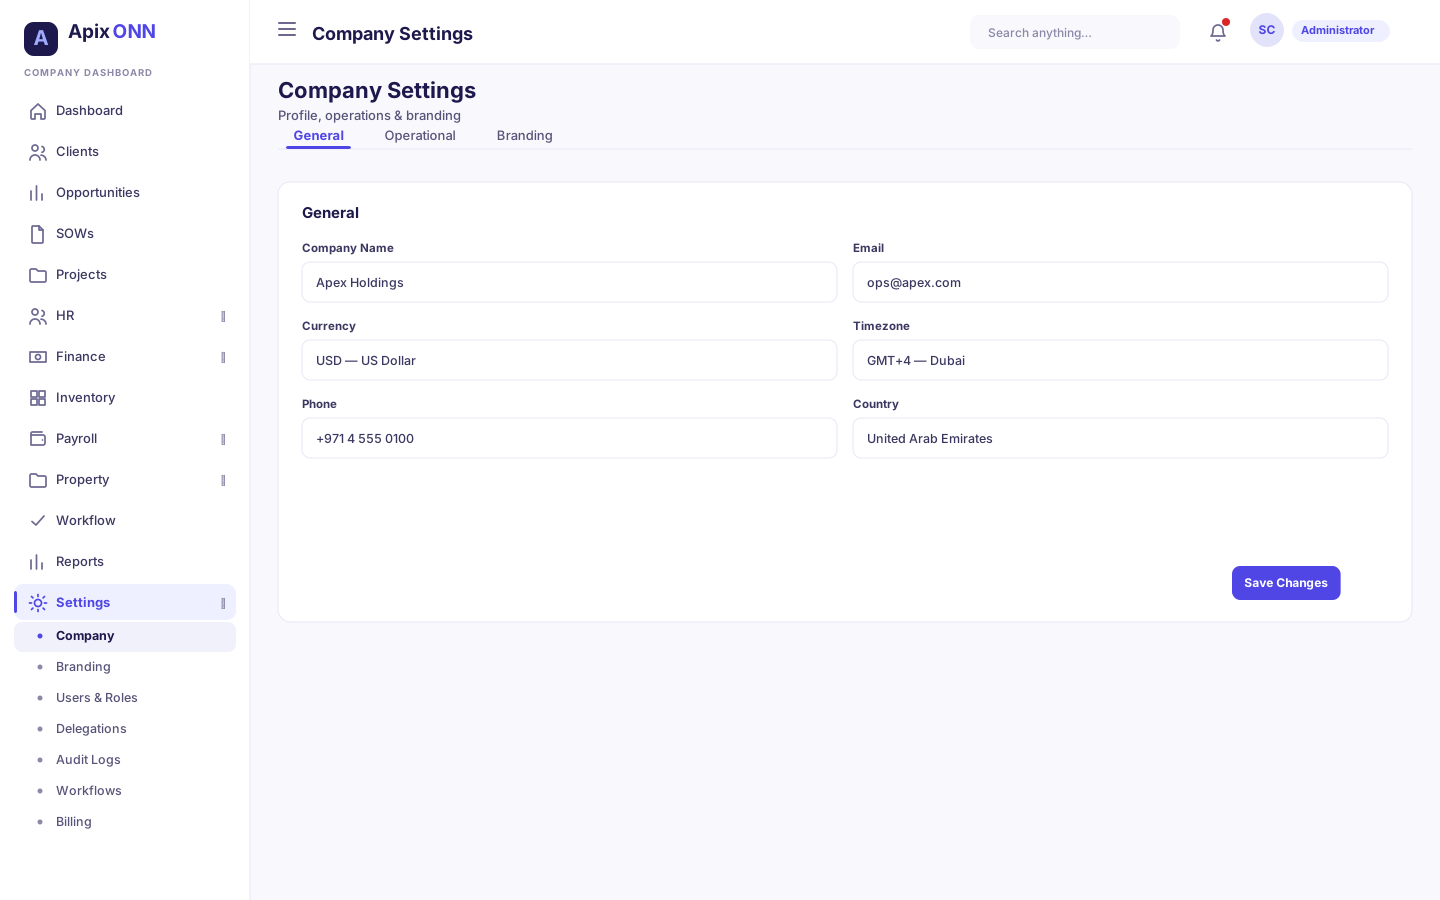
This screen controls how your company presents itself across the app — its name, contact details, operating rules, and visual branding. It's organized into three tabs: General, Operational, and Branding.
#General tab
Field guide
| Field | What it means | Notes |
|---|---|---|
| Company Name | The display name shown throughout the app and in the sidebar. | |
| Primary company email. | ||
| Phone | Primary company phone. | |
| Website | Company website URL. | |
| Currency | Default currency, chosen from a full list of world currencies. | Affects how amounts are shown. |
| Timezone | Company timezone — UTC, Amman, Dubai, or Riyadh. | Affects dates and times across the app. |
#Operational tab
Field guide
| Field | What it means | Notes |
|---|---|---|
| Legal Name | The registered legal entity name. | Used on formal documents. |
| Registration Number | Official company/business registration number. | |
| Working Days/Week | Standard working days per week (1–7). | Feeds attendance and leave calculations. |
| Date Format | How dates display (YYYY-MM-DD, DD/MM/YYYY, MM/DD/YYYY). | |
| Absorb bench cost to department | When on, an employee's unallocated (bench) and non-project time is costed to their department at their loaded rate (salary ÷ standard hours) and shown in the Bench Cost report. | Turn off to track those hours without charging the department. On by default. |
#Branding tab
Upload your logo and set your primary and secondary brand colors. Once saved, the app refreshes and adopts your logo (in the sidebar and browser tab) and color scheme.
How to update company settings
- Go to Settings → Company.
- Choose the tab you need — General, Operational, or Branding.
- Edit the fields.
- Click Save Changes (Branding uploads apply as soon as you pick the file, then reload the page).
Note: Editing branding requires the branding permission. General and operational company settings are typically limited to Admins and Super Admins.
#Branches
Where to find it: Settings → Branches
Branches are the physical locations or offices your company operates from. Employees can be tied to a branch, and the branch appears in reporting.
What you can do here
- View all branches with location, contact, employee count, and status.
- Create a new branch (up to your plan's branch limit).
- Edit branch details.
- Activate or deactivate a branch.
- Delete a branch.
How to create a branch
- Go to Settings → Branches.
- Click New Branch (top right).
- Fill in the branch details in the dialog.
- Save.
Note: Your plan sets a maximum number of branches. The Branch Usage card shows used / max with a progress bar. When you hit the limit, New Branch is disabled and reads Limit reached — contact support to raise it.
Field guide (branch)
| Field | What it means | Notes |
|---|---|---|
| Name | Branch display name. | |
| Code | Short code shown as the branch's badge. | |
| Address / City / Country | Location details. | |
| Phone / Email | Branch contact info. | Optional. |
| Status | Active or Inactive. | Click the status pill to toggle it. |
Tips & FAQ
- Can I toggle a branch's status quickly? Yes — click the green/grey Active/Inactive pill directly in the table.
- Deleting a branch is permanent. You'll be asked to confirm. Reassign employees first if needed.
#Companies (multi-entity)
Where to find it: Settings → Companies
If your organization runs multiple legal entities, this is where you manage them. Each company has its own name, code, currency, and timezone, and users can hold different roles per company (see Assigning roles).
What you can do here
- View all companies with code, currency, timezone, and status.
- Create a new company.
- Delete a non-default company.
How to create a company
- Go to Settings → Companies.
- Click New Company.
- Fill in Company Name and Company Code (required), plus legal name, currency, timezone, email, and phone as needed.
- Click Create.
Field guide (new company)
| Field | What it means | Notes |
|---|---|---|
| Company Name | Display name. | Required. |
| Company Code | Short unique code (e.g. HQ). | Required; auto-uppercased. |
| Legal Name | Registered entity name. | Optional. |
| Currency | Three-letter currency code. | Defaults to USD. |
| Timezone | Company timezone. | Defaults to UTC. |
| Email / Phone | Contact details. | Optional. |
Note: The Default company can't be deleted, and the company you're currently working in is tagged Current. You switch between companies using the company switcher near the top of the sidebar.
Note: Viewing this screen requires the view companies permission — usually Admin or Super Admin.
#Subscription, plan & billing
Where to find it: Settings → Billing
Billing is your ApixONN subscription in one place: your plan and seats, the invoices ApixONN sends you, and how you pay them. It has four tabs: Overview, Invoices, Plans, and Billing details.
What you can do here
- See your current plan and period, your seats (included, extra, and used), your open invoices, and your billing details.
- Upgrade your plan (invoiced for the rest of the period) or downgrade it (from the next period).
- Buy extra seats.
- Cancel at the end of the period, or resume.
- Pay an invoice by bank transfer and report the transfer to ApixONN.
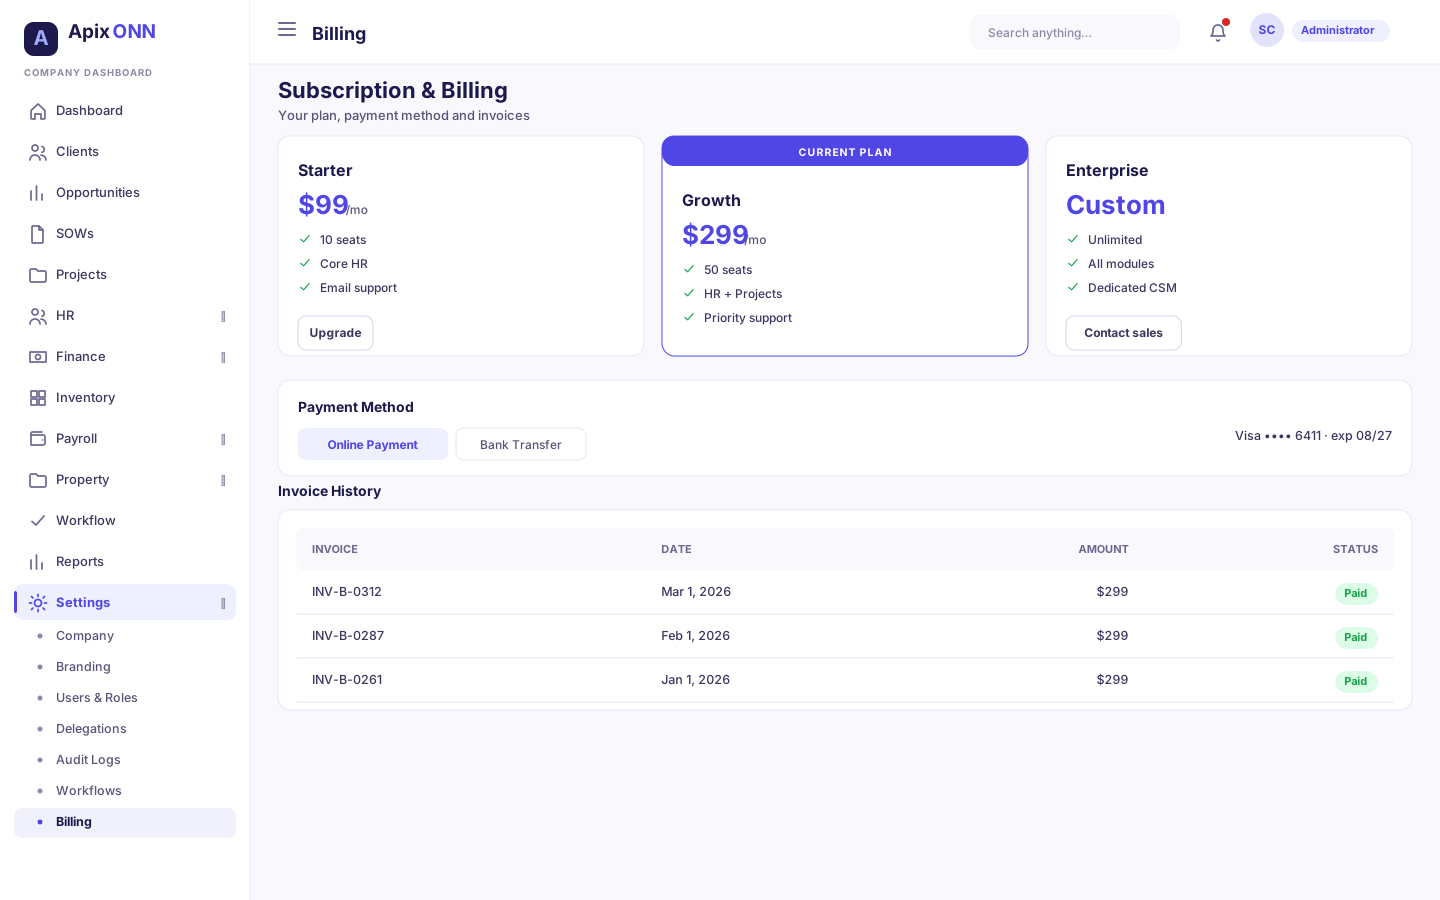
#The Overview tab
| Card | What it shows |
|---|---|
| Plan | Your plan's name and price (per month or per year), and the Current period dates. Shows No plan yet if you haven't chosen one. |
| Seats | How many seats are used out of your limit (for example 8 of 10 used), with a bar, and how many are with the plan and how many are extra. |
| Balance due | Nothing to pay., or how many invoices are open and how many transfers are waiting for confirmation. |
Below the cards, To pay lists your open invoices with their due date and amount, each with a Pay button. Add-ons lists anything added to your plan, and the Cancel subscription card sits at the bottom.
A banner at the top of the page tells you when something needs attention: a trial ending, a scheduled plan change ("You'll move to the … plan on …"), a scheduled end ("Your subscription ends on …. You keep full access until then."), or read-only mode (see Reminders and read-only mode).
#How to buy extra seats
- Go to Settings → Billing → Overview.
- On the Seats card, use − and + next to Extra seats.
- Click Save.
Added seats are invoiced for the rest of the current period. Removing seats takes effect straight away, with no refund for the current period. You can't go below the number of seats in use.
#How to change your plan
- Go to Settings → Billing → Plans. Each plan card shows its price, the seats included, the price of an extra seat, and how many companies it covers. Your current plan is marked Your plan.
- On the plan you want, click:
- Upgrade — to move up now. You're invoiced the difference for the rest of this period.
- Switch at period end — to move down. The change happens at the end of your current period (the confirmation shows the date), and you keep your current plan until then.
- Choose — if you're on a trial or have no active plan. An invoice for the first period is raised, and the plan starts when it's paid.
- Confirm.
A scheduled change shows as "Moving to … on …". To cancel it, click Keep my current plan.
#How to cancel or resume
- Go to Settings → Billing → Overview.
- On the Cancel subscription card, click Cancel at period end, then confirm.
You keep full access until the end of the current period; after that the workspace becomes read-only. There's no refund for the current period.
Changed your mind? The card now reads Keep your subscription. Click Resume subscription and it keeps renewing.
#How you pay: bank transfer
You pay ApixONN invoices by bank transfer, then tell ApixONN about it so they can confirm it.
- Open the Invoices tab, or click Pay next to an invoice in the To pay list.
- Click the invoice. A panel opens with its lines, totals, any payments so far, and Download PDF.
- Under Pay by bank transfer, transfer the amount you owe to the bank details shown (Bank, Account name, IBAN, Account number, SWIFT). Quote the Reference shown, which is the invoice number.
- Back in the panel, fill in the report form:
- Amount paid
- Transfer date
- Bank reference — from your bank's confirmation
- Proof of payment (optional — PDF or image, up to 5 MB)
- Note (optional)
- Click I’ve paid — report transfer.
The invoice now shows Transfer reported. ApixONN confirms the payment once it reaches their account; the invoice then shows Paid and you get a receipt by email. If a transfer can't be found, it's listed as Not received with the reason.
Note: If the panel says "Bank details aren't available yet", contact ApixONN to pay that invoice.
Invoice statuses
| Status | What it means |
|---|---|
| Due | Issued and not yet paid. |
| Overdue | Past its due date and still unpaid. |
| Transfer reported | You've reported a transfer; ApixONN hasn't confirmed it yet. |
| Paid | ApixONN has confirmed the payment. |
| Void | Cancelled; nothing to pay. |
The For column says what the invoice is for: First period, Renewal, Plan upgrade, Extra seats, Add-on, or Other charges.
#Reminders and read-only mode
- ApixONN sends reminders before an invoice's due date and again after it.
- If an invoice stays unpaid past the grace period, your workspace becomes read-only: everyone can still view everything, but no one can add or change anything. The Billing page says "An invoice is unpaid." and shows a Pay now button.
- Full access returns as soon as the payment is confirmed. Report your transfer (above) so ApixONN can confirm it quickly.
The workspace also becomes read-only when a free trial ends or a subscription ends without a plan. In that case, choose a plan to continue.
#Billing details
On the Billing details tab you keep the details your invoices are addressed to: Billing email (where invoices are emailed), VAT number, Tax ID, Address, City, Postal code, and Country. Click Save billing details when you're done.
#Who can do what
| Permission | What it lets you do |
|---|---|
admin.billing.view |
See Settings → Billing. |
admin.billing.pay |
Pay invoices: the Pay button and the report-a-transfer form. |
admin.billing.manage |
Change the plan or seats, cancel or resume, and edit billing details. |
Note: These permissions are usually held only by Admin and Super Admin. Without the pay permission, the invoice panel says "Ask someone who can pay invoices to report the transfer."
#Why some sections are hidden (plans & modules)
Your plan unlocks specific modules. If a module isn't part of your plan, its entire section — and every screen under it — is hidden from your sidebar automatically. This isn't a permission issue; the feature simply isn't included.
| Module | Sidebar sections it powers |
|---|---|
| HR | The HR section (Employees, Contracts, Leaves, Attendance, Performance, and more). |
| PRP (Projects & Resources) | Projects, Resources, and Clients/CRM. |
| Finance | The Finance section (Invoices, Journals, GL, AP/AR, and more). |
| Payroll | The Payroll section (Cycles, Payslips, Loans, End of Service). |
| Workflow | The Workflow Inbox and Workflow settings. |
Note: Dashboard, Reports, Notifications, and core Settings are always available regardless of module mix.
Tips & FAQ
- A whole area vanished from my sidebar. Your plan likely doesn't include that module. Check your plan in Settings → Billing, or ask your administrator.
- I can see the module but not a specific screen. That's permissions, not the plan. Your role doesn't grant that screen — see Roles & Permissions.
- Are there user-facing feature flags? There's no separate feature-flag screen for end users. What you can access is governed by two things only: the modules your plan includes, and the permissions your roles grant.
#Delegations & Audit Logs (administrator tools)
Two more Access Control tools sit alongside Users & Roles:
- Settings → Delegations — temporarily hand your approval authority to a colleague (for example, while you're on leave) so approvals don't stall. Requires the delegations permission.
- Settings → Audit Logs — a searchable record of who did what and when across the workspace, including the action, the affected item, and the originating address. Requires the audit permission. (A focused audit view is also available under Reports → Compliance → Audit Trail.) See Audit logs below.
Tip: If approvals are piling up because an approver is away, set up a Delegation rather than reassigning work item by item.
#Audit logs
Where to find it: Settings → Audit Logs
The audit log answers "who created, changed or deleted this, and when?". Besides changes to records, it also records sign-ins, failed sign-ins, and role or permission changes.
How to find an entry
- Go to Settings → Audit Logs.
- In Filters, narrow the list:
- User — pick a person from the list (or leave it on All users).
- Action — for example Created, Updated, or Deleted.
- Record type — for example Employee, Invoice, Payroll cycle, or Role.
- From Date and To Date.
- Click Apply Filters. The list only changes when you click it; Clear resets the filters.
Reading the Activity Log
| Column | What it shows |
|---|---|
| Timestamp | When it happened. |
| User | Who did it, by name (System for automatic changes). |
| Action | What they did, for example Created or Updated. |
| Record | The kind of record and its number. |
| Details | One line per field. A change reads Field: before → after (for example Status: Draft → Sent); a new or deleted record shows Field: value. Up to four lines show, then "+n more". |
| IP Address | Where the request came from. |
Support sessions. Anything ApixONN support did during a support session carries an amber Support session · name badge, naming the person from ApixONN. Hover over the badge to see the reason they gave.
How to export
Click Export CSV to download the entries shown on the page as a CSV file, ready for a spreadsheet. The list shows 50 entries per page, so filter first, and export each page you need. In the file, a support-session entry's User column ends with "(support session by name)".
Note: The User picker lists everyone only if your role can view users; otherwise it lists the people who already appear in the log.
Settings → Audit Logs — filters with a user picked, and a Details cell showing "Field: before → after"
#Reports
Where to find it: Reports in the left sidebar.
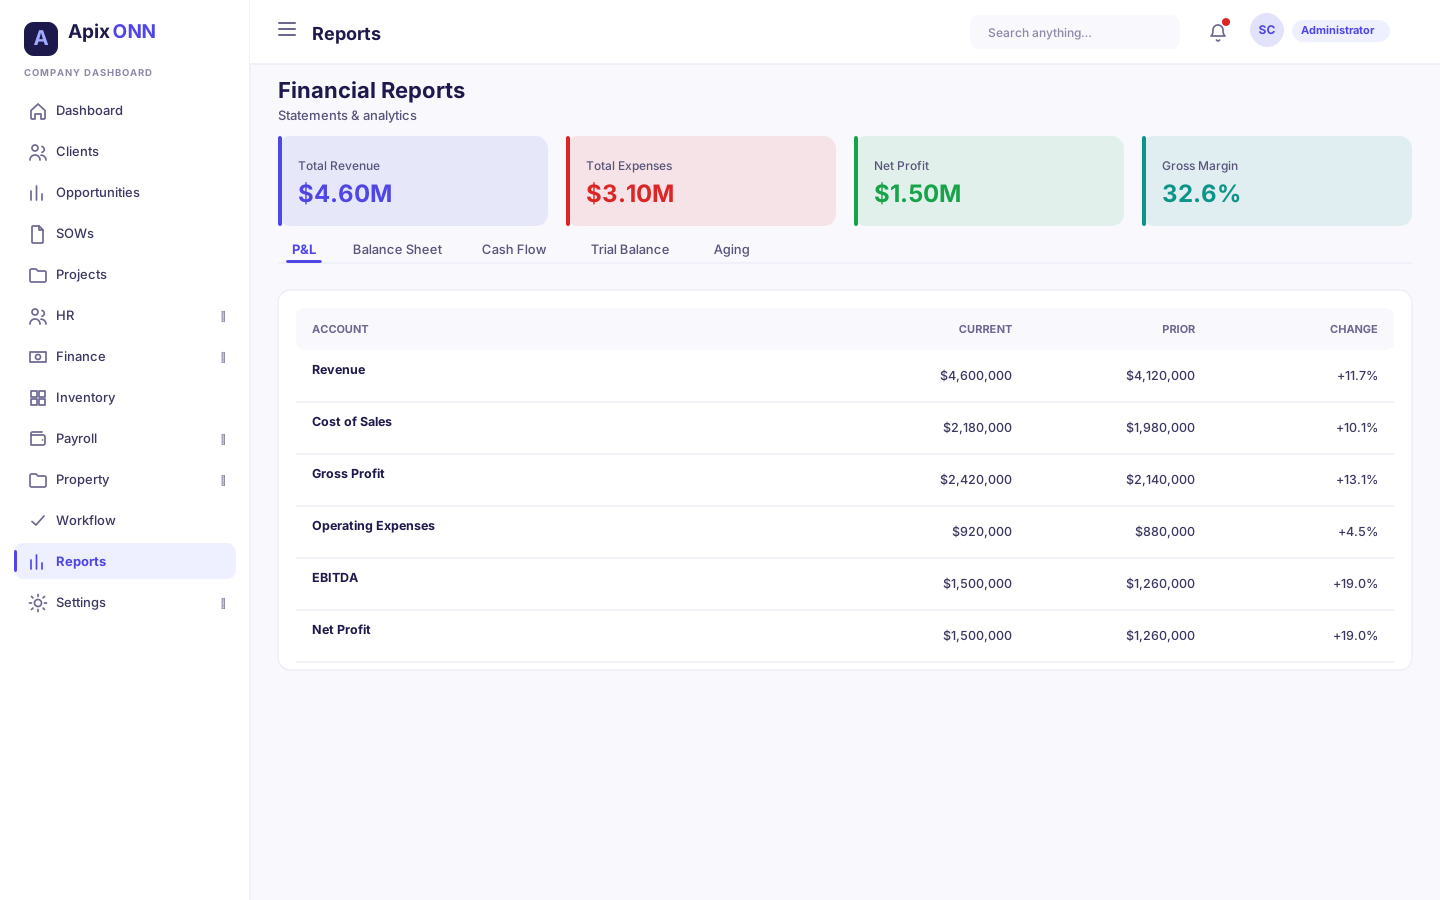
Reports turn your operational data into dashboards, tables, and trends. Each report is a live view — open it and it loads current data; use Refresh to re-pull at any time. The Reports menu contains:
| Report | What it covers | Permission area |
|---|---|---|
| Dashboards (Executive) | Company-wide KPIs — revenue, active projects, utilization, headcount, open demands. | Reports · Dashboards |
| Financial | Revenue, costs, margins, project margins, burn rate, cash flow, AR aging. | Reports · Financial |
| Financial Statements | Balance Sheet, Income Statement, Cash Flow — formal statements you can print. | Reports · Financial |
| Consolidated Statements | Balance sheet and income statement across your companies in one currency, with intercompany balances eliminated. See Consolidated Statements. | Reports · Consolidated |
| Sales Reports | Revenue by period, top customers, and sales by customer, item, and category — with cost and margin for stock items. | Reports · Financial |
| Payables Reports | Open supplier bills with aging, purchases by supplier, and spend by category. | Reports · Financial |
| Receivables | What each customer owes, aged by due date, less unapplied credit notes. | Reports · Receivables |
| Inventory Reports | Stock status, reorder & EOQ, stock in transit, stock ledger, valuation, cost and price variances, negative stock. | Reports · Inventory |
| Resources | Utilization, trends, bench analysis, bench cost, and skills distribution. | Reports · Resources |
| HR Analytics | Performance, nine-box talent grid, headcount, and recommendations. | Reports · HR |
| Project Analytics | Project health, variance analysis, risk matrix, and milestones. | Reports · Projects |
| Compliance | Time-tracking, contract, and leave-balance compliance, plus the audit trail. | Reports · Compliance |
Note: Each report is permission-gated. If a report isn't in your menu, your role doesn't grant it — a typical mapping is Finance roles to financial reports, HR roles to HR analytics, and Project/Resource roles to project and resource reports.
#Who can see which reports
The main analytics reports, and the matching widgets on the home Dashboard, each need one permission:
| Report | Permission needed |
|---|---|
| Dashboards (Executive) | reports.dashboards.view |
| Financial dashboards | reports.financial.view — Finance Managers and Accountants have it. |
| Project Analytics | reports.projects.view |
| Resources | reports.resources.view |
Access is checked for the company you have selected. If you hold a permission in one company but not in the one you're viewing, the report says so, for example "You don't have access to project analytics in this company." Switch company, or ask your administrator.
#How to run and read a report
- Open Reports and pick the report you need.
- The page loads with summary cards at the top and one or more tabs beneath, each a different view.
- Switch tabs to drill into a specific angle (for example, Financial has Overview, Project Margins, Burn Rate, Cash Flow, and AR Aging). AR Aging splits what clients owe into Not yet due, 1–30 days, 31–60 days, 61–90 days, and 90+ days, each with its own card and column.
- Use any date range, search, or filter controls on the tab.
- Click Refresh to re-pull the latest data.
The newer business reports — Sales Reports, Payables Reports, Receivables, Inventory Reports, and Consolidated Statements — work slightly differently: there's no Refresh button because they reload as soon as you change a date or filter, and they have Excel and Print / PDF buttons that export the table on screen. Sales, payables, receivables, and inventory amounts are converted into your company's base currency, which is shown in the summary cards and on every export; Consolidated Statements use the currency you pick.
Note: If a document is in a foreign currency and there's no exchange rate for it, a yellow banner says how many documents "are in another currency with no exchange rate set; they are shown at face value". Add the rate in Settings → Currencies & Rates and the figures correct themselves.
#Resource Analytics in detail
Where to find it: Reports → Resources.
Resource Analytics answers "who is billable, who is idle, and what is the idle time costing us?" It has five tabs:
- Utilization — how many people are allocated vs. on the bench, and the overall utilization rate.
- Trends — utilization over recent months.
- Bench Analysis — who is currently on the bench, with their department, grade, skills, and days on bench (amber over 14 days, red over 30).
- Bench Cost — the money view (below).
- Skills — how skills are distributed across your people.
The Bench Cost tab
This tab puts a cost on utilization, built from approved timesheets (actual logged hours), not planned allocations. Four summary cards head it up:
- Utilization — billable project hours ÷ total logged hours, as a percentage.
- Bench Hours — hours logged to non-project / bench work.
- Bench Cost — the loaded cost of those bench hours (idle time you're paying for).
- Project Cost — the loaded cost of billable project hours.
Below the cards, a by-department rollup and a by-employee table break the figures down — each person's utilization, project vs. bench hours, their cost per hour, and their bench cost — sorted so the biggest bench cost sits at the top. Pick a date range (the last 30 days by default) and optionally a department to focus.
How the cost is worked out. A person's loaded cost per hour = their monthly salary ÷ standard monthly hours (contract weekly hours × 52 ÷ 12). Hours logged to a project count as project cost; hours logged to the Bench category or other non-project department work count as bench cost — the cost of time not billed to a client.
Tip: Bench cost is your clearest "cost of idle capacity" figure. A large bench cost concentrated in one department is a signal to redeploy those people or chase more billable work. Whether bench time is costed to the department at all is controlled by the Absorb bench cost to department toggle (Settings → Company → Operational).
Note: These figures depend on approved timesheets and each employee's current contract salary. Time not yet approved, or an employee with no active contract, won't be counted — approve timesheets and keep contracts current for accurate numbers.
#Compliance report in detail
Where to find it: Reports → Compliance
Compliance is the report managers and auditors reach for most. It has four tabs:
| Tab | What it shows |
|---|---|
| Time Tracking | Each employee's submitted vs. expected timesheet weeks, a compliance rate, and a status (Compliant / At Risk / Non-Compliant). |
| Contracts | Totals for active, expiring-soon, and missing contracts, plus a list of contracts nearing expiry with days remaining. |
| Leave Balances | Employees over their leave limit or with negative balances, and the specific issue. |
| Audit Trail | A searchable feed of user actions — who did what, to which item, when, and from where. |
Statuses (time-tracking compliance)
| Status | Meaning |
|---|---|
| Compliant | Timesheets are up to date. |
| At Risk | Some weeks are missing; attention needed. |
| Non-Compliant | Significant gaps in submissions. |
#Financial Statements in detail
Where to find it: Reports → Financial Statements
Pick a tab — Balance Sheet, Income Statement, or Cash Flow — choose your date range, and click Generate. Use Print to produce a clean, printable copy for sharing or filing.
For the same statements across several companies at once, use Consolidated Statements.
#Sales reports in detail
Where to find it: Reports → Sales Reports
Sales reports are built from sent invoices — a draft is not a sale. Figures are net of invoice discounts and credit notes, and before tax. Choose a From / To period at the top (it starts at 1 January of this year through today), then pick a tab:
| Tab | What it shows |
|---|---|
| Revenue | One row per month (or per day — use Group by): Invoices, Sales, Credit notes, Net revenue, Tax, and Total billed. |
| Top customers | Your ten largest customers by net revenue, with a bar chart of their Share, plus Invoices, Outstanding, and Last invoice date. |
| By customer | Every customer: Invoices, Sales, Credit notes, Net revenue, Tax, Received, Outstanding, and Share. |
| By item | Every product (or, for lines without a product, every description): its Category, Qty, Sales, Cost, Margin, Margin %, Share, and number of Invoices. |
| By category | The same, grouped by the product's Category (lines with no category show as "Uncategorised"). |
The cards change with the tab — for example Net revenue, Sales, Credit notes, and Invoices on Revenue, or Still owed and Largest customer on By customer.
Note: Cost and Margin are only known for stock items: they use the cost of sales recorded when each invoice was sent (see Finance → Selling stock items). For services and lines without a product they show "—", and the cards read Cost (stock items) and Margin (stock items) for that reason.
#Payables reports in detail
Where to find it: Reports → Payables Reports
Payables reports are built from approved bills — a draft bill owes nothing yet — and are net of debit notes. Three tabs:
| Tab | Filter | What it shows |
|---|---|---|
| Open payables | As of date | Every approved bill that was still owed at the end of that day: Bill, Supplier, Bill date, Due, Cur., Owed (bill cur.), Owed (base), Days overdue, and its Aging bucket. Cards: Total owed, Overdue, Open bills, Suppliers, plus a strip splitting the total into Not yet due, 1–30 days, 31–60 days, 61–90 days, and 90+ days. |
| By supplier | From / To | Per supplier: Bills, Purchases, Debit notes, Net purchases, Tax, Paid, Still owed, and Share. |
| By category | From / To | Spend grouped by the Category you enter on bill lines ("Uncategorised" if left blank): Bills, Suppliers, Amount (before tax), Tax, Total, and Share. |
Tip: The By category tab is only as good as the categories on your bill lines. Fill in the line Category when you enter bills to make it useful.
#Receivables summary in detail
Where to find it: Reports → Receivables (needs the View Receivables Reports permission)
The Receivables summary shows what each customer owed at the end of the As of date, aged by due date. Partly paid invoices are included at their remaining balance, and credit notes not yet applied by then are taken off.
Per customer you see: Invoices, the amount Not yet due, then 1–30, 31–60, 61–90, and 90+ days past due, Total owed, Unapplied credits, Net (total owed less unapplied credits), and the Oldest due date. The cards show Total owed, Overdue, 90+ days, and the number of Customers.
Note: On both this report and Open payables, the As of date gives you the position as it stood at the end of that day — so you can pick a past month-end and get what was owed then. The report takes every sent invoice (or approved bill) dated on or before that day, including ones paid since, and shows what was still owed on it that day: payments, receipts, and applied credit or debit notes count only if they were made by then. Unapplied credit notes are shown as they stood that day too. Leave the date on today for the current position.
#Inventory reports
Where to find it: Reports → Inventory Reports
Nine tabs covering stock status, reorder & EOQ, stock in transit, the stock ledger, valuation, WIP & finished goods, standard vs actual cost, purchase price variance, and negative stock. They're explained tab by tab on the Inventory page: see Inventory reports.
Tips & FAQ
- How do I export a report? The Sales, Payables, Receivables, Inventory, and Consolidated reports have Excel and Print / PDF buttons for the table on screen. For the single-company formal statements, use the Print button on Reports → Financial Statements. The older analytics reports (Dashboards, Financial, Resources, HR, Projects, Compliance) are built for on-screen review.
- The numbers look empty or stale. Click Refresh. If data is still missing, the underlying module (e.g. Timesheets or Finance) may not have entries yet for the period.
- Payroll figures? Payroll reporting (summaries, cost center, tax, overtime, headcount) lives inside the Payroll module rather than the general Reports menu, and requires payroll permissions.
#Consolidated Statements
Where to find it: Reports → Consolidated Statements (needs the View Consolidated Statements permission)
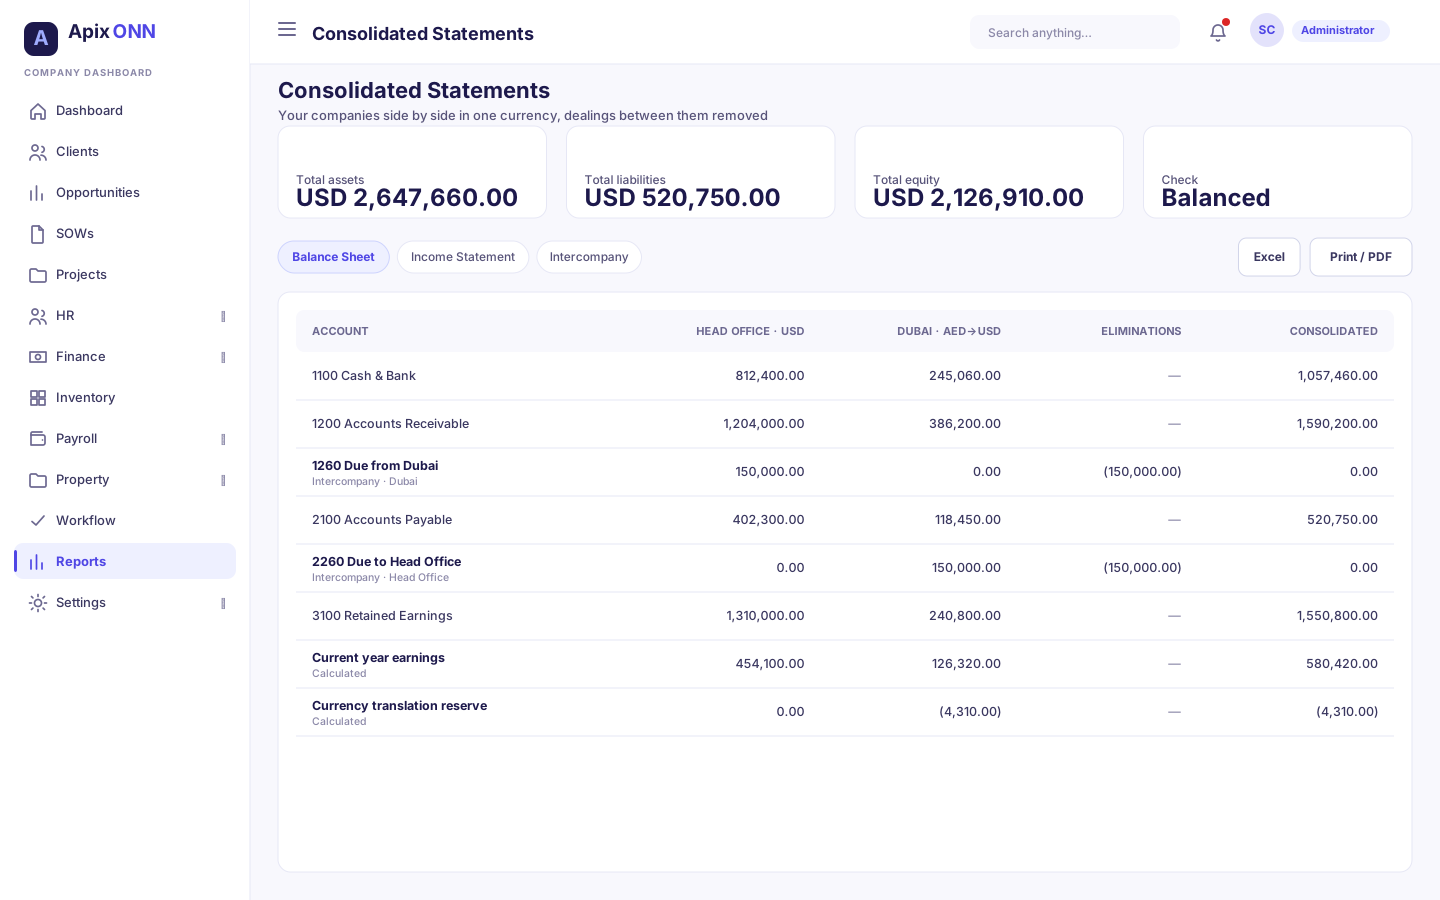
If your organization runs more than one company in ApixONN, this report puts their balance sheets and income statements side by side in one currency, removes the dealings between them, and gives you the group total. It's laid out the way an accountant builds a consolidation worksheet: one column per company, an Eliminations column, and a Consolidated column.
#Choosing what to consolidate
- Companies — a button for each company you can report on, all selected (✓) when the page opens. Click a button to leave that company out or bring it back; at least one stays selected. Your current company is listed first.
- Show in — the presentation currency. It starts as your current company's currency; pick any other currency to translate everything into it.
- As of (Balance Sheet and Intercompany tabs) or From / To (Income Statement tab, starting at 1 January of this year through today).
- The tabs: Balance Sheet, Income Statement, and Intercompany.
The report reloads whenever you change any of these. Excel and Print / PDF export the worksheet on the two statement tabs.
Which companies appear. You see the active companies you're a member of where you hold either the financial-reports or the consolidated-statements permission (full administrators see every active company). If you can only see one company, the page says "You have access to one company. Consolidation combines two or more — ask an administrator for access to your other companies." Selecting a single company still works — it shows that company's statements translated into the Show in currency.
#Reading the worksheet
| Column | What it holds |
|---|---|
| Account | The account code and name. Accounts line up across companies by account code, so use the same codes for the same kinds of account in every company. Client and supplier sub-accounts are rolled into their Accounts Receivable and Accounts Payable control accounts. |
| One column per company | That company's figures, translated into the Show in currency. When the company's own currency is different, the header shows the conversion, e.g. "AED → USD @ 0.272294". |
| Eliminations | What's removed because it's between the companies being consolidated (see Eliminations). "—" where there's nothing to remove. |
| Consolidated | The group figure: the company columns plus the eliminations. |
Accounts are grouped into sections — Assets, Liabilities, and Equity on the balance sheet (ending with Total Liabilities & Equity), Revenue and Expenses on the income statement (ending with Net Income) — each with a Total row. Negative amounts are shown in red, in brackets. Only posted journal entries count; drafts don't.
The cards above the worksheet summarize it:
- Balance Sheet: Total assets, Total liabilities, Total equity, and a check that reads Balanced — or Out of balance by an amount (see Warnings).
- Income Statement: Revenue, Expenses, Net income, and Intercompany sales removed (the revenue taken out by eliminations).
Lines in italics in the Equity section aren't accounts — the report works them out. Each appears only when it isn't zero:
| Line | What it is |
|---|---|
| Current year earnings | Profit (revenue less expenses) from the start of the current fiscal year up to the As of date. The fiscal year is your current company's year that contains the As of date (1 January if no fiscal year is set up). |
| Earnings of earlier years not yet closed | Profit from before this fiscal year that was never closed into retained earnings. It appears when a previous year wasn't closed; close that year in Finance → Fiscal Years and the amount moves into retained earnings. |
| Currency translation reserve | The difference that comes from translating at different rates (see Currency translation). |
| Intercompany difference (unreconciled) | The part of the intercompany balances that didn't cancel out, because the two companies' intercompany accounts don't agree (see The Intercompany tab). |
#Currency translation
Each company's figures come from its own ledger, in its own base currency. The report then translates them into the Show in currency:
- Assets and liabilities at the rate on the report date (the As of date). This is the rate shown in the column header.
- Income, expenses, and equity at the rate on each entry's date.
Because different parts of the balance sheet use different rates, a translated company would no longer balance on its own. The difference is shown on the Currency translation reserve line in Equity, so each company's column — and the group — still balances. It's normal for this line to be non-zero whenever a company reports in another currency and rates have moved. (On the income statement, the rate in the column header is the one on the To date, for reference; each entry is still translated at the rate on its own date.)
The rates come from Settings → Currencies & Rates. For each date the report uses the most recent rate on or before it; a rate entered the other way round (for example USD → AED instead of AED → USD) works too, and so does going through USD when there's no direct rate.
- An entry is older than your first rate. The first rate on file is used for the earlier dates and a yellow note tells you so ("No AED → USD rate was on file for … or earlier, so the first rate on file (…) was used for earlier dates."). Add older rates for exact figures.
- There's no rate at all for a currency pair. The statement can't be built. The page shows a message such as "No exchange rate is configured for AED → USD as of 2026-09-28. Add it in Settings → Currencies & Rates, then try again.", and the error pop-up has an Add AED → USD rate button that takes you straight to Settings → Currencies & Rates. (If you aren't allowed to edit exchange rates, the pop-up asks you to contact an administrator instead.) Use Add Rate there, then come back.
#Eliminations
When companies deal with each other — one lends the other money, or charges it management fees — both books record it: a receivable in one, a payable in the other; income in one, an expense in the other. Seen as one group, those amounts cancel out and must not be counted. The Eliminations column removes them.
- Only accounts marked as intercompany are eliminated. You mark them in Finance → GL Accounts — see Intercompany accounts.
- An account is eliminated only when the company it names is also selected. Leave that company out and the account stays in at its full balance — correctly, since it's then a real balance with an outside party.
- On the balance sheet, intercompany balances are removed from assets, liabilities, and equity. On the income statement, intercompany revenue and expenses are removed; the Intercompany sales removed card shows the revenue part.
- When both sides agree, the eliminations cancel out exactly. When they don't, the leftover is shown on Intercompany difference (unreconciled) instead of being hidden.
- Companies are treated as wholly owned: each is consolidated in full and there's no minority (non-controlling) interest line.
If you selected two or more companies but no account is marked as intercompany, a note under the worksheet says "No accounts are marked as intercompany, so nothing was eliminated." — mark your intercompany accounts to fix it.
#The Intercompany tab
This tab checks, for the As of date, that each pair of companies agrees about what's between them. There's one card per pair (for example Head Office ↔ Dubai Branch) with a badge — Agrees or Doesn't agree — and a small table:
| Column | What it means |
|---|---|
| Owed to it, less owed by it | For each company, from its intercompany accounts: what the other company owes it, less what it owes the other company. |
| Income less expense | For each company: its intercompany income from the other, less its intercompany expense to it, for all entries up to the As of date. |
| Difference (should be 0) | The two companies' figures added together. The two sides should mirror each other exactly — one company's receivable is the other's payable — so this should be zero. |
If there are no intercompany accounts between the chosen companies, the tab says so: "No intercompany accounts between the chosen companies. Mark an account as intercompany in Finance → GL Accounts (edit the account, then choose the other company under "Intercompany")."
When a pair doesn't agree, the usual causes are:
- Only one side's account is marked as intercompany (the other company's figure shows 0).
- One company has recorded a transaction the other hasn't yet, or on a later date than the As of date.
- The two companies recorded different amounts.
- The companies keep their books in different currencies and booked the same transaction at different rates.
Compare the two accounts' Statements in Finance → GL Accounts (switching company with the company switcher), correct the side that's wrong, and the difference disappears.
#Warnings and what they mean
Warnings appear in a yellow banner above the worksheet:
| Warning | What it means | What to do |
|---|---|---|
| "Intercompany accounts between A and B don't agree (balances differ by …) (income and expense differ by …)." | The pair's intercompany accounts don't mirror each other. The gap is what Intercompany difference (unreconciled) carries. | Reconcile the pair on the Intercompany tab (see above). |
| "Company's own books are out of balance by … (a one-sided posting), so the consolidated balance sheet is out by the same amount." | That company's ledger itself doesn't balance — a debit without a matching credit. The Check card shows Out of balance by the same amount. | Find the one-sided entry in that company's Trial Balance and correct it. |
| "No X → Y rate was on file for … or earlier, so the first rate on file (…) was used for earlier dates." | Some entries are older than your first exchange rate. | Add older rates in Settings → Currencies & Rates. |
A missing exchange rate isn't a warning — it stops the report with an error and an Add rate button (see Currency translation).
Under the worksheet, grey notes repeat how amounts were translated and, if relevant, that nothing was eliminated.
#Setting up for consolidation — checklist
- Line up your charts of accounts. Use the same account codes for the same kinds of account in every company, since rows are matched by code.
- Mark intercompany accounts on both sides. In each company, edit the accounts used for dealings with the other company in Finance → GL Accounts and choose that company under Intercompany. See Intercompany accounts.
- Record intercompany transactions in both companies, on the same date and for the same amount.
- Add exchange rates in Settings → Currencies & Rates for every company currency that differs from the currency you'll show the report in, going back to your oldest entries.
- Close finished years in Finance → Fiscal Years, so earlier profit sits in retained earnings instead of Earnings of earlier years not yet closed.
- Check the result. Open Reports → Consolidated Statements: every pair on the Intercompany tab should say Agrees, and the Balance Sheet Check card should say Balanced.
Tips & FAQ
- A company I expected is missing from the picker. You're not a member of it, you don't hold the financial-reports or consolidated-statements permission in it, or it's inactive. Ask an administrator.
- "You can't include company — you don't have access to its financial reports." Your access changed while the page was open. Reload the page.
- Why is there a Currency translation reserve? Because assets and liabilities are translated at today's rate while income, expenses, and equity use historical rates. It's expected whenever a company's currency differs from the one you're showing.
- The consolidated net income is lower than the companies' net incomes added up. Intercompany fees and sales were eliminated — see the Eliminations column and the Intercompany sales removed card.
#Notifications
Every user has their own notification inbox and channel preferences, found under Notifications in the sidebar.
#Notification inbox
Where to find it: Notifications → Inbox
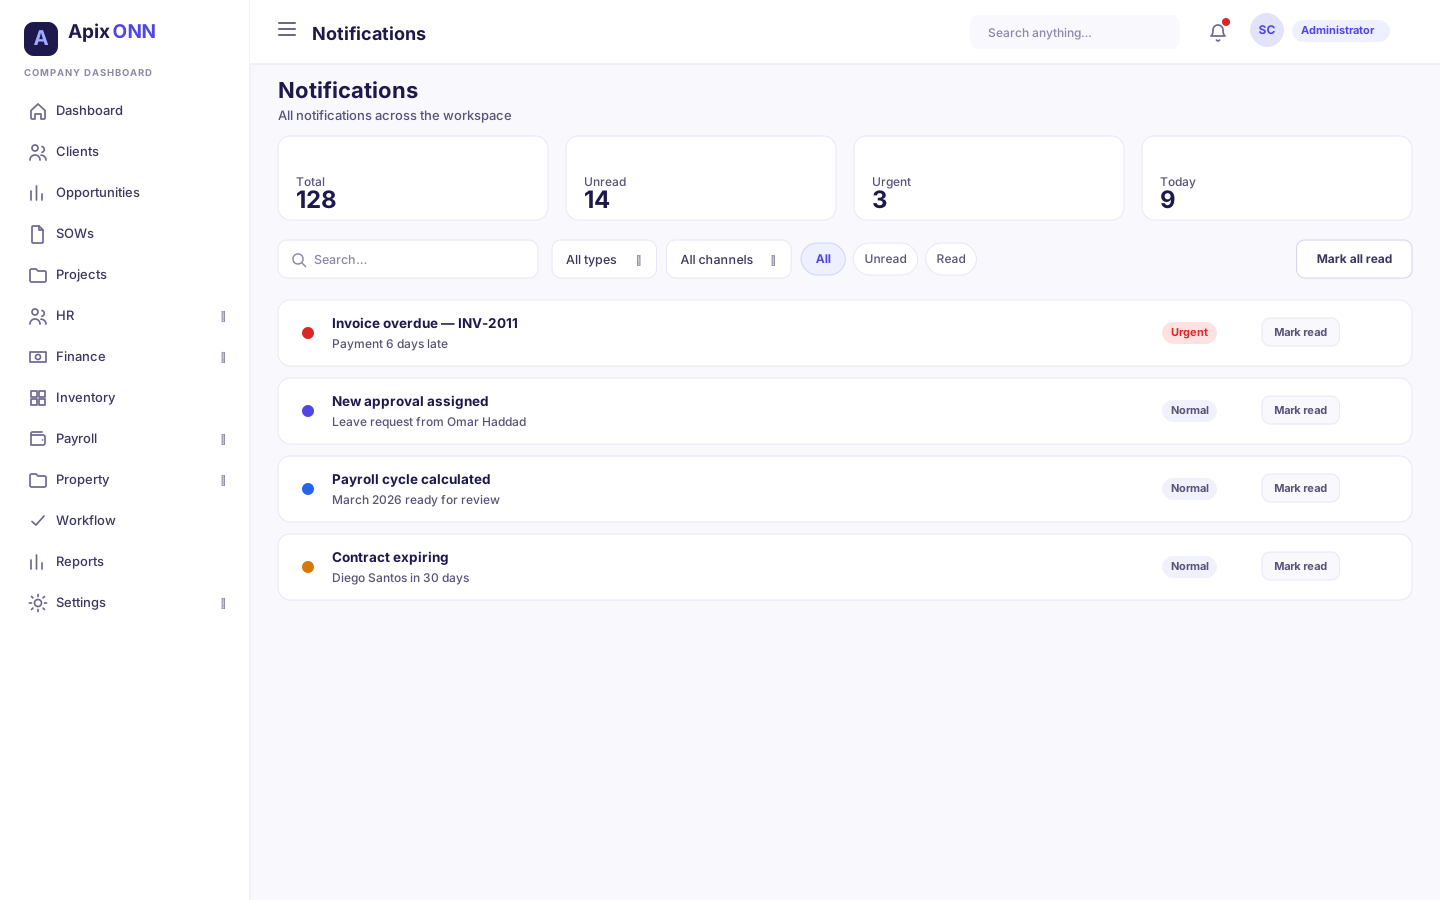
Your inbox collects everything the system wants to tell you — approvals waiting on you, requests you submitted being approved or rejected, contract and payroll updates, and more.
What you can do here
- See all notifications with subject, message, type, priority, and time.
- Filter by All / Unread / Read, and by Type or Channel.
- Mark a single notification as read, or Mark All Read.
- Delete a notification.
- Jump to Preferences from the top of the page.
How to clear your inbox
- Open Notifications → Inbox.
- To clear one, hover its row and click the check (Mark as read).
- To clear everything, click Mark All Read at the top.
Statuses & priority
| Priority | Meaning |
|---|---|
| Urgent | Needs immediate attention (shown in red). |
| High | Important (orange). |
| Normal | Standard (blue). |
| Low | Informational (grey). |
Tip: Unread notifications are highlighted and carry a blue dot. The Unread filter and the counter in the header help you focus on what's new.
#Notification preferences
Where to find it: Notifications → Preferences
Choose how you want to be told about each kind of event. For every notification type you can turn on or off four delivery channels independently.
The four channels
| Channel | What it does |
|---|---|
| Sends the notification to your inbox. | |
| SMS | Text message, best kept for urgent items. |
| Push | Mobile and browser push notifications. |
| In-App | Shows inside the platform (your Notifications inbox). |
The notification types you can tune
Leave Requests, Timesheets, Payroll, Contracts, Approvals, Projects, Evaluations, and System announcements.
How to set your preferences
- Open Notifications → Preferences.
- For each row (notification type), tick the channels you want.
- Use the All / None shortcuts in a channel's column header to turn that channel on or off for every type at once.
- Click Save Preferences. Changes take effect immediately.
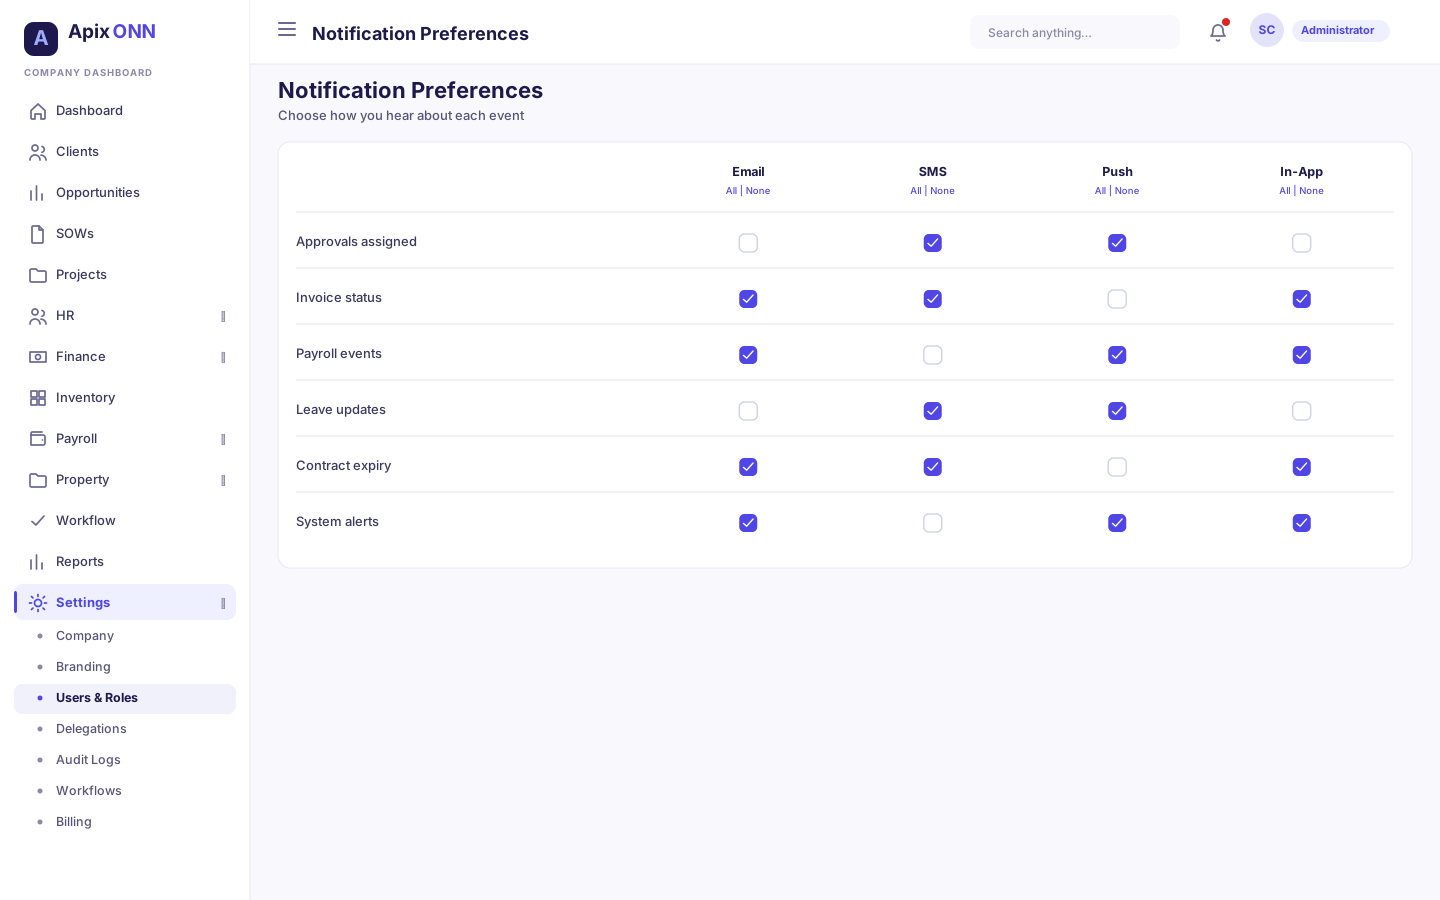
Tip: A sensible default is Email + In-App on for everything, Push on for the things you want to catch quickly, and SMS reserved for truly urgent types.
#How approval & assignment notifications work
Many actions in the app route to someone for approval — a leave request to a manager, a timesheet to a team lead, an expense or invoice to finance, a payroll cycle to a payroll manager. When that happens:
- The approver receives a notification (through the channels they've enabled) that an item is waiting, and the item appears in their Workflow Inbox if your plan includes the Workflow module.
- The requester receives a notification when their item is approved or rejected.
- If you've been assigned something — a project, a document to sign, a work item — you're notified the same way.
Note: You control the delivery channels for these in Preferences, but you can't switch off the underlying approvals themselves — they're part of how work moves through the system. If you're an approver who'll be away, set up a Delegation (Settings → Delegations) so approvals reach someone else.
Tips & FAQ
- I'm not getting emails. Check Preferences — the Email channel may be off for that type. Also confirm your email address is correct on your profile.
- Too many notifications. Turn off channels you don't need per type, or reserve SMS/Push for urgent categories only.
- An approval is stuck because the approver is on leave. Ask an administrator to set up a delegation, or escalate through the Workflow Inbox.
- Who do I contact for access problems? Your workspace administrator (Super Admin or Admin) manages users, roles, plans, and modules.