Projects
Projects is where your delivery work lives — every client engagement, internal initiative, or support effort is tracked here from planning through go-live. Project managers, team leads, resource managers, and finance staff use it to plan phases and milestones, staff teams, watch the budget, route approvals, and turn delivered work into invoices. This guide covers the Projects list, everything inside a project's detail tabs, and the wider Resources area (allocations, capacity, demands, hiring requests, timesheets, and document requests).
Company Dashboard22 min read15 sections
On this page15 sections
Note: Projects and the Resources menu are part of the Projects module (PRP). If you don't see them in the sidebar, your company may not have the module enabled, or your role may not include project access. Contact your administrator.
#Projects list
Where to find it: Projects (top of the sidebar).
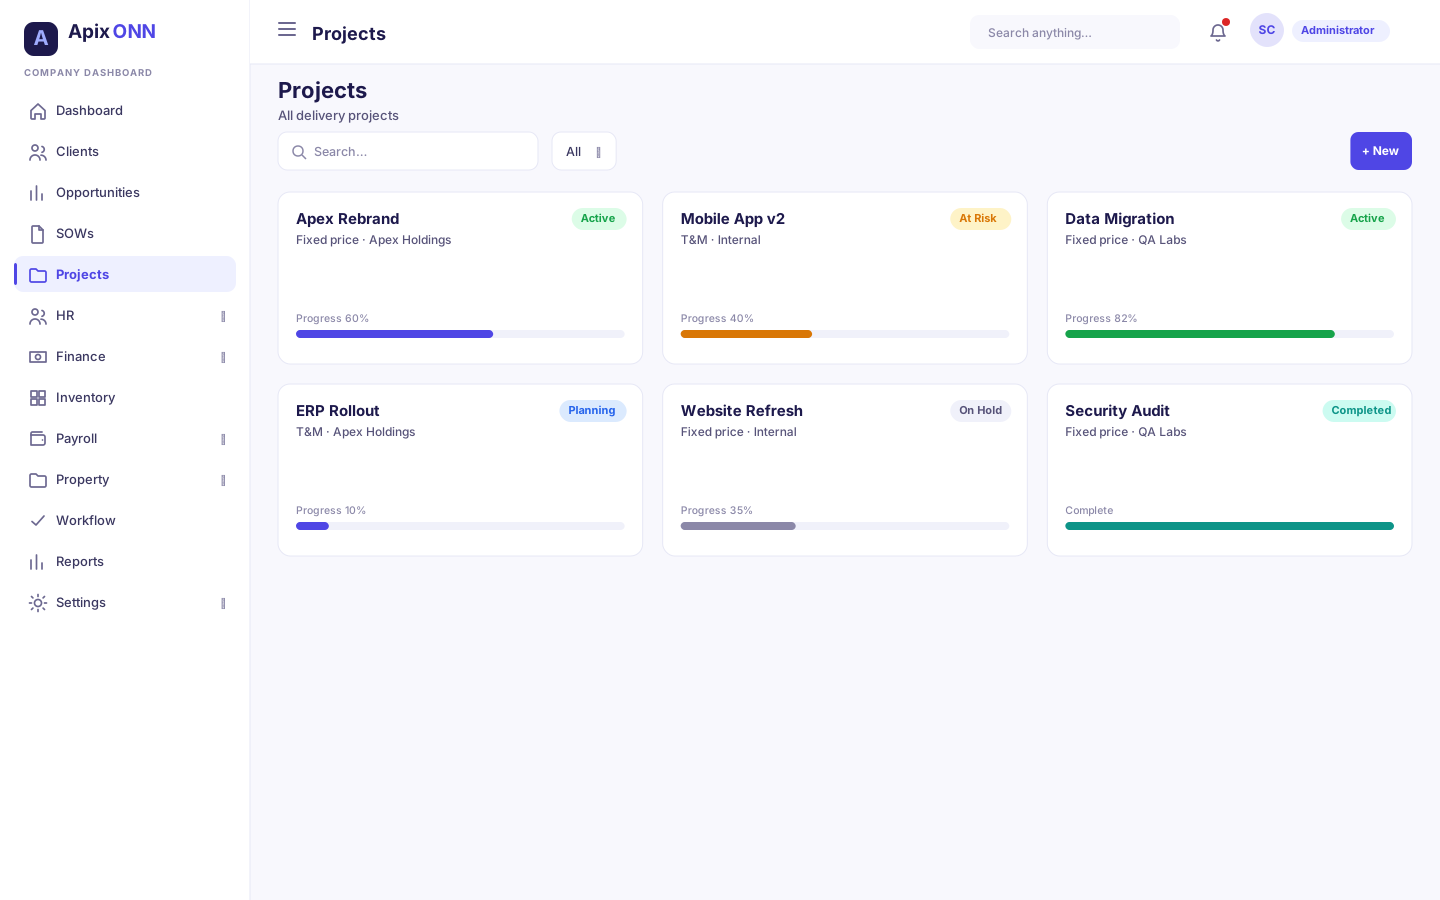
The list shows every project you have access to as a grid of cards. Each card gives you the project name and code, its status, its type, the client, budget, actual cost so far, a progress bar, and the number of active team members. If a project is waiting on an approval, an amber badge shows which step it's on and who it's with.
What you can do here
- Search projects by name or code.
- Filter by status.
- Open a project to see its full detail.
- Create a new project.
- Edit or delete a project directly from its card.
#How to find a project
- Type part of the name or code into the search box. Results update as you type.
- Or pick a status from the All Status dropdown (Planning, Active, On Hold, Completed, Cancelled) to narrow the list.
- Click a card, or its View Details button, to open the project.
Tip: The small amber clock badge on a card ("Step 1/2 · Finance") means the project is mid-approval. You can open it and go to the Approval tab to see exactly where it's stuck.
#Deleting a project
On the card, click the red trash icon and confirm. Deleting is permanent, so only do this for projects created in error. If you only want to stop work, set the status to On Hold or Cancelled instead.
Note: Creating, editing, and deleting projects are gated by permissions. Project Managers and Admins can typically create and edit; deleting is usually limited to Admins and Super Admins. Roles like Employee, Consultant, Contractor, and Read Only may only view.
#Creating a project
Where to find it: Projects → Create Project (top right).
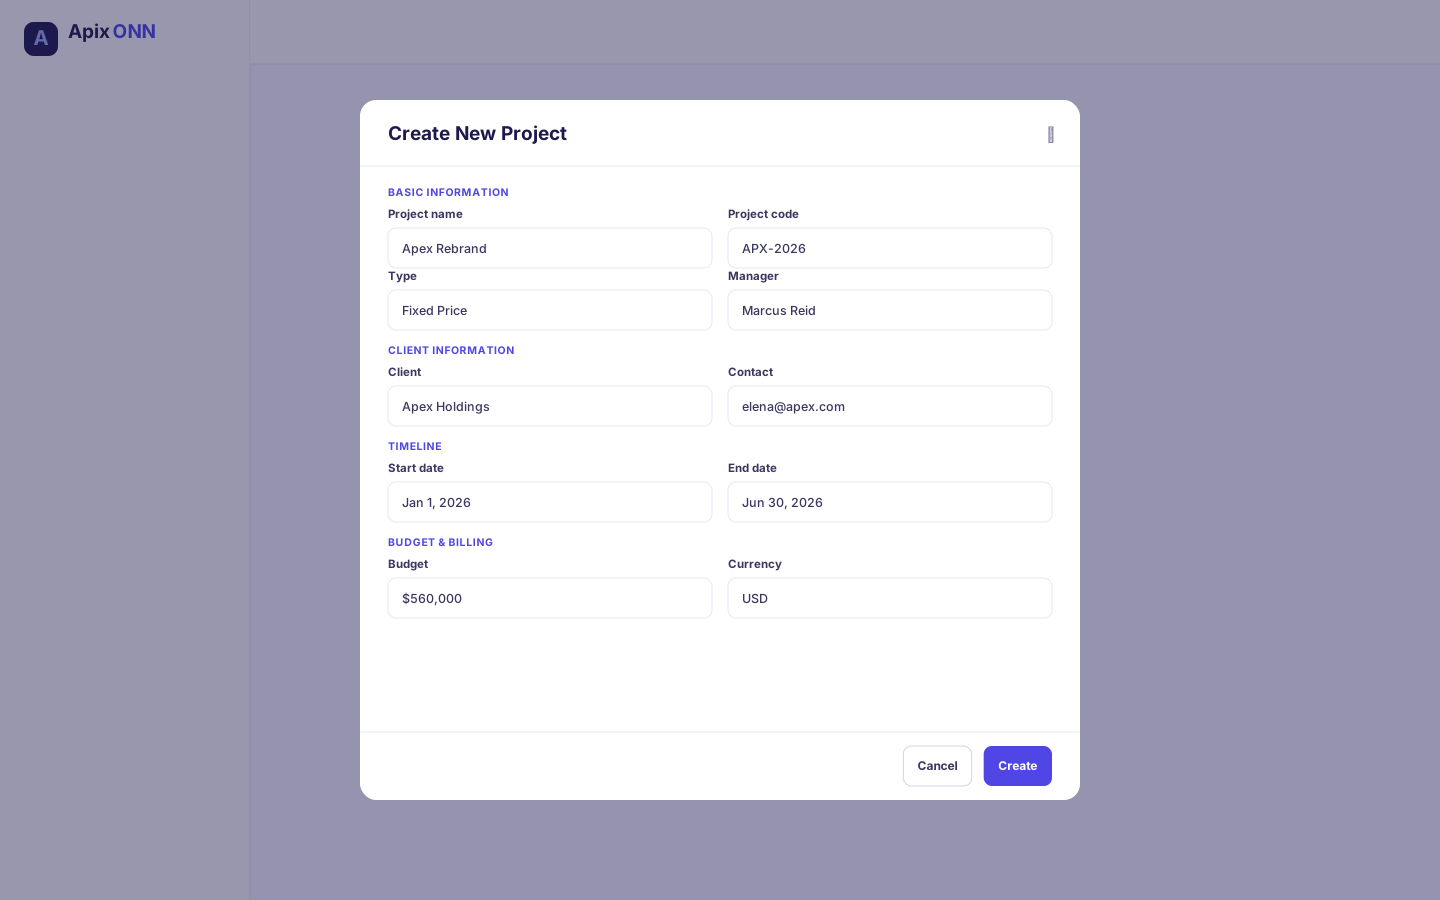
The Create Project form is grouped into four sections. Required fields are marked with a red asterisk.
#How to create a project
- Click Create Project.
- Fill in Basic Information — at minimum a project code, name, type, status, and branch — and pick the Project Manager.
- Pick a Client (optional but recommended for billable work). If the client doesn't exist yet, click + New client to add it without leaving the form.
- Set the Start Date (required) and, if known, an End Date.
- Optionally set a Budget (you can leave it blank and compose it later on the Plan tab), and choose the Currency, Delivery Model, and whether the project is Billable.
- Click Create Project.
Note: Branch is required — you cannot save without one. If your company hasn't set up branches yet, click the green + next to the Branch dropdown to create one on the spot.
Tip: When you create a project in Planning status, it is automatically submitted for approval. See When a new project needs approval below.
#Field guide — Basic Information
| Field | What it means | Notes |
|---|---|---|
| Project Code | A short unique identifier (e.g. PRJ-001) | Required. Shown throughout the app; pick a convention and stick to it. |
| Project Name | The full, human-readable name | Required. |
| Description | A sentence or two about the work | Optional. |
| Type | Client, Internal, Support, or R&D | Required. Drives reporting and colour-coding. |
| Status | Planning, Active, On Hold, Completed, Cancelled | Required. New projects usually start as Planning. |
| Branch | The office/legal entity the project belongs to | Required. Use the + to add one if none exist. |
| Priority | Low, Medium, High, Critical | Optional. Helps teams triage. |
| Project Manager | The employee who manages the project | Optional. Search by name or employee number. Any Project manager approval step for this project goes to this person (see Workflow & Approvals). |
#Field guide — Client Information
| Field | What it means | Notes |
|---|---|---|
| Client | Pick an existing client record | Optional; use + New client to create one. Picking a client fills in the name and email below. |
| Client Name (as shown on the project) | The client name shown on the project | Filled in from the client; you can type one if the client isn't set up yet. |
| Client Contact | The main person on the client side | Optional. |
| Client Email | Their email address | Optional. |
#Field guide — Timeline & Budget
| Field | What it means | Notes |
|---|---|---|
| Start Date | When work begins | Required. |
| End Date | Planned finish | Optional but needed for schedule and burn-rate analytics. |
| Budget (optional) | The total money planned for the project | Optional at creation, but required for the Analytics tab to work. |
| Currency | Any currency from the list | Defaults to your company's base currency. Applies to all money shown on the project. |
| Delivery Model | Fixed Price, Time & Material, or Internal | Affects how you bill — Time & Material projects invoice from timesheets. |
| Hourly Rate | Default billing rate per hour | Used when generating invoices from timesheets. |
| Estimated Hours | Planned effort | Feeds progress and analytics. |
| Billable Project | Whether this project can be invoiced | When on, the Generate Invoice button appears on the project. |
Note: The contract value / revenue figure is tracked on the project's financial summary rather than captured on this form. Budget is optional at creation — set it here, or leave it blank and compose it on the project's Plan tab. Revenue is populated as invoices are raised and appears on the Overview and Financials tabs.
#How to edit a project
You can change any of a project's details after it's created, including its project manager, client, dates, budget, and currency.
- Click Edit on the project's card in the list, or Edit at the top of the project's page.
- The Edit Project form has the same fields as Create Project. Change what you need.
- Click Update Project.
Note: The Project Code can't be changed. Setting the status to Cancelled releases the project's open allocations and budget commitments, and the form warns you before you save.
#Inside a project: the detail tabs
Opening a project shows a header with its name, status, and code, plus a row of tabs. If the project is billable, a Generate Invoice button sits in the top-right. The tabs are: Overview, Team, Phases, Risks, Plan, Budget, Financials, Analytics, Approval, Tickets. An amber number on the Approval tab means an approval is in progress.
#Overview tab
Where to find it: open any project → Overview.
The landing view for a project. At the top are four cards: Budget, Actual Cost, Progress, and Health. Below them you'll find:
- Project Information — type, delivery model, priority, billable flag, and branch.
- Timeline — start date, planned end date, actual end date, and duration.
- Client Information — name, contact person, and email.
- Financial Summary — budget, actual cost, revenue, remaining budget, hourly rate, and estimated hours.
- Upcoming Milestones — the next milestones due (managed on the Phases tab).
Use Overview as your quick health check before drilling into a specific tab.
#Team tab
Where to find it: open a project → Team.
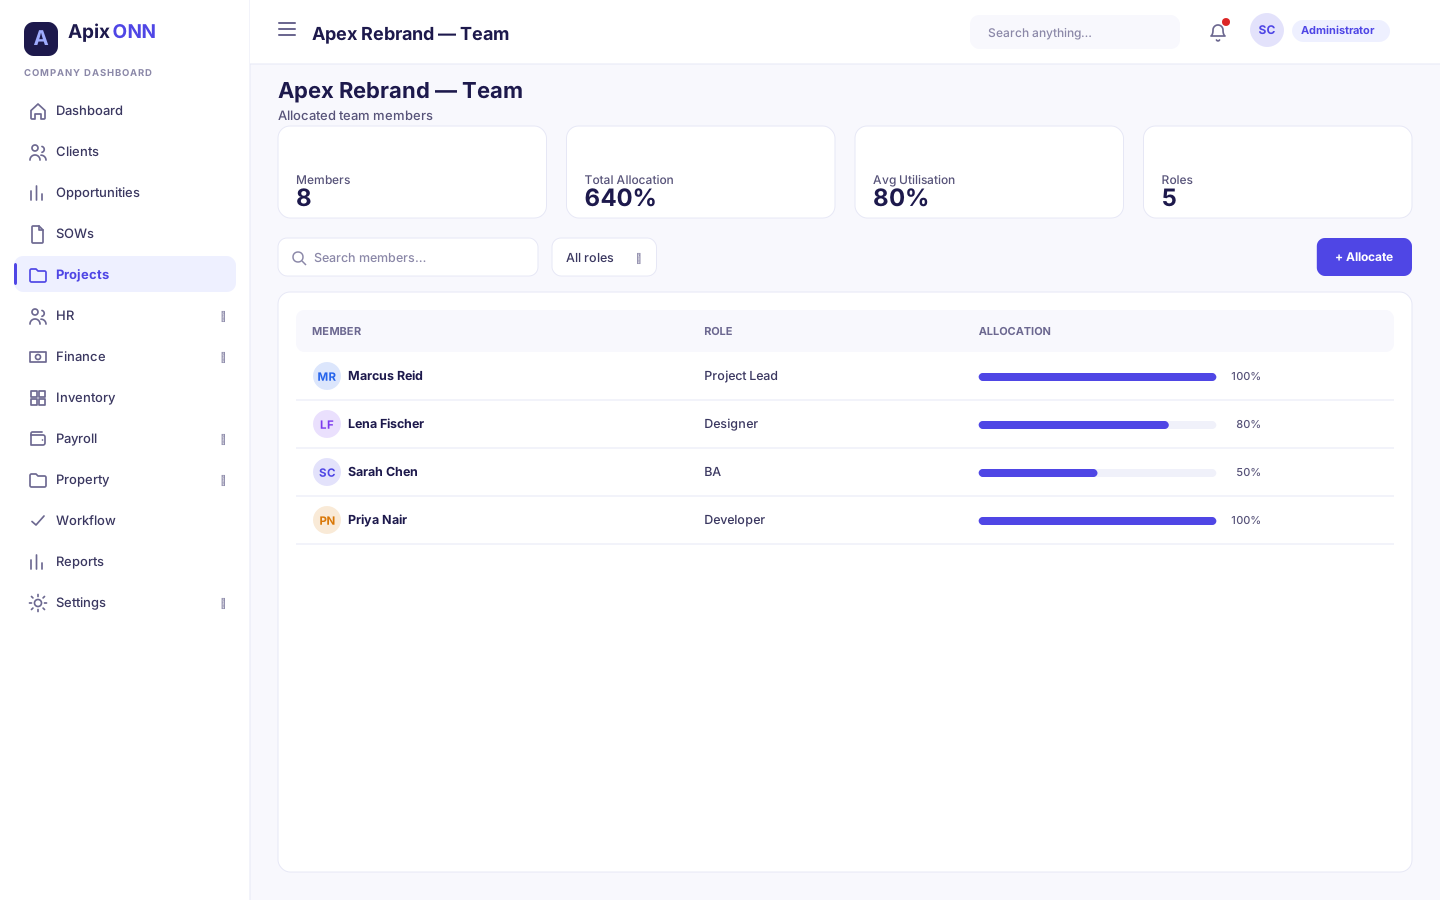
Team shows who is allocated to the project and how much of their time. Three summary cards give you Total Team Members, Active Allocations, and Total Allocation percentage.
What you can do here
- Allocate an employee to the project.
- Set each person's role and the percentage of their time.
- Edit or remove an allocation.
#How to allocate someone
- Click + Add (or the allocate button) on the Team tab.
- Choose the Employee.
- Enter their Role (e.g. Senior Developer).
- Set the Allocation % (for example 50 for half their time).
- Set the start and end dates and any notes.
- Save.
Note: Some allocations route through an approval before they take effect — you'll see a planning status with an approval badge until it's approved. This protects against over-allocating people who are already committed elsewhere. Resource Managers and Project Managers typically own allocations.
Tip: The Total Allocation figure helps you spot over-commitment. If someone is at 120% across projects, that's a conflict to resolve — see Capacity Planning.
#Phases & Milestones (deep dive)
Where to find it: open a project → Phases.
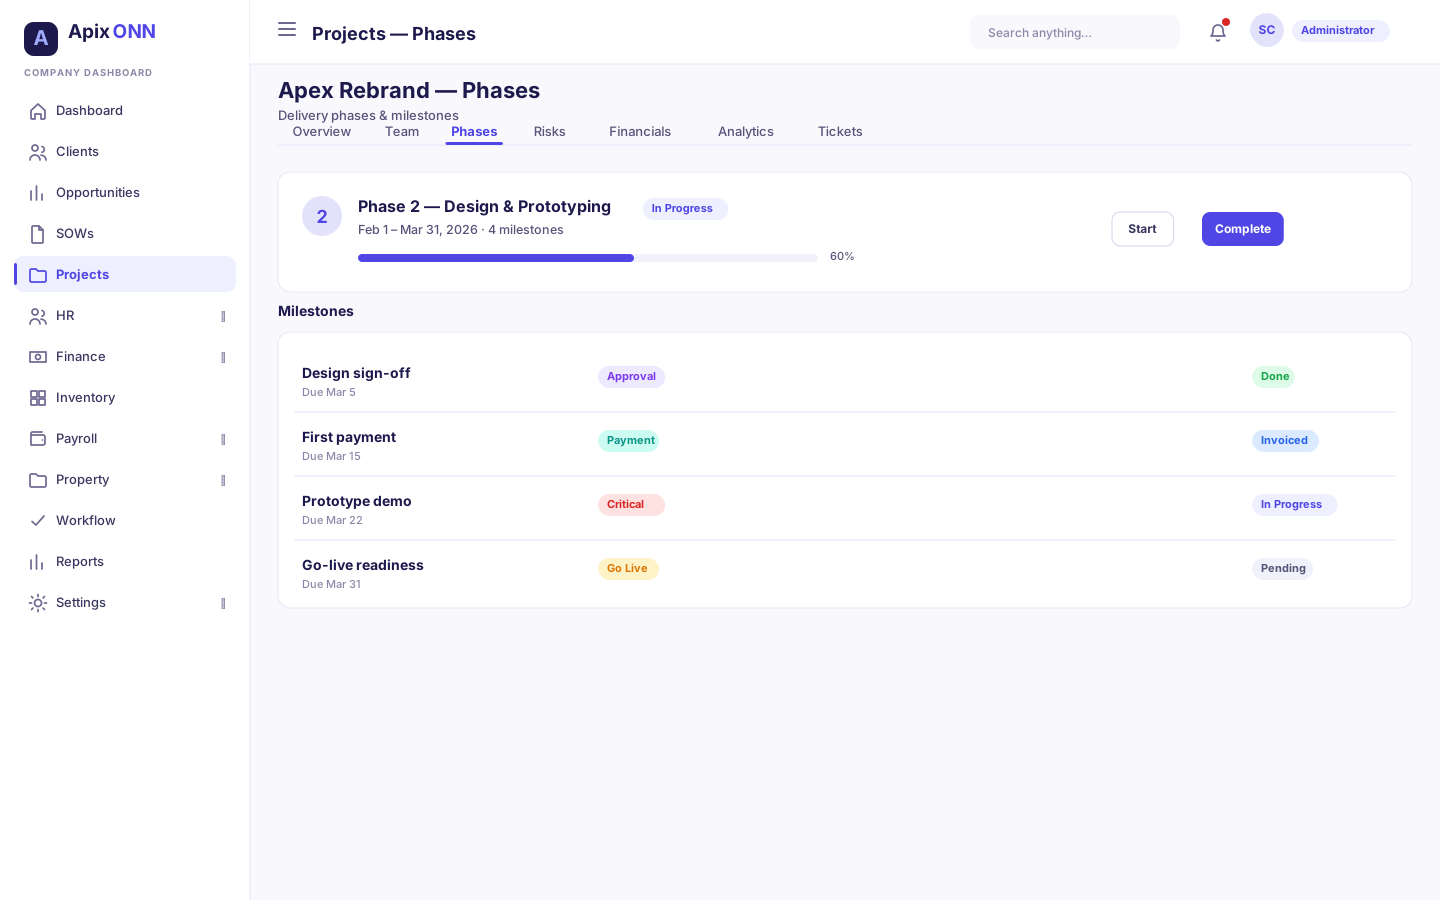
This is the heart of project execution. A phase is a stage of work (e.g. Requirements, Build, UAT). A milestone is a checkpoint inside the work — a deliverable, a client sign-off, a payment point, or a go-live. Milestones are what drive approvals and, for payment milestones, invoices.
What you can do here
- Add phases and put them in order.
- Add milestones and link them to a phase.
- Start, complete, and reopen phases and milestones.
- Submit payment, critical, approval, and go-live milestones for approval.
#How to add a phase
- Click + Add Phase.
- Enter the Phase Name and Phase Order (1, 2, 3…).
- Add a description if useful.
- Set the planned Start Date and End Date.
- Enter the planned Budget and Estimated Hours.
- Click Create Phase.
#Phase field guide
| Field | What it means | Notes |
|---|---|---|
| Phase Name | The stage's name | Required. |
| Phase Order | Where it sits in sequence | Required. Lower numbers come first. |
| Start / End Date | Planned dates for the phase | Required. |
| Budget | Money planned for this phase | Required. |
| Estimated Hours | Effort planned for this phase | Required. |
| Notes | Anything else | Optional. |
#How to add a milestone
- Click + Add Milestone.
- Choose the Phase it belongs to (or leave as "No phase").
- Enter the Milestone Name and pick a Type (see below).
- Add a description and Acceptance Criteria (what "done" means).
- Set the Due Date and an Owner.
- For payment milestones, fill in the payment settings (see Payment milestones).
- Tick Critical Milestone if this checkpoint must be formally approved.
- Click Create Milestone.
Note: The Owner dropdown only lists people already allocated to the project. If the person you want isn't there, add them on the Team tab first.
#Milestone types
| Type | What it's for | Needs approval before completing? |
|---|---|---|
| Deliverable | A piece of work to hand over | No (unless marked Critical) |
| Review | An internal or client review point | No (unless marked Critical) |
| Approval | A formal sign-off gate | Yes |
| Payment | A billing point tied to money | Yes, when it has a payment amount |
| Go Live | Launching into production | Yes |
Tip: Any milestone you mark Critical requires approval regardless of its type. Use it for high-stakes checkpoints you don't want closed without oversight.
#Starting and completing work
Each phase and milestone moves through a simple lifecycle.
- Start Phase — begins the phase. Any not-yet-started milestones inside it are automatically started for you, and you'll see a note telling you how many.
- Work the milestones. Each has its own Start button and then a Complete (or Submit) button.
- Complete Phase — closes the phase once its milestones are done.
Note: Why is my Complete Phase button blocked? A phase cannot be completed while it still has milestones that aren't finished. If you try, you'll get a message listing the pending milestones by name. Finish or reopen-and-resolve those milestones first, then complete the phase.
#The Complete vs. Submit button
On a milestone that's in progress you'll see one of two buttons:
- ✅ Complete — for ordinary deliverable and review milestones. Clicking it closes the milestone immediately.
- ✅ Submit — appears instead when the milestone requires approval (payment with an amount, approval type, go-live, or critical). Clicking it submits the milestone for approval rather than completing it. The milestone moves to a pending / In Approval state and a workflow is started.
When you submit, a message tells you which approval workflow was triggered, and the milestone shows an In Approval label with a View Inbox → link. It only becomes Completed once the approver(s) sign off.
#Milestone statuses
| Status | What it means | What you can do |
|---|---|---|
| Not started | Created but not begun | Start it, edit it, or delete it |
| In progress | Being worked on | Complete it, or Submit it for approval |
| Pending / In Approval | Submitted and awaiting sign-off | Track it in the Workflow Inbox; no direct edits |
| Completed | Done (and approved, if required) | Reopen it if something needs redoing |
#Payment milestones and auto-invoicing
When you set a milestone's type to Payment, a blue settings panel appears:
| Field | What it means | Notes |
|---|---|---|
| Payment % | The share of the contract this milestone bills | Optional; use either % or amount. |
| Payment Amount | The exact money to bill at this milestone | Drives the approval tier (see below). |
| Auto-generate invoice on approval | Draft an invoice automatically once approved | A checkbox inside the panel. |
The panel reminds you: payment milestones require workflow approval before completion. You cannot simply mark a payment milestone done — it always goes through approval first.
The full milestone → approval → invoice flow, honestly:
- You click Submit on the payment milestone.
- The system starts a payment approval workflow, sized by the amount:
- Small — under $10,000
- Medium — $10,000 to $50,000
- Large — over $50,000
- The milestone sits in In Approval while the approver(s) review it in their Workflow Inbox.
- Only when it's approved does the milestone become Completed.
- If you ticked Auto-generate invoice on approval, a draft invoice is created at that point and the milestone shows an 🧾 Invoiced — view draft link. That draft still needs to be reviewed and sent from Finance → Invoices; it is not automatically finalized or emailed.
Note: Payment approvals are usually routed to Finance Manager / Accountant roles, while go-live and general milestone approvals may route to a Project Manager or PMO reviewer. The exact routing is defined in your company's workflow settings — see the Workflow & Approvals guide.
Tip: If a payment milestone doesn't create an invoice, check that (a) the Auto-generate invoice on approval box was ticked before submitting and (b) the milestone was actually approved, not just submitted.
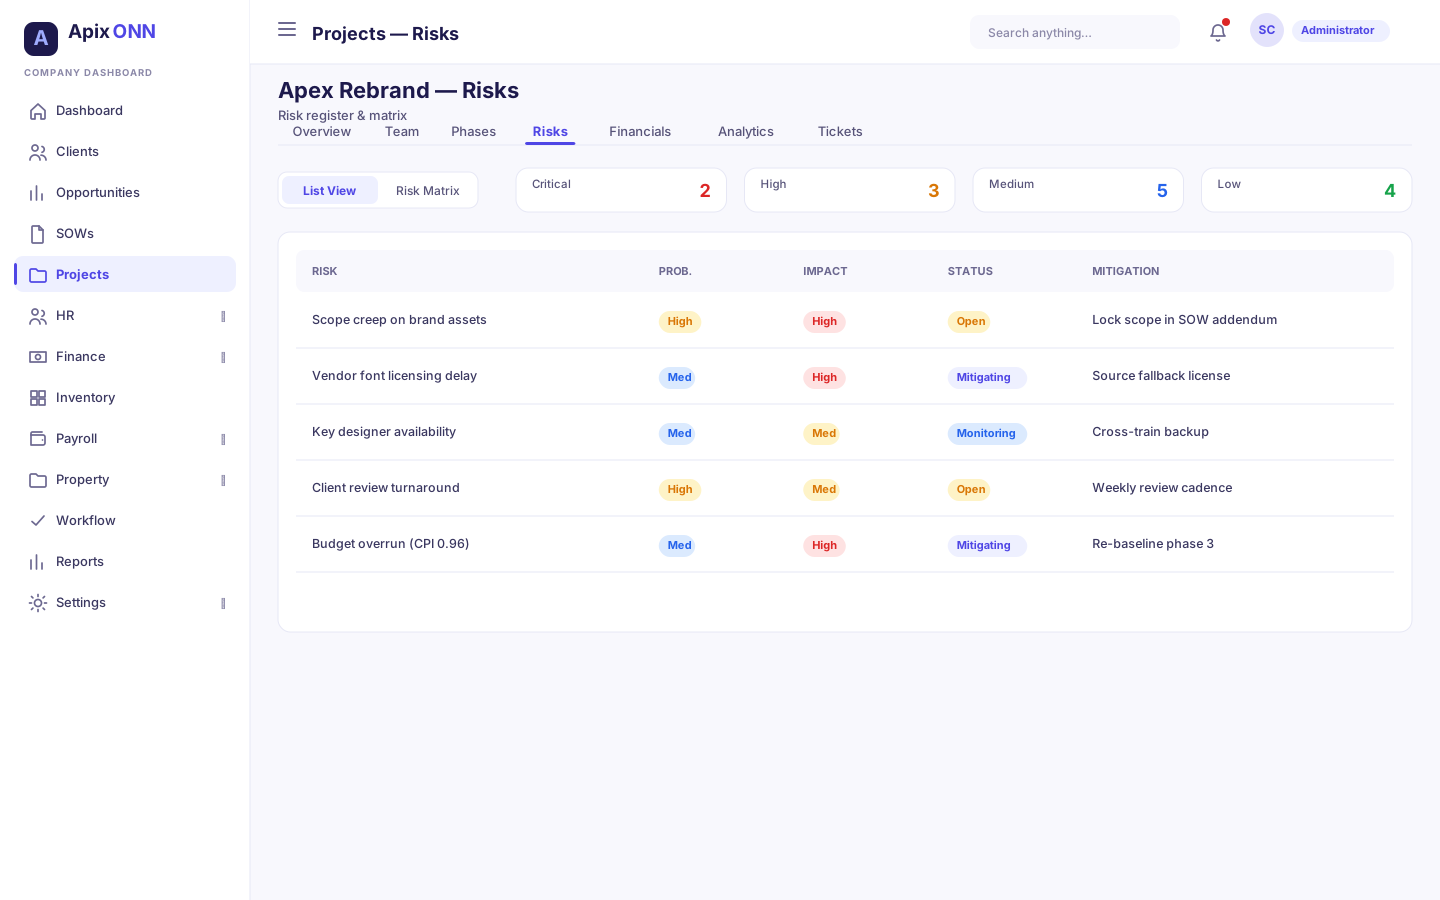
#Risks tab
Where to find it: open a project → Risks.
Log and track things that could hurt the project.
#How to add a risk
- Click + Add on the Risks tab.
- Enter a title and description.
- Choose a category, a probability, and an impact — each on a five-point scale (Very Low, Low, Medium, High, Very High).
- Set the status (starts at Identified).
- Add a mitigation plan and, if you can, the estimated cost impact and estimated schedule impact (days).
- Save.
As you act on a risk you can record mitigation — the actions taken and the actual cost/schedule impact. Probability and impact together give each risk a severity you can prioritise by. The tab offers a List View and a Risk Matrix (a probability × impact heat-map), with summary cards grouping risks by severity.
#Plan tab
Where to find it: open a project → Plan.
The Plan tab is where you compose the project's budget and price up front. Instead of typing one budget figure, you break the cost into three buckets and set a target profit — the budget and price calculate live.
#How to plan a project
- Open the project and go to the Plan tab.
- Enter the three cost buckets:
- Staffing (labour) — the people delivering the work.
- Management (overhead) — PM, governance, and indirect cost.
- Assets (equipment / materials) — hardware, licences, materials.
- Enter a Target profit (%).
- As you type, the panel updates live:
- Budget = the three buckets added together (your total planned cost).
- Profit = budget × target profit %.
- Price = budget + profit (what you'd charge the client).
- Click Save plan & set budget. This writes the plan and sets the project's budget and price.
A burn-down bar shows actual cost against the planned budget, so you can see at a glance how much of the plan the project has consumed as timesheets and purchases roll in.
Tip: You don't have to set a budget when you first create a project — leave it blank and compose it here. Actuals from timesheets and purchases burn this plan down; they don't change the planned budget, so your baseline stays intact for variance analysis.
#Budget tab
Where to find it: open a project → Budget.
A detailed, line-by-line budget for the project, separate from the single Budget figure on Overview. Three views are available: Breakdown, Variance, and Forecast.
#How to add a budget line
- On the Budget tab, click + Add (Breakdown view).
- Pick a category — Labor, Materials, Equipment, Subcontractors, Travel, or Other.
- Add a subcategory if useful.
- Enter the budgeted amount.
- Save. You can later record actuals against each line.
The Variance view compares budgeted vs. actual per category and flags where you're over or under. Green means comfortably under budget, blue on budget, yellow slightly over, red significantly over.
Tip: Keep this in sync with reality by recording actuals — the variance and the Analytics tab both depend on it.
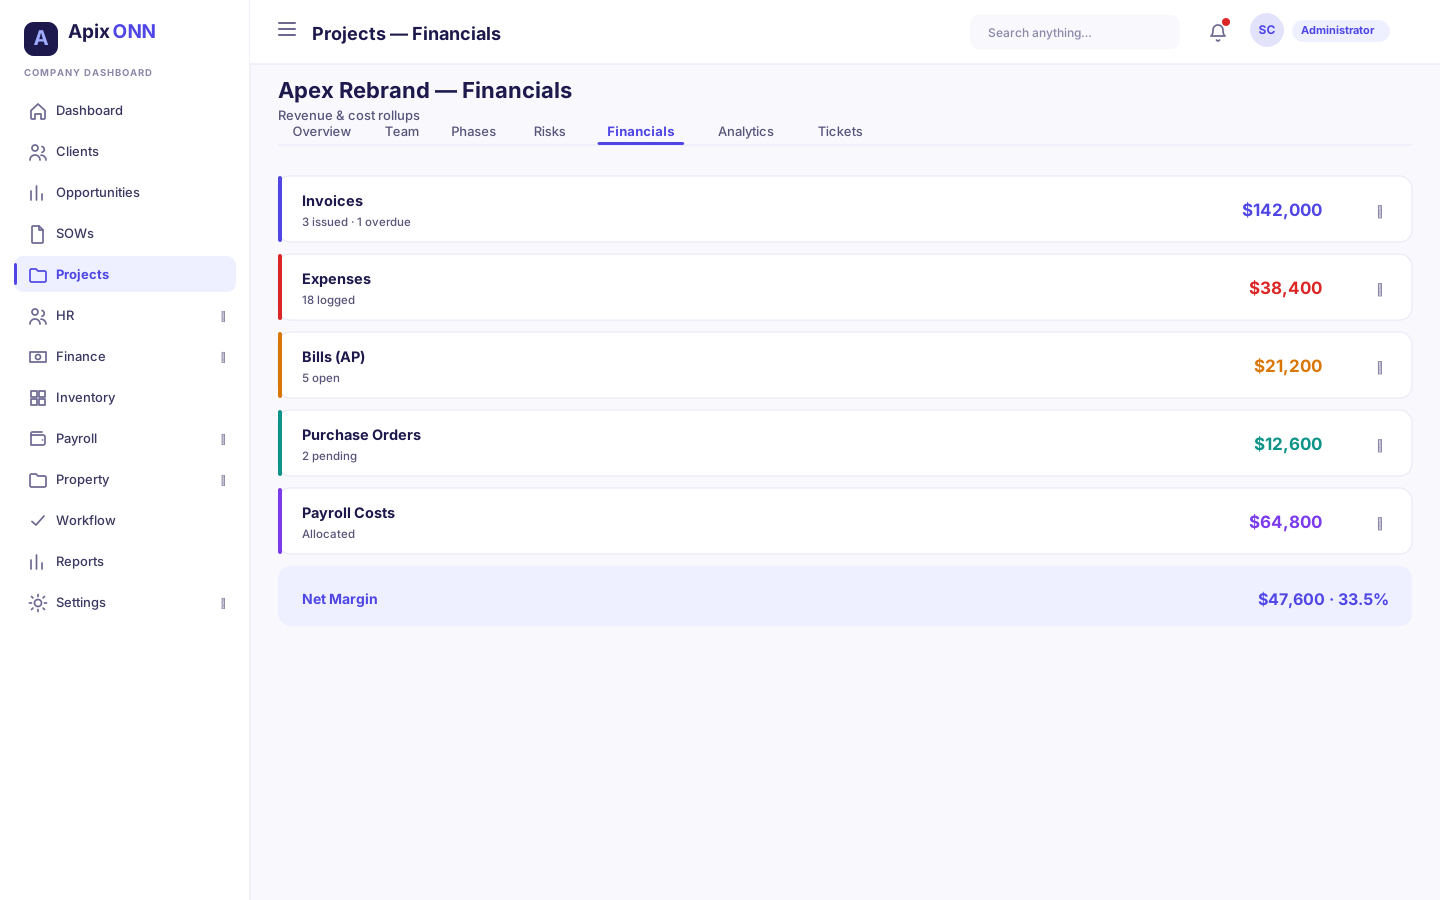
#Financials tab
Where to find it: open a project → Financials.
A read-only rollup of everything financial touching the project, pulled from across the system:
- Invoiced / Collected — what you've billed and received.
- Expenses — costs booked to the project.
- Bills — supplier bills against the project.
- PO Committed — money committed on purchase orders.
- Labor Costs — payroll cost of the people who worked on it.
Each section expands to show the underlying entries. Use it to see the true cost and margin picture in one place.
#Analytics tab
Where to find it: open a project → Analytics.
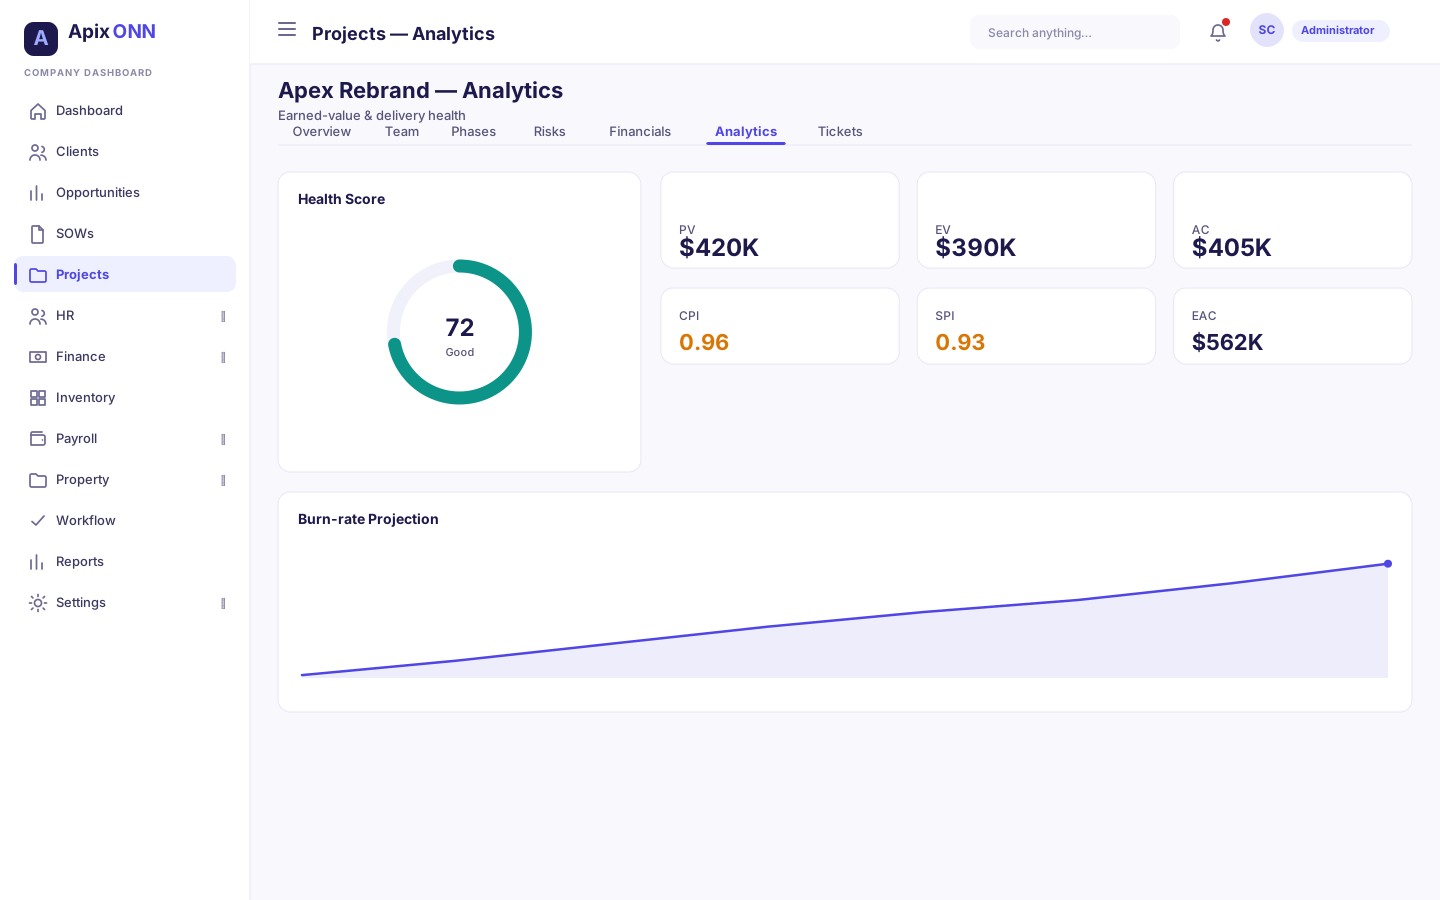
Analytics turns your project data into project-management metrics. It has four parts:
Project Health Score — an overall score out of 100, broken into Schedule, Cost, and Quality sub-scores, each shown as a bar. The status reads Healthy, At Risk, or Critical.
Earned Value Management (EVM) — the industry-standard way to see if you're on time and on budget:
| Metric | Plain meaning |
|---|---|
| Planned Value (PV) | The value of work you should have done by now |
| Earned Value (EV) | The value of work you've actually completed |
| Actual Cost (AC) | What you've actually spent |
| CPI (Cost Performance Index) | Above 1.0 = under budget; below 1.0 = over budget |
| SPI (Schedule Performance Index) | Above 1.0 = ahead of schedule; below 1.0 = behind |
| CV (Cost Variance) | EV minus AC — positive is good |
| SV (Schedule Variance) | EV minus PV — positive is good |
| EAC (Estimate at Completion) | Projected total cost if the trend continues |
Budget Burn Rate — your daily burn rate, remaining budget, days remaining, and a projected final cost. If the projection exceeds your budget, it tells you by how much.
Progress & Key Insights — timeline progress, work completed, and budget utilisation bars, plus plain-language alerts (cost overrun, schedule delay, nearing completion, or "on track").
Note: Why is Analytics empty or showing zeros? These numbers only appear once the project has (1) a budget set, (2) logged timesheet costs so there's actual cost to measure, and (3) an updated progress percentage and phase/milestone data so earned value can be calculated. A brand-new project with none of these will show little or nothing here — that's expected, not a bug.
#Approval tab
Where to find it: open a project → Approval.
Projects themselves go through an approval before they become active.
#When a new project needs approval
A project created in Planning status is automatically submitted for approval when you save it. The standard project creation workflow has two steps:
- PMO Review — a 72-hour service level.
- Finance Review — a 48-hour service level.
Once both steps are approved, the project's status changes to Active automatically. If it's rejected, it stays out of active delivery.
Note: Your administrator can change these steps under Settings → Workflows. A step set to Project manager goes to the person in the project's Project Manager field, so set that field on every project.
What you'll see on this tab:
- A status banner (Pending, In Progress, Approved, Rejected) with progress pills showing which step you're on.
- The approval history timeline.
- If you are the current approver, Approve and Reject buttons with a place to add comments.
- For older projects that never entered the workflow, a Submit for Approval button (shown only while the project is still in Planning).
Note: The Approval tab covers the project's own approval. Milestone approvals (payment, go-live, etc.) are tracked from the Phases tab and in your Workflow Inbox. Both are explained fully in the Workflow & Approvals guide.
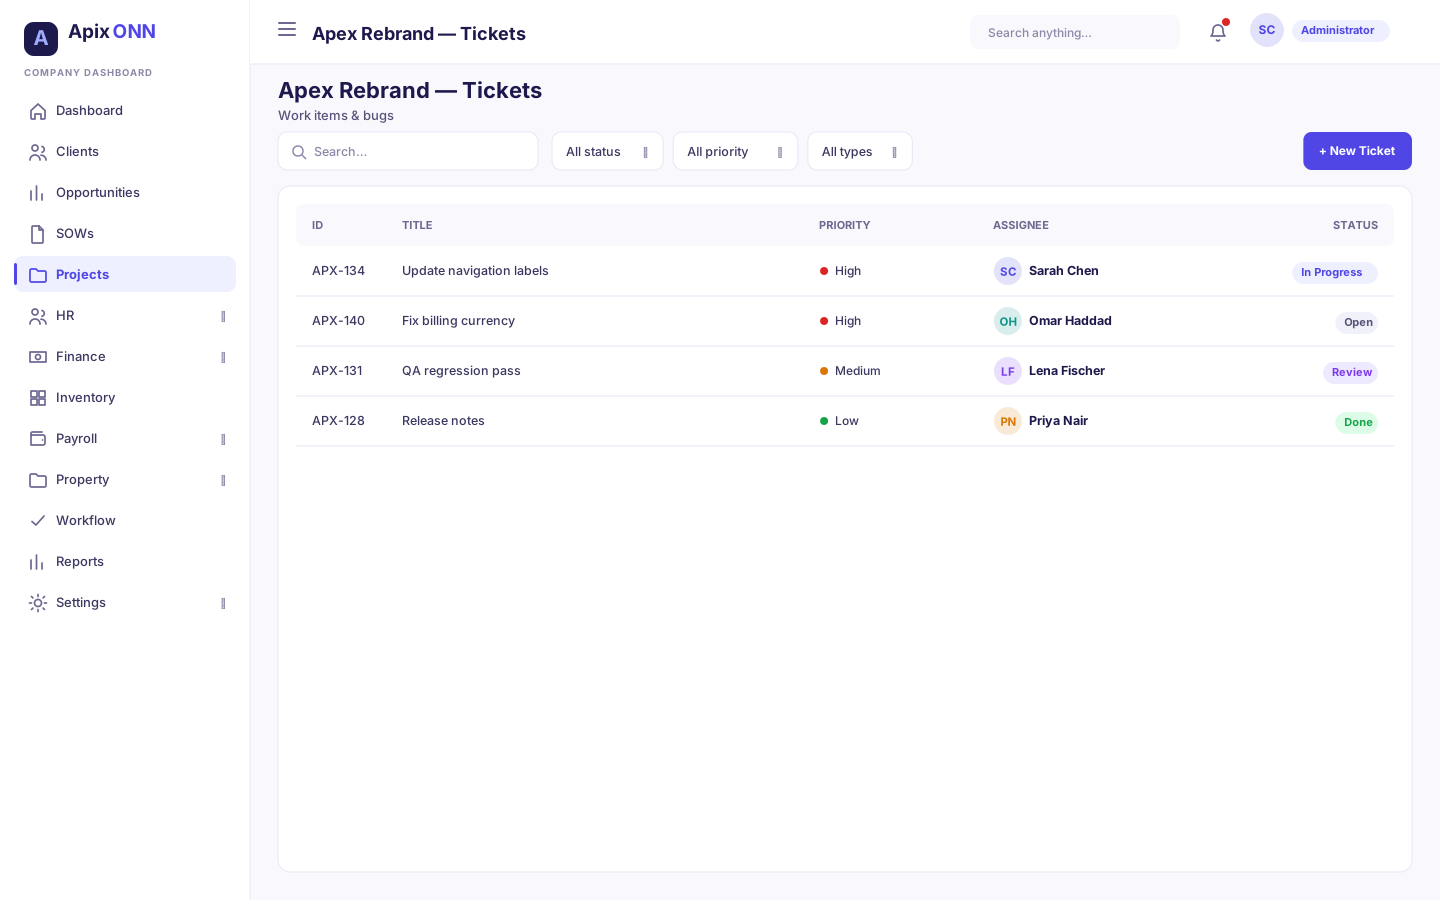
#Tickets tab
Where to find it: open a project → Tickets.
A lightweight issue/task tracker scoped to the project. Summary counts show in progress, blocked, and completed tickets, and overdue items are flagged.
What you can do here
- Search tickets by title or number.
- Filter by status, priority, and type.
- Open a ticket to see its details.
Use it to log defects, tasks, and blockers without leaving the project.
#Generate Invoice
Where to find it: open a billable project → Generate Invoice (top-right button).
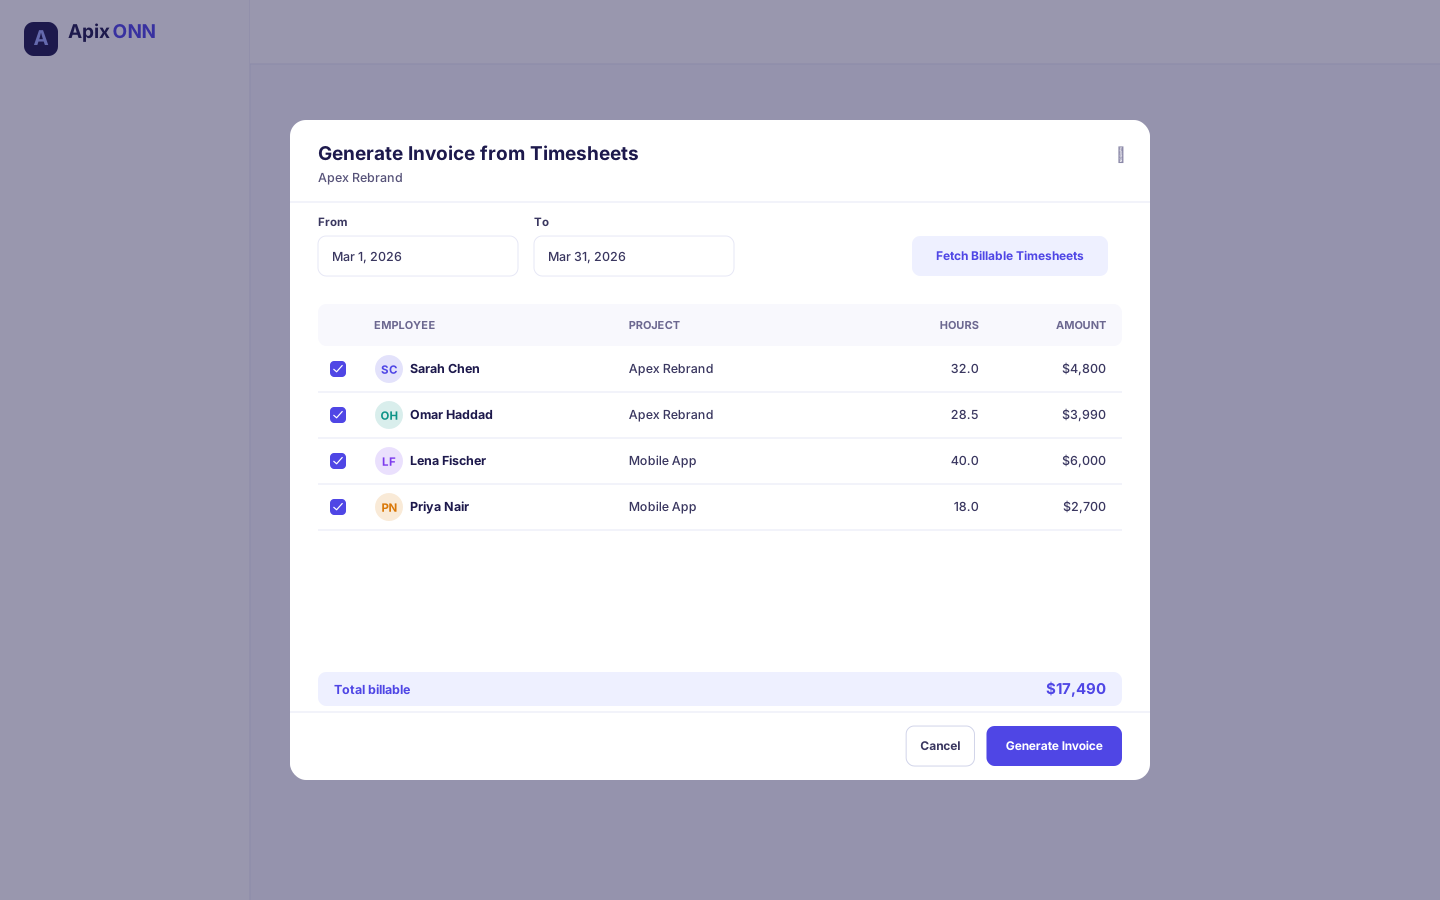
This turns approved billable timesheets into a client invoice. It's the main way Time & Material projects get billed.
#How to generate an invoice from timesheets
- Click Generate Invoice.
- Confirm the project and set the Period From and Period To dates.
- Click Fetch Billable Timesheets.
- Review the suggested line items — one per person, with billable hours, rate, and amount. All are ticked by default; untick any you don't want to bill.
- Optionally set a Due Date and add notes.
- Click Create Invoice. The total reflects only the lines you selected.
Note: Only approved, billable timesheet hours for the period appear here. If nothing shows up, check that the relevant timesheets were submitted and approved, and that the work was marked billable. Payment-milestone invoices are created a different way — see Payment milestones.
Tip: The Generate Invoice button only appears when the project is marked Billable. If you don't see it, edit the project and turn on Billable Project.
#Resources
The Resources menu (in the sidebar, below Projects) groups the people-planning tools that sit alongside project delivery: Allocations, Capacity Planning, Demands, ORF & Hiring, HR Requests, Document Requests, and Timesheets.
#Allocations
Where to find it: Resources → Allocations.
The company-wide view of who is allocated to what — the same allocations you see per-project on the Team tab, but across every project at once. The screen has three tabs: All Allocations, Capacity Planning (how loaded each person is), and Pending Approvals (allocations awaiting sign-off).
What you can do here
- Filter allocations by employee, project, or status.
- See utilisation across the team.
- Create and manage allocations centrally.
Allocation statuses are Planning, Active, Completed, and Cancelled. Some allocations require approval before they turn active — those appear in Planning with an approval badge.
Note: Resource Managers own this area. Team Leads and Project Managers typically request allocations for their people; approvals keep anyone from being double-booked.
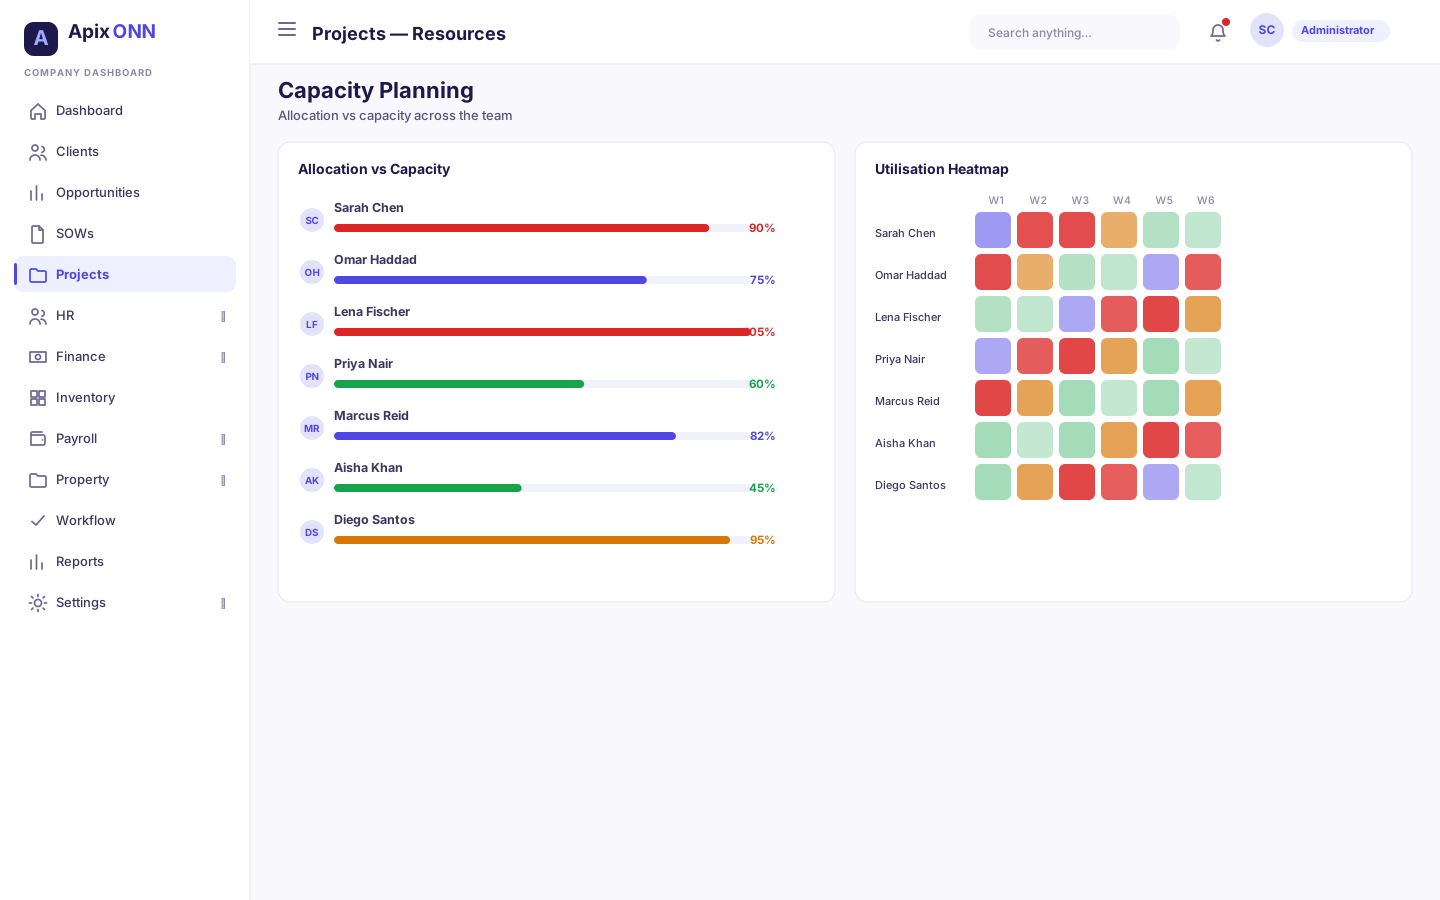
#Capacity Planning
Where to find it: Resources → Capacity Planning.
Shows each person's available capacity against what's already allocated, so you can staff new work without overloading anyone. Deeper views are available for forecasting, conflicts (over-allocations), scenarios (what-if planning), availability, and a heatmap of utilisation over time.
Tip: Check Capacity Planning before accepting a new demand or allocation — it's the fastest way to see who actually has room.
#Demands
Where to find it: Resources → Demands.
A demand is a request for a resource with a particular skill for a period — "I need a senior backend developer at 100% for three months." Summary cards show how many demands are open vs. fulfilled.
How to raise a demand
- Click Create (or New Demand). The Create New Demand form opens.
- Enter a Title (for example "Senior Backend Developer") and a Description of what's needed.
- Pick the Project the demand is for (required). Search by name or code; if the project doesn't exist yet, click + New project.
- Pick the Skill needed. If it isn't in your skills library, click + New skill.
- Choose the Proficiency Level (Beginner, Intermediate, Advanced, Expert) and the Priority (Low, Medium, High, Urgent).
- Set the Start Date and End Date, and optionally Hours per Week, Allocation %, and Notes.
- Click Create Demand.
Tip: You never type a project or skill ID — you pick them from searchable lists. The + New … buttons appear only if your role can create that kind of record. See Picking a record in a form.
Demand statuses are Open, Fulfilled, and Cancelled. A demand is fulfilled when someone is allocated against it.
#ORF & Hiring
Where to find it: Resources → ORF & Hiring.
An Open Requisition Form (ORF) is a formal request to hire when existing people can't meet a demand. Summary cards track how many are open, in progress, and filled.
How to open a requisition
- Click Create. The Create Open Requisition Form opens.
- Pick the Project and the Position to hire for from their searchable lists. If either doesn't exist yet, click + New next to it to create it on the spot.
- Enter the Required Count (how many people) and choose the Priority (Low, Medium, High, Urgent).
- Set the Start Date and End Date.
- Optionally add a Budget Code (for cost tracking) and a Justification.
- Under Skill Requirements, pick a Skill (or + New to create one), choose its Proficiency Level, and click + Add. Add at least one skill; use Remove to take one off.
- Optionally tick Automatically run AI matching after creation.
- Click Create ORF.
ORF statuses are Draft, Open, In Progress, Filled, and Cancelled. Requisitions typically route to HR and Finance for approval before hiring proceeds.
Note: Use a Demand when you want an existing employee's time; use an ORF when you need to hire someone new. Demands can escalate into ORFs when internal capacity runs out.
#HR Requests
Where to find it: Resources → HR Requests.
A place to raise and track HR-related requests connected to your resources and projects. Search by employee or request title to find a specific one. HR staff pick these up and action them.
#Document Requests
Where to find it: Resources → Document Requests.
Where you process the document requests your employees raise from their portal — letters, certificates, and similar — using your company's templates. (Employees start these requests in the Employee Portal; this admin screen is where you fulfil them, so there's no "new request" button here.)
How to process a request
- Open Document Requests and click Process on the request you're handling.
- Pick a template.
- Fill in the template's variables, then switch to Preview Document to check it.
- Generate the document to complete the request.
Each request has tabs for its overview, the document itself, signatures, and notes. You can also upload an external document against a request. Documents that need signing move through the signatures step.
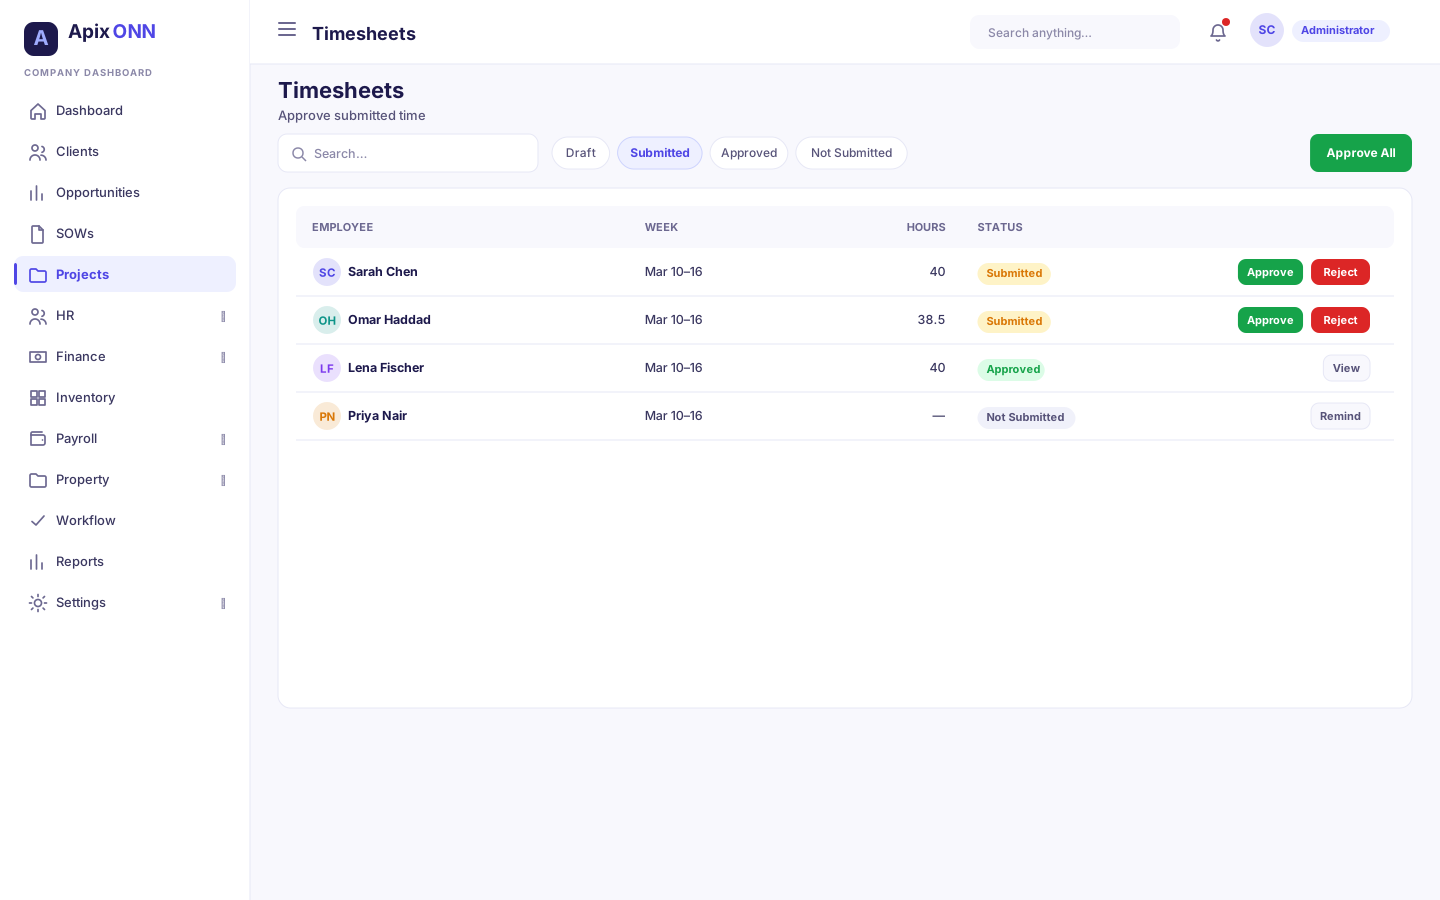
#Timesheets
Where to find it: Resources → Timesheets.
Where logged hours are reviewed and approved — the source of both project actual costs and billable invoices. You can filter people by timesheet status and search by name, number, or department.
Timesheet statuses are Draft, Submitted, Approved, and Not Submitted (no timesheet entered for the period). Approvers review submitted timesheets and approve or reject them.
Note: This matters for billing and analytics. Only approved billable hours can be pulled into an invoice via Generate Invoice, and timesheet costs are what feed the Actual Cost, burn rate, and EVM figures on the Analytics tab. Chase down Not Submitted and Submitted timesheets promptly so your project numbers stay accurate.
#Tips & FAQ
- My project is stuck in Planning. New projects wait on the two-step PMO → Finance approval before going Active. Open the Approval tab to see which step it's on and who owns it.
- I can't complete a phase. It has unfinished milestones. The error lists them by name — resolve those first.
- The Complete button says "Submit." That milestone requires approval (payment, approval, go-live, or critical). Submitting sends it for sign-off; it completes only after approval.
- My payment milestone didn't create an invoice. Make sure Auto-generate invoice on approval was ticked before you submitted, and that the milestone was approved. The result is a draft invoice in Finance → Invoices, not a sent one.
- Analytics is blank. Set a budget, log and approve timesheets, and update progress — the metrics need all three.
- No Generate Invoice button. The project isn't marked Billable. Edit it and turn that on.
- A "Project manager" approval went to the wrong person. It goes to whoever is in the project's Project Manager field. Edit the project and set the right person.
- I can only view, not edit. Editing, creating, and approving are permission-based. Roles like Employee, Consultant, Contractor, and Read Only are view-only; ask an Admin or your Project Manager if you need more access.