HR
The HR area is where you manage people from hire to exit: employee records, employment contracts and pay, salary grades, leave and attendance, org structure, benefits, skills, and performance reviews. HR staff and admins spend most of their day here, while managers and employees touch smaller slices of it (requesting leave, uploading documents, running reviews).
Company Dashboard21 min read17 sections
On this page17 sections
- Employees (directory)
- Employee profile & tabs
- Contracts (the employee's employment contracts)
- Contract templates
- Grades
- Upgrade Grade (promotions)
- Leaves
- Attendance
- Departments
- Positions
- Job Titles
- Org Chart
- Benefits
- Skills (skills matrix)
- Performance & Evaluations
- Employee Documents & Document Requests
- Related screens
Everything below lives under the HR menu in the left sidebar unless noted otherwise. Access to each screen is controlled by permissions tied to your role, so if a menu item or button doesn't appear, your role probably isn't cleared for it — ask a Super Admin or Admin to adjust your access.
Note: Roles named throughout this guide are the 13 standard roles (Super Admin, Admin, HR Manager, Finance Manager, Payroll Manager, Project Manager, Team Lead, Accountant, Resource Manager, Employee, Consultant, Contractor, Read Only). Day-to-day HR administration is normally handled by HR Manager, Admin, and Super Admin. Read Only users can view but never change anything.
#Employees (directory)
Where to find it: HR → Employees
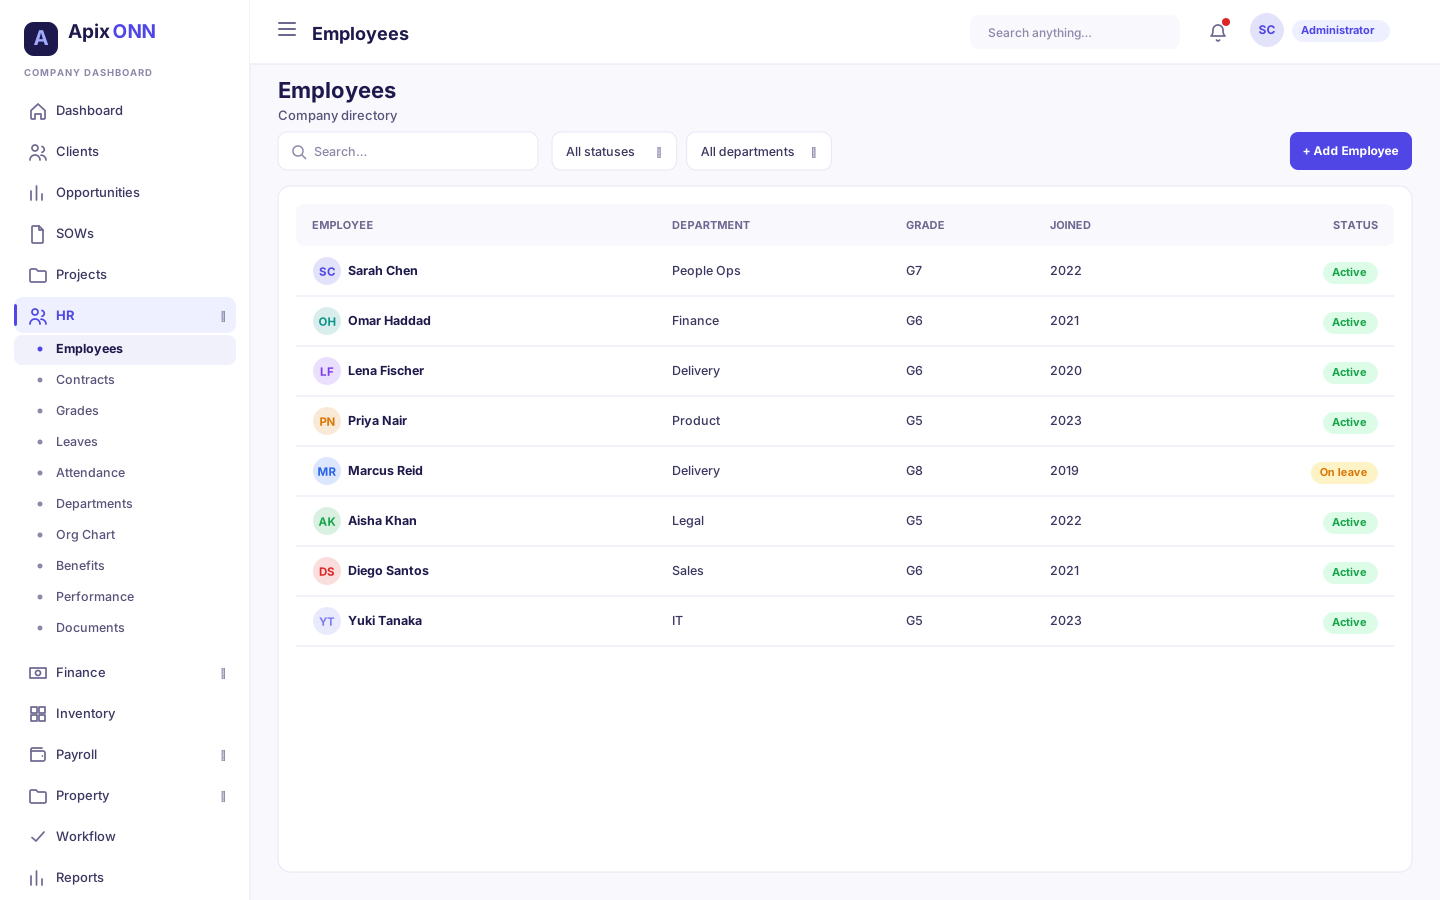
The employee directory is the master list of everyone in your company. It's the starting point for opening a person's profile, adding a new hire, or making quick edits.
#What you can do here
- Search people by name, email, or employee number.
- Filter the list by status (Active, Inactive, Terminated).
- Open any person's full profile.
- Add a new employee.
- Quick-edit or delete an employee.
#How to find an employee
- Go to HR → Employees.
- Type a name, email, or employee number into the search box.
- Optionally choose a status from the All Status dropdown to narrow the list.
- Click the person's row, or click View Details, to open their profile.
#How to add a new employee
- Click Add Employee (top right).
- Fill in the Personal Information section (first name, last name, email are required).
- In Employment Details, choose a Branch — this is the only required field here.
- Optionally set Department, Position, Grade, and Job Title. Choosing a department filters the Position list to that department.
- Set Employment Type, Status, and Hire Date.
- Click Create Employee.
Tip: Adding someone here creates their HR record only. It does not give them a login. Portal or seat access is granted separately (see Access & login below).
#Field guide — Add / Edit employee
| Field | What it means | Notes |
|---|---|---|
| First / Last name | The person's legal name | Required |
| Work email; also used if you later grant them a login | Required, must be unique | |
| Phone | Contact number | Optional |
| Branch | Which company location they belong to | Required |
| Department | The team they sit in | Optional; drives which Positions appear |
| Position | Their role within the department | Optional |
| Grade | Their salary grade (drives pay range and leave entitlements) | Settable when adding; on an existing employee it's read-only — change it with Upgrade Grade |
| Job Title | Their public-facing title | Optional |
| Employment Type | Full Time, Part Time, Contract, or Intern | Required |
| Status | Active, Inactive, or On Leave when creating | Required |
| Hire Date | The day they started | Required |
#Statuses
| Status | What it means |
|---|---|
| Active | Currently employed and working |
| Inactive | On the books but not currently active (e.g. suspended) |
| On Leave | Away on approved leave |
| Terminated | Employment has ended (only settable when editing an existing employee) |
#Tips & FAQ
- Why can't I see the Add button? You need the employee create permission — typically HR Manager, Admin, or Super Admin.
- Deleting vs terminating: Deleting removes the record entirely and asks for confirmation. To reflect a departure while keeping history, set the status to Terminated instead (see below).
- Who to contact: HR Manager for data corrections, Admin/Super Admin for access issues.
#Employee profile & tabs
Where to find it: HR → Employees → click a person
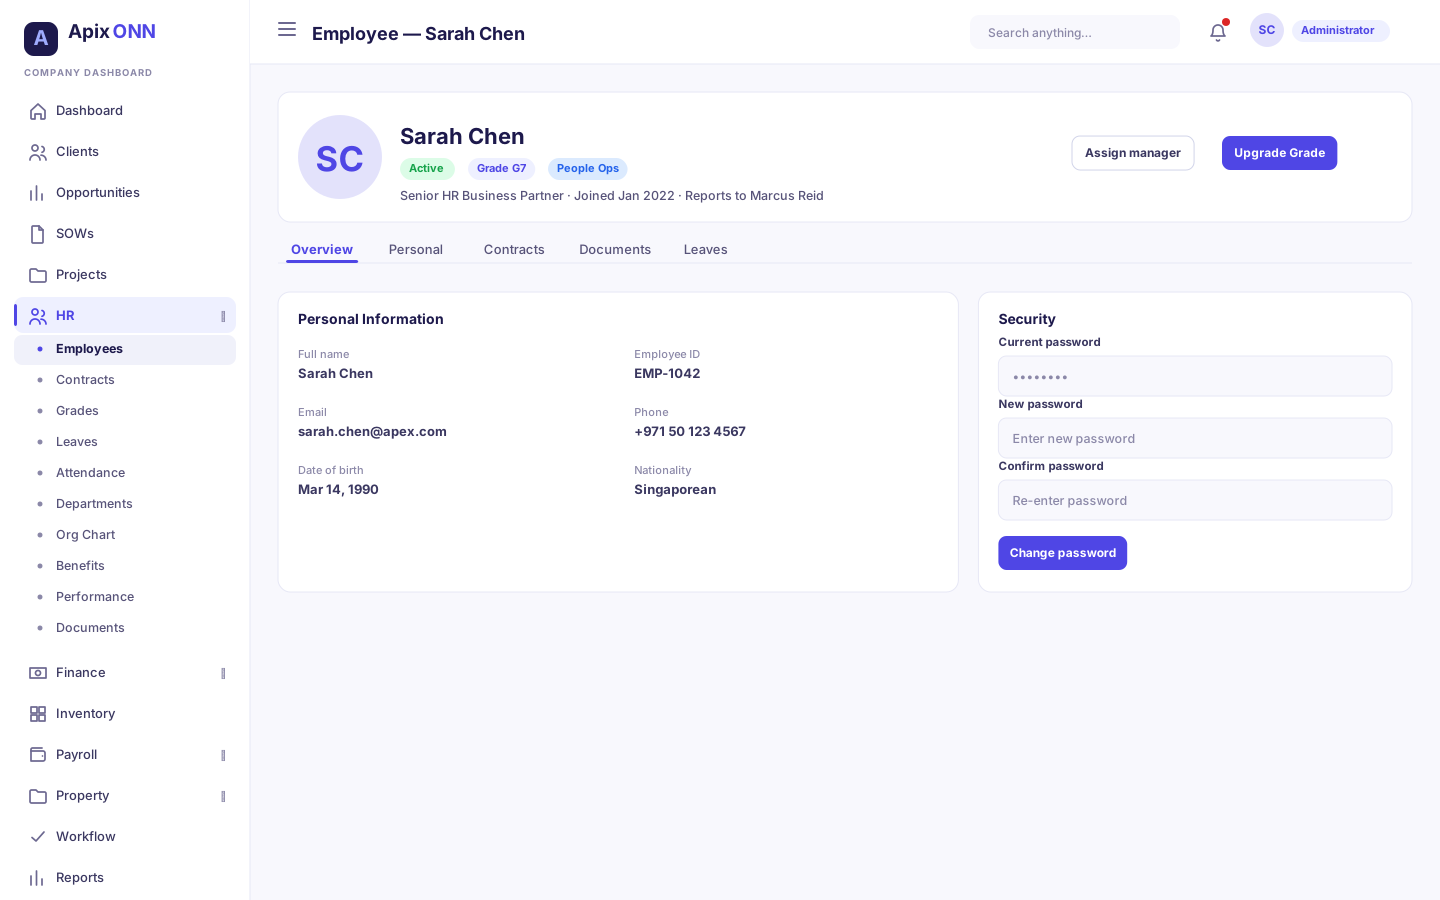
The profile is the single view of everything about one employee. The header shows their name, status badge, access badge (Seat or Portal user), employee number, position, department, email, and manager. Two header actions sit on the right: Upgrade Grade and Back.
#The tabs
| Tab | What it shows |
|---|---|
| Overview | Key metrics (employment type, tenure, active projects, leave balance) plus personal info, employment details, current contract, and current project allocations |
| Contracts | The employee's employment contracts and all contract actions (assign, amend, renew, terminate, activate) |
| Documents | Uploaded documents and document requests |
| Benefits | Benefit enrollments for this person |
| Allocations | Which projects they're allocated to and at what percentage |
| Leave & Attendance | Their leave history and attendance records |
| Skills | The skills this person has, with proficiency and years of experience — see The Skills tab |
| Performance | Their evaluation history and ratings — see The Performance tab |
#The Skills tab
Where to find it: HR → Employees → open a person → Skills
Record what the person can do, so they show up in skills searches and resource planning. The table lists each skill with its Category, Proficiency, and Experience, and a Primary badge on their main skills.
How to add a skill to an employee
- Open the employee's profile and select the Skills tab.
- Under Add a skill, search for the Skill. If it isn't in your skills library yet, click + New skill to create it on the spot.
- Choose the Proficiency — Beginner, Intermediate, Advanced, or Expert.
- Optionally enter the Years of experience.
- Tick Primary skill if it's one of their main skills.
- Click Add Skill.
To update a skill, click Edit on its row (or pick a skill they already have — it's marked "Has it"), change the values, and click Update Skill. To remove one, click Remove and confirm.
Note: Adding, editing, and removing skills needs permission to edit skills. Without it, you see the list but not the form.
#The Performance tab
Where to find it: HR → Employees → open a person → Performance
Shows the employee's evaluation history at a glance. Summary cards give the number of Evaluations, their Average performance (out of 5, with the change since their first review), their Talent segment, and Goals completed. The latest 9-Box Rating card shows where they sit on the Nine-Box.
Under Evaluation History, each evaluation is a card with the cycle name, its period, the Performance, Potential, and Overall score ratings, the Recommendation, and who reviewed it and when. Click View details & goals to see strengths, areas for improvement, reviewer comments, and goals.
If the person hasn't been in an evaluation cycle yet, the tab says "No evaluations yet". Launch a cycle under HR → Performance (see Performance & Evaluations).
#How to assign or change a manager
- Open the employee's profile.
- Next to Manager, click Assign.
- Search for a person by name or number, or choose No manager.
- Click Save.
Note: Manager relationships feed the Org Chart and route approvals for things like leave and grade changes.
#How to edit an employee's core details
- From HR → Employees, click Edit on the person's row (or use the directory quick action).
- Update the fields you need — the edit form adds Terminated as a Status option. (Grade is read-only here; change it with Upgrade Grade.)
- Click Update Employee.
#Access & login (Portal vs Seat)
Employees can optionally be given a login. A Portal user gets limited self-service access; a Seat user gets a full paid seat. The header badge tells you which (if any) applies. Granting, upgrading, downgrading, or deactivating access is an admin action — typically handled by Admin or Super Admin. Creating an employee never automatically creates a login.
#Contracts (the employee's employment contracts)
Where to find it: HR → Employees → open a person → Contracts tab
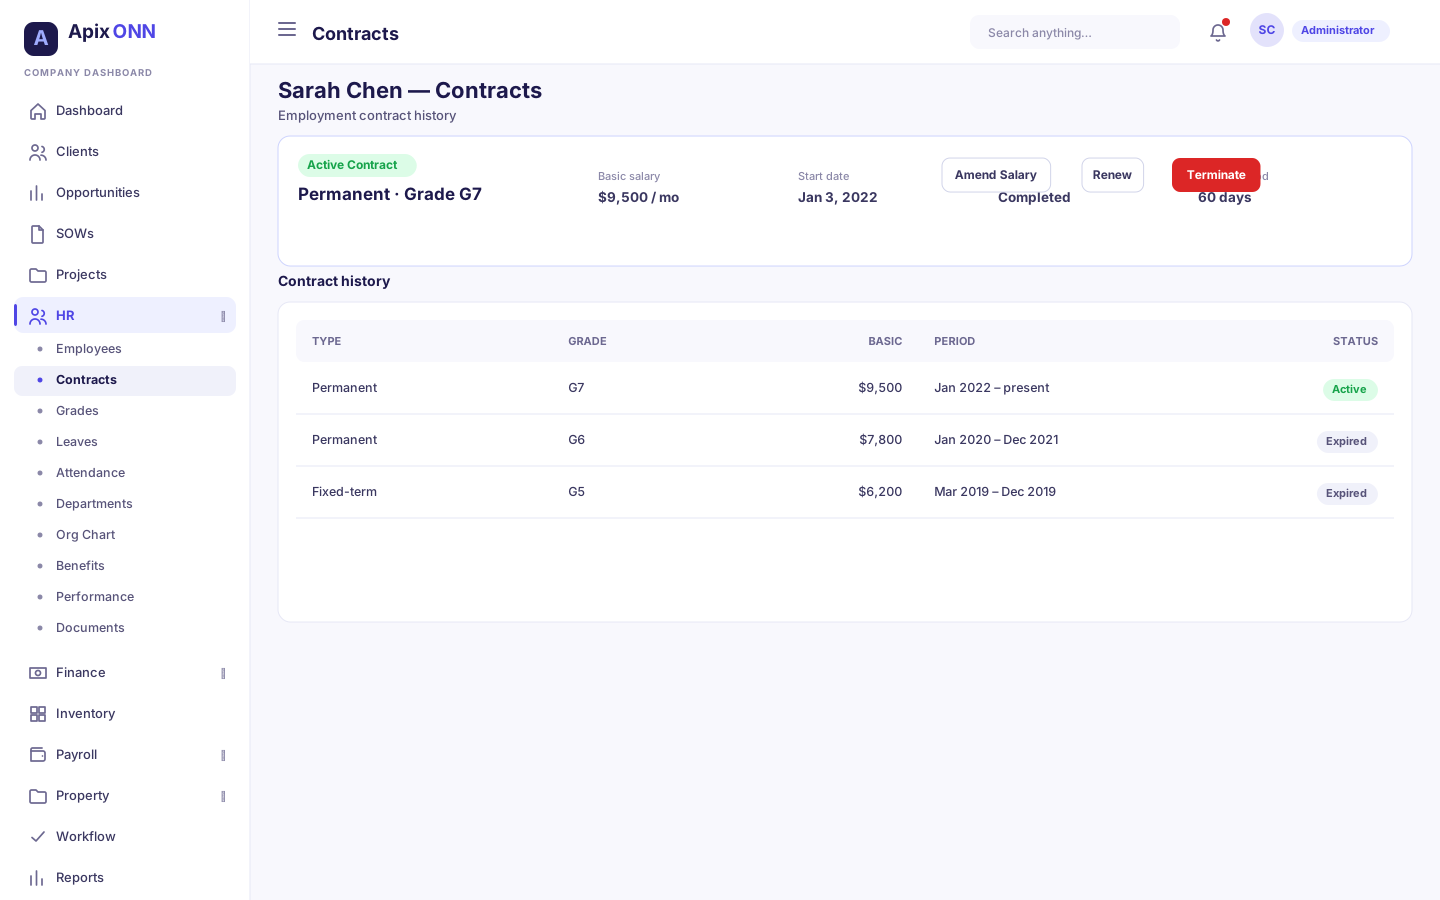
This is where an individual's real employment contracts live — the documents that define their pay and term. (The Contract Templates item in the HR sidebar is for reusable templates; see Contract templates below.)
#What you can do here
- See the active contract summarized at the top (number, total salary, start/end dates).
- View every contract the employee has had, with a full salary breakdown.
- Assign a new contract.
- Amend salary, renew, terminate, or activate a contract.
#How to assign a contract
- On the Contracts tab, click Assign Contract.
- Choose a Grade — the grade sets the allowed salary range.
- Choose a Contract Template (the list is filtered to templates for that grade).
- Set the Start Date and, if the contract is time-limited, an End Date.
- Enter the Salary Breakdown: Basic Salary (required) plus optional Housing, Transport, Food, and Other allowances.
- Watch the Total Salary box — it must fall within the grade's range, or the form will flag "Outside grade range" and the Assign Contract button stays disabled.
- Click Assign Contract.
#Field guide — Assign contract
| Field | What it means | Notes |
|---|---|---|
| Grade | Salary band this contract belongs to | Required; controls the valid total-pay range |
| Contract Template | The pre-built terms (type, duration, probation, notice) | Required; only templates for the chosen grade appear |
| Start Date | When the contract begins | Required |
| End Date | When it ends | Leave blank for an indefinite contract |
| Basic Salary | Core monthly pay | Required |
| Housing / Transport / Food / Other allowances | Additional pay components | Optional; all roll into Total Salary |
#Contract lifecycle & statuses
| Status | What it means | What you can do |
|---|---|---|
| Draft | Created but not yet in force | Activate |
| Pending | Awaiting activation | Activate |
| Active | Currently in force | Amend Salary, Renew, Terminate |
| Expired | Passed its end date | Activate (re-activate it) |
| Terminated | Ended early | (No further actions) |
Contract types you'll see: Permanent, Fixed Term, Temporary, and Internship (templates also support Probation and Consultant types).
#How to amend salary
- On an Active contract, click Amend Salary.
- Enter the new salary breakdown; the modal shows Current Total, New Total, and the Difference.
- Set an Effective Date and a Reason (both required).
- Click Amend Salary.
Note: Salary amendments are approval-gated. Submitting sends the change for approval; the new pay takes effect only once it's approved. You'll see "Amendment submitted for approval."
#How to renew a contract
- On an Active contract, click Renew.
- Enter a New End Date (must be after the current end date).
- Choose a Renewal Type — Manual or Automatic.
- Click Renew Contract.
#How to terminate a contract
- On an Active contract, click Terminate.
- Set the Termination Date (cannot be later than the scheduled end date).
- Enter a Reason (at least 10 characters).
- Click Terminate Contract.
Warning: Terminating a contract ends it before its scheduled end date and cannot be undone. Use it for resignations, mutual agreements, or performance exits.
#How to activate a contract
For a Draft or Pending contract, click Activate and confirm. Activating a new contract is also part of what happens automatically during a grade upgrade (see Grades).
#Tips & FAQ
- Why is Amend/Renew/Terminate missing? Those actions only appear on the Active contract. Draft, Pending, and Expired contracts show Activate instead.
- Salary changes touch payroll — expect Finance Manager or Payroll Manager to be part of the approval chain.
#Contract templates
Where to find it: HR → Contract Templates
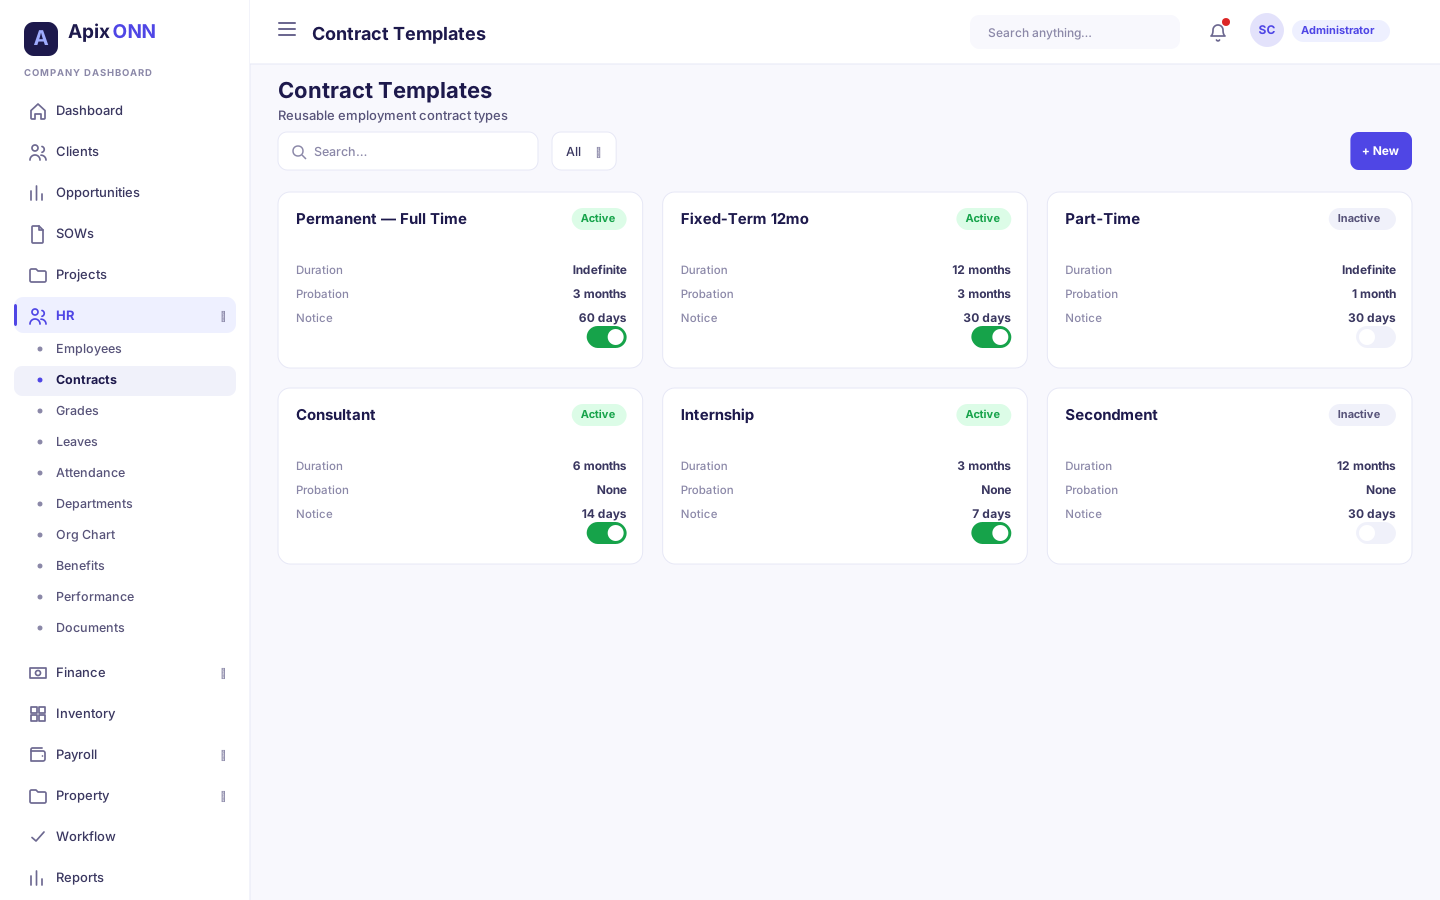
Templates are reusable contract blueprints tied to a grade. When you assign a contract to an employee you pick one of these, so setting them up first saves time and keeps terms consistent.
#What you can do here
- Filter templates by type and status.
- Create, edit, activate/deactivate, or delete a template.
#How to create a contract template
- Go to HR → Contract Templates and click Create Template.
- Enter a Code and Template Name.
- Choose the Grade it applies to and the Type (Permanent, Fixed Term, Probation, Internship, or Consultant).
- Optionally set Duration, Probation, and Notice Period (Duration only appears for non-permanent types).
- Toggle Auto Renew and Active as needed.
- Click Create Template.
#Field guide — Contract template
| Field | What it means | Notes |
|---|---|---|
| Code | Short identifier, e.g. a full-time grade code | Required |
| Template Name | Human-friendly name | Required |
| Grade | Which salary grade this template is for | Required; determines where it appears during assignment |
| Type | Permanent, Fixed Term, Probation, Internship, Consultant | Required |
| Duration (months) | Default length | Shown only for non-permanent types |
| Probation (months) | Probation length | Optional |
| Notice Period (days) | Required notice to end the contract | Optional |
| Auto Renew | Renew automatically at end of term | Optional |
| Active | Whether it can be used when assigning contracts | Inactive templates are hidden from assignment |
Tip: Deactivate an old template instead of deleting it if any employees are on contracts created from it — this keeps your list tidy without losing history.
#Grades
Where to find it: HR → Grades
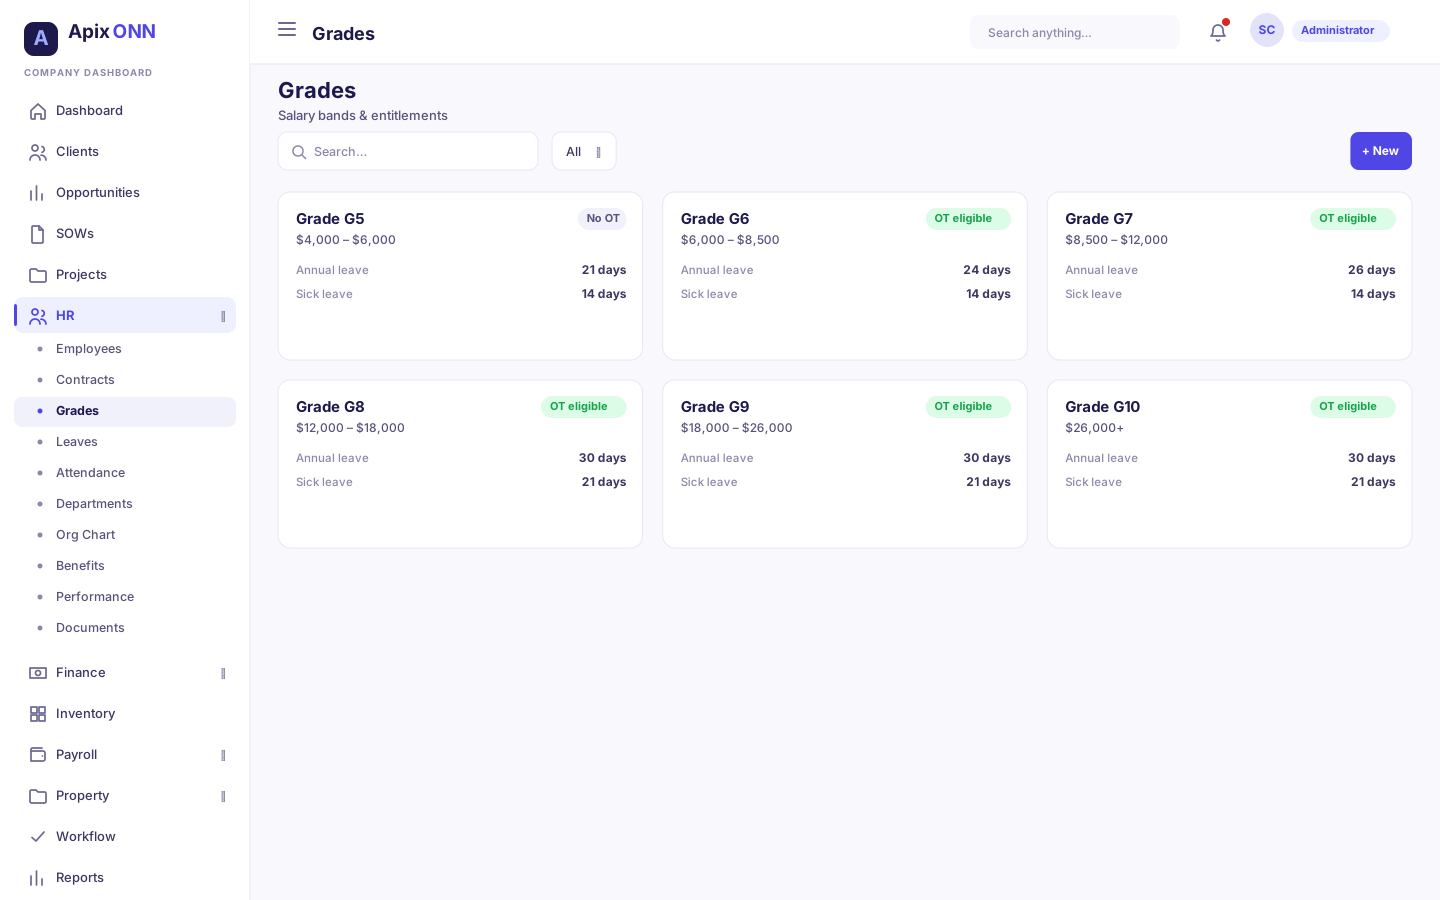
Grades are your salary bands. Each grade sets a pay range plus default leave entitlements and working hours, and it's the backbone of contracts, pay validation, and leave balances.
#What you can do here
- View all grades as cards with their salary range and benefits at a glance.
- Open a grade to see its full salary breakdown.
- Create, edit, or delete a grade.
#How to create a grade
- Go to HR → Grades and click Create Grade.
- Enter a Code, Name, and optional Description.
- Set the Minimum and Maximum Salary (max must be greater than min).
- Optionally set Annual, Sick, and Emergency Leave days.
- Optionally set Weekly and Daily Hours.
- Set Sort Order, and toggle Overtime Eligible and Active.
- Click Create Grade.
#Field guide — Grade
| Field | What it means | Notes |
|---|---|---|
| Code / Name | Grade identifier and label | Both required |
| Min / Max Salary | The pay band | Contracts on this grade must total within this range |
| Annual / Sick / Emergency Leave (days) | Default leave entitlements | Feed the employee's leave balances |
| Weekly / Daily Hours | Standard working hours | Optional |
| Overtime Eligible | Whether people on this grade can earn overtime | Optional |
| Sort Order | Controls display order | Optional |
| Active | Whether the grade can be used | Optional |
Note: Because grades drive pay ranges and leave, changing a grade's numbers affects future contracts and balances — coordinate with Finance Manager/Payroll Manager before editing.
#Upgrade Grade (promotions)
Where to find it: HR → Employees → open a person → Upgrade Grade (header button)
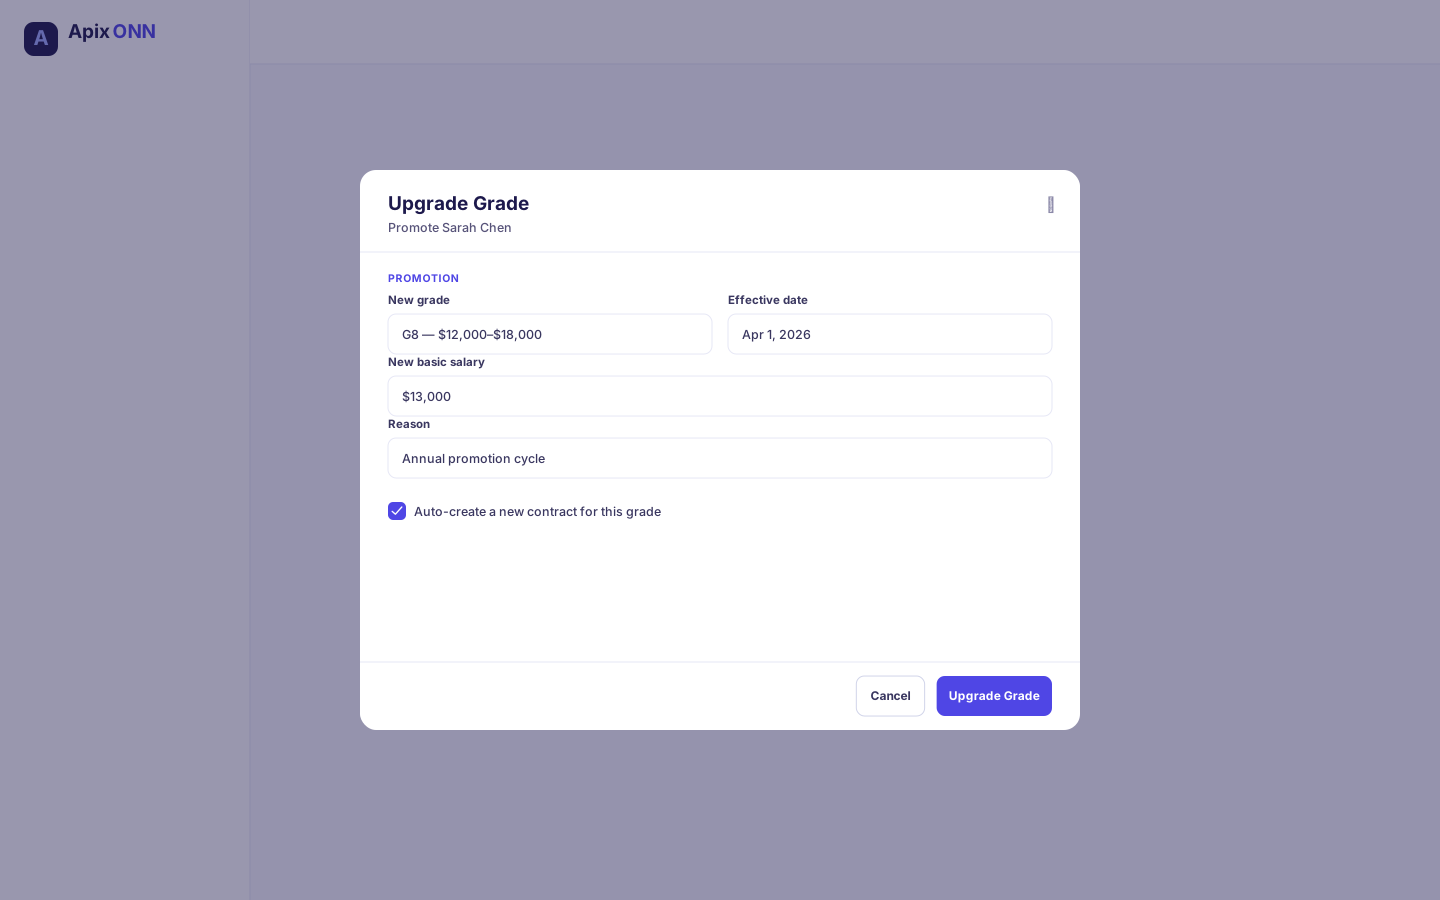
Use this to move an employee to a new grade, e.g. for a promotion.
#How to upgrade a grade
- Open the employee's profile and click Upgrade Grade.
- Choose the New Grade (their current grade is excluded from the list). A preview shows the new salary range, annual leave, and overtime multiplier.
- Set an Effective Date and an optional Reason.
- Leave Auto-create new contract ticked (default) to have the system handle the contract switch, or untick it to keep the current contract.
- Click Upgrade Grade.
Important: With Auto-create new contract on, the upgrade terminates the current contract and creates a new one based on the new grade's salary structure. You can adjust the new salary afterward. The grade change is approval-gated — it's submitted for approval and takes effect (and regenerates the contract) only once approved.
#Tips & FAQ
- Nothing changed after I clicked Upgrade Grade. That's expected — the change is pending approval. It applies once an approver signs off.
- Grade upgrades usually involve HR plus a Finance/Payroll approver because pay changes.
#Leaves
Where to find it: HR → Leaves
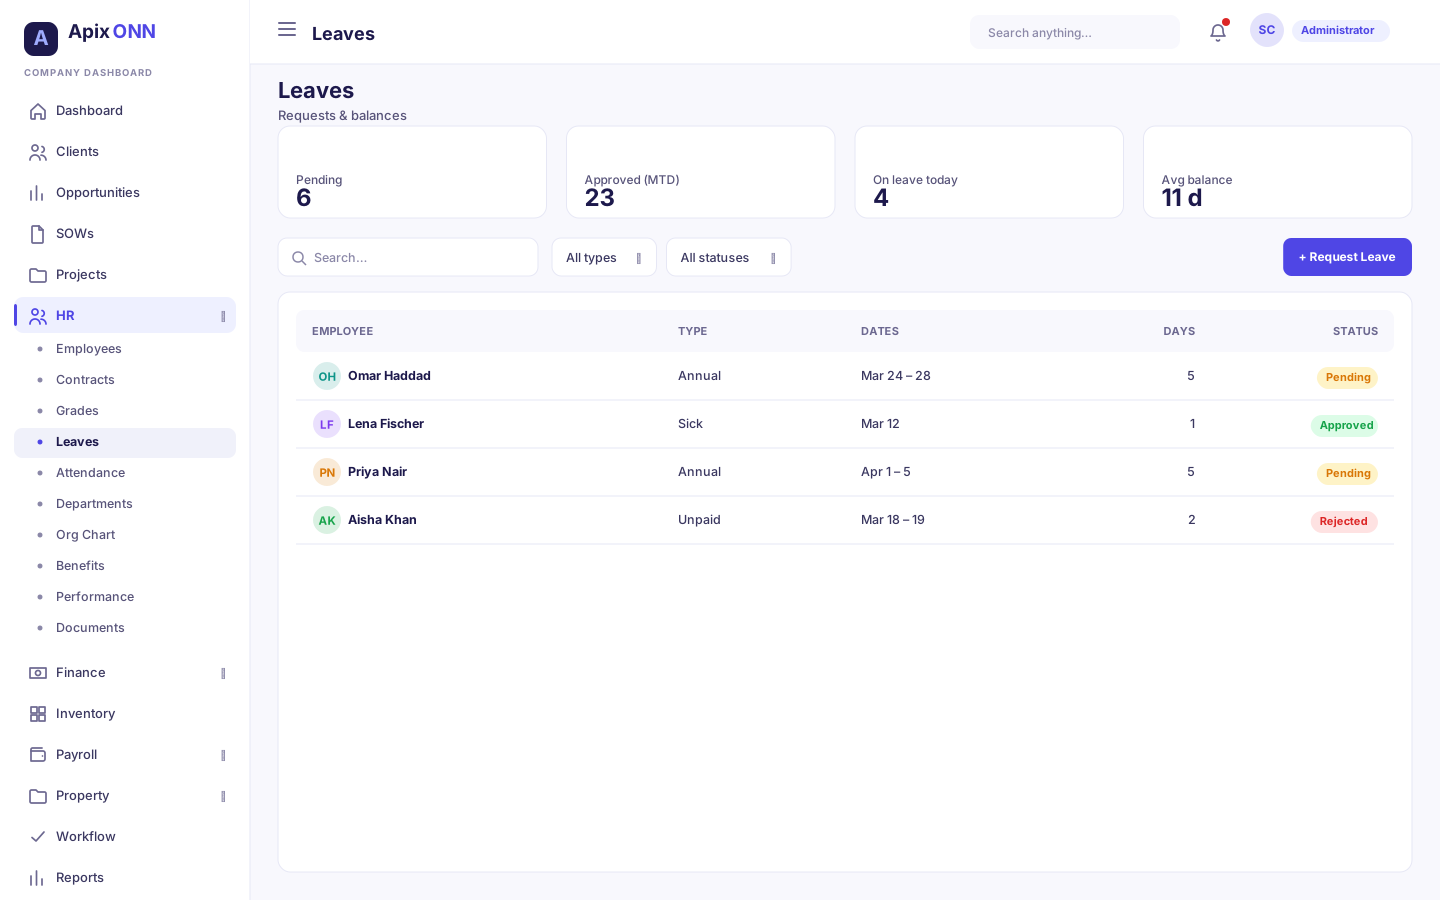
Track time off: request leave, watch balances, and cancel a pending request. Approvals happen in the Workflow Inbox, not on this screen.
#What you can do here
- See remaining leave balances by type (remaining, total, and used days).
- Request leave.
- Filter and search requests.
- Cancel a pending request.
- Assign a replacement for an approved leave.
#How to request leave
- Go to HR → Leaves and click Request Leave.
- Choose a Leave Type (the dropdown shows how many days are available for each).
- Set the Start Date and End Date.
- Add a Reason (optional, up to 500 characters).
- Click Submit Request.
#Field guide — Leave request
| Field | What it means | Notes |
|---|---|---|
| Leave Type | Annual, sick, emergency, etc. | Available types and days come from the employee's grade |
| Start / End Date | The leave period | End can't be before start; both must be today or later |
| Reason | Why you're taking leave | Optional |
#Statuses
| Status | What it means | Available action |
|---|---|---|
| Pending | Awaiting approval | Requester can Cancel |
| Approved | Granted | Assign a Replacement |
| Rejected | Declined by an approver | — |
| Cancelled | Withdrawn before approval | — |
#How leave gets approved
Leave isn't approved on this screen. A submitted request routes into the Workflow Inbox, where the assigned approver (typically HR Manager, Team Lead, or Admin) approves or rejects it. On the Leaves screen the only row action is Cancel on a pending request (for the requester); once a request is actioned in the inbox, its status here updates to Approved or Rejected.
Tip: Leave types and starting balances are derived from each person's Grade. If someone's balance looks wrong, check their grade's leave entitlements first.
#Tips & FAQ
- I don't see Approve/Reject here. That's expected — leave approvals are actioned from the Workflow Inbox, not the Leaves screen. This screen is for requesting leave and tracking its status.
- Assign Replacement appears only on Approved leaves — use it to name who covers the person while they're out.
#Attendance
Where to find it: HR → Attendance
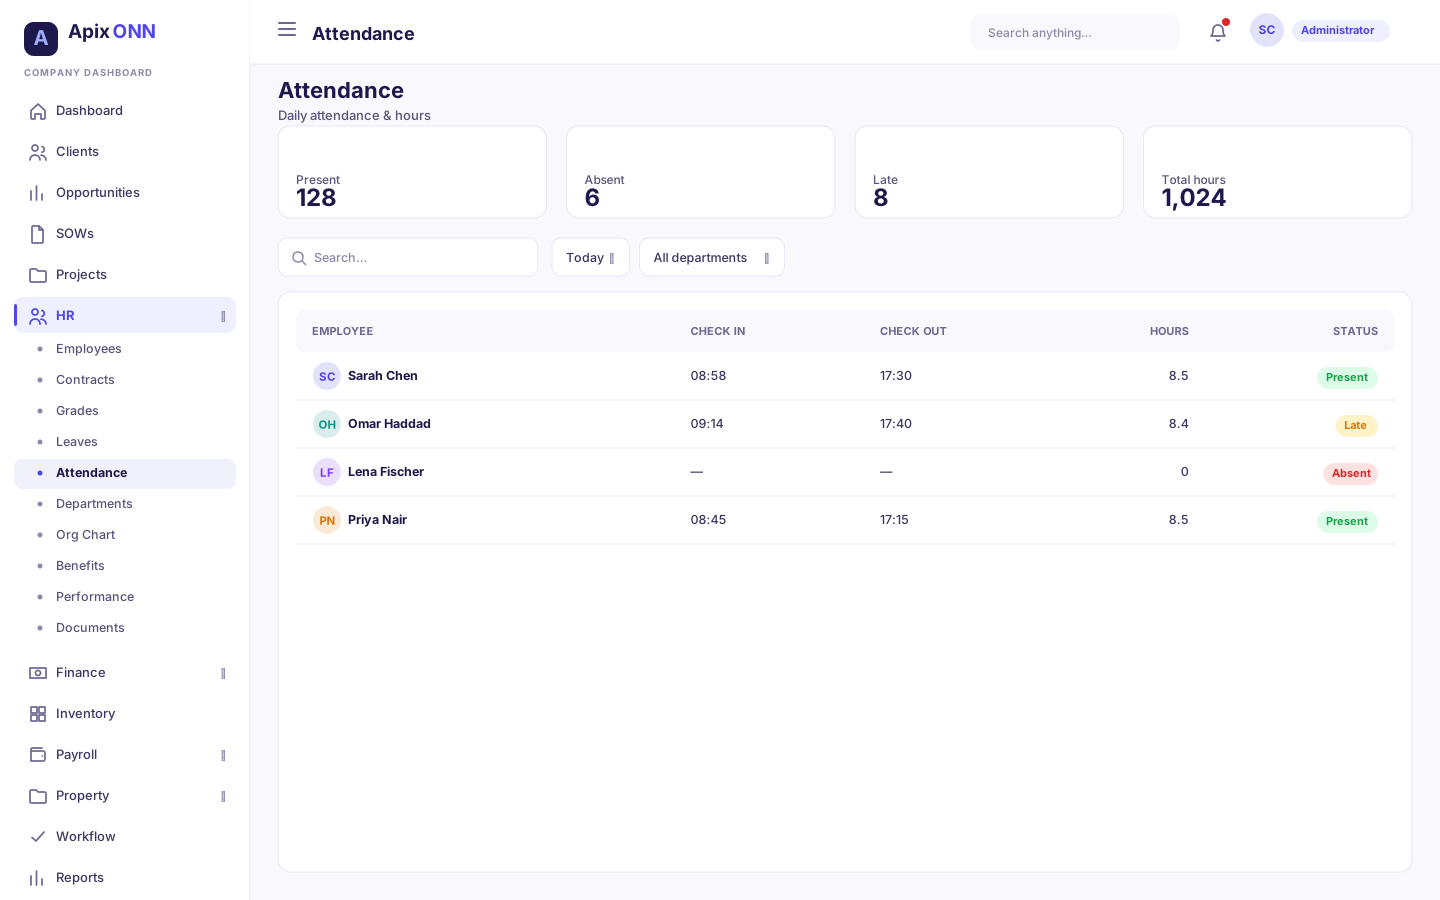
Record and review daily attendance — clock-ins, clock-outs, worked hours, and exceptions like late or absent.
#What you can do here
- See a daily summary (total employees, present, absent, late, total hours) when viewing a single day.
- Filter by employee, date range, and status.
- Check an employee in or out.
- Add or edit a manual attendance entry.
- Bulk-import attendance.
- Edit or delete a record.
#How to check an employee in or out
- Click Check In / Out.
- Use the toggle to pick Check In or Check Out.
- Select the Employee.
- Optionally add a Location and Notes.
- Confirm.
#How to add a manual attendance entry
- Click Manual Entry.
- Choose the Employee and Date.
- Enter Clock In / Clock Out times and set the Status.
- Optionally enter worked, break, and overtime minutes and Notes.
- Save. Manually entered records are flagged manual in the table.
#How to bulk-import attendance
Click Bulk Import and follow the prompts to upload multiple records at once — useful after an offline period or when migrating from another system.
#Statuses
| Status | What it means |
|---|---|
| Present | Worked a normal day |
| Absent | Did not attend |
| Late | Arrived late |
| Half Day | Worked part of the day |
| On Leave | Away on approved leave |
| Weekend / Holiday | Non-working day |
#Field guide — Manual entry
| Field | What it means | Notes |
|---|---|---|
| Employee / Date | Who and when | Required |
| Clock In / Clock Out | Start and end times | Optional but recommended |
| Status | Present, absent, late, etc. | Required |
| Worked / Break / Overtime minutes | Time accounting for the day | Optional; overtime respects grade eligibility |
| Notes | Free text | Optional |
#Departments
Where to find it: HR → Departments
Departments are the teams that structure your company. Each can have a department head and shows how many people belong to it.
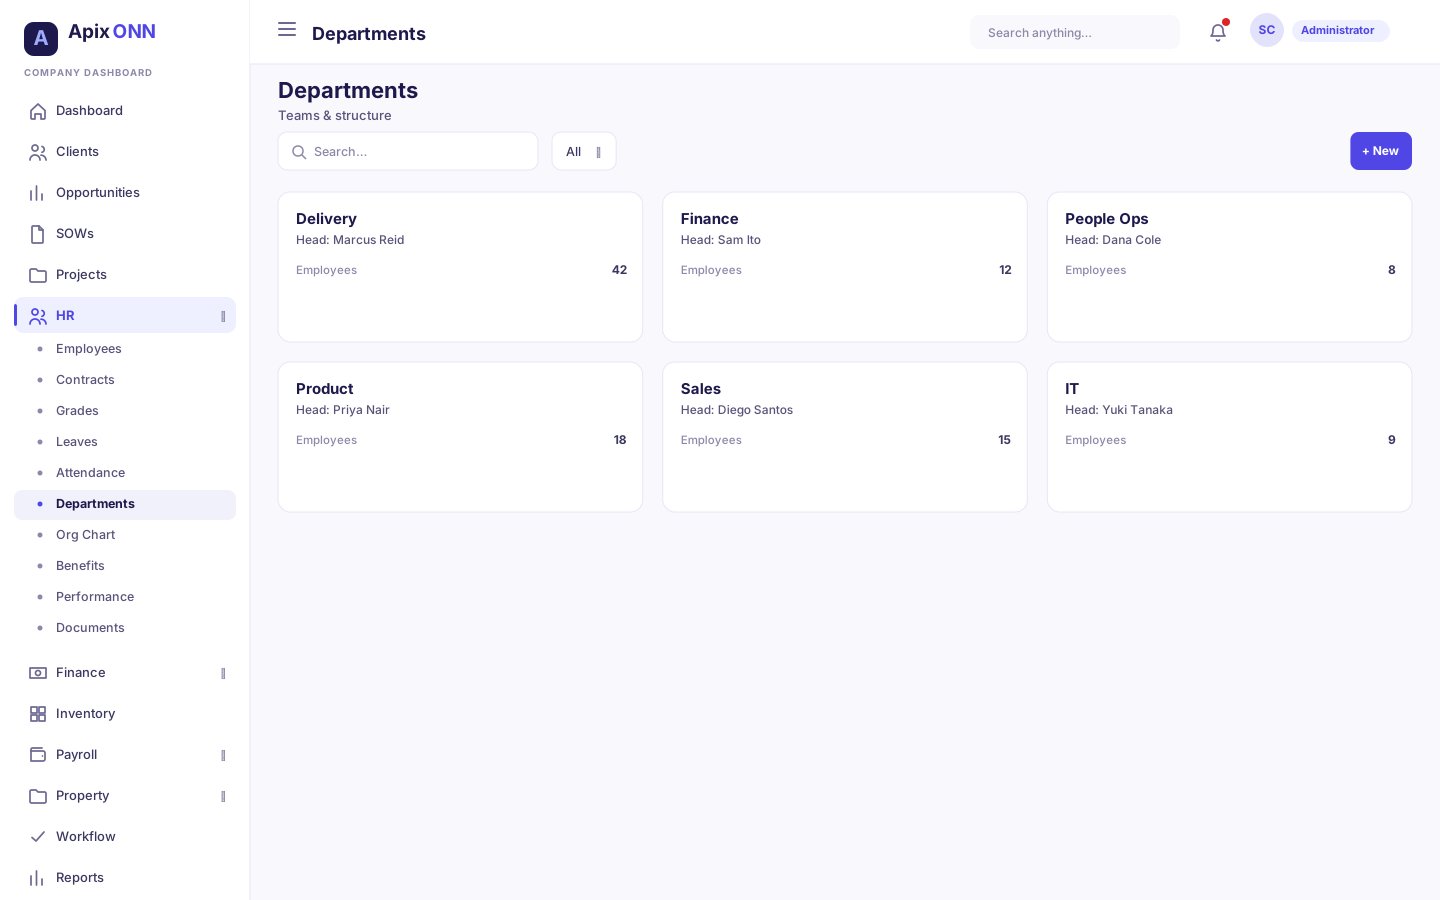
#How to add a department
- Go to HR → Departments and click Add Department.
- Enter the department details (name and code) and optionally a description and head.
- Save.
#Field guide — Department
| Field | What it means | Notes |
|---|---|---|
| Name / Code | Department label and short identifier | Required |
| Description | What the department does | Optional |
| Head | The employee who leads it | Optional |
| Active | Whether it's currently in use | Inactive departments are hidden from selection |
Tip: You can't meaningfully delete a department that still has people in it — reassign employees first, or set it Inactive.
#Positions
Where to find it: HR → Positions
Positions are roles within a department (e.g. "Software Engineer"). Each can be scoped to a department or left open to all departments, and can carry a seniority level.
#How to add a position
- Go to HR → Positions and click Add Position.
- Enter a Name and Code (both required).
- Optionally assign a Department (leave blank for "All Departments") and a Level (Executive, Senior, Mid, Junior, Intern).
- Optionally add a description; toggle Active.
- Click Create Position.
#Field guide — Position
| Field | What it means | Notes |
|---|---|---|
| Name / Code | Position label and short code | Required |
| Department | Which department it belongs to | Optional; blank = available to all departments |
| Level | Seniority band | Optional |
| Active | Whether it can be assigned | Optional |
Note: When you add an employee, the Position dropdown is filtered by the department you pick, so scoping positions to departments keeps that list clean.
#Job Titles
Where to find it: HR → Job Titles
Job titles are the public-facing titles employees carry, independent of the internal position/grade structure. They're simpler than positions: a name, an optional code and description, a sort order, and an active flag.
#How to add a job title
- Go to HR → Job Titles and click Add.
- Enter a Name (required) and optionally a code, description, and sort order.
- Click Create Job Title.
#Org Chart
Where to find it: HR → Org Chart
The Org Chart visualizes reporting relationships across the company, built from the Manager assignments on each employee profile. Use it to see the reporting structure at a glance.
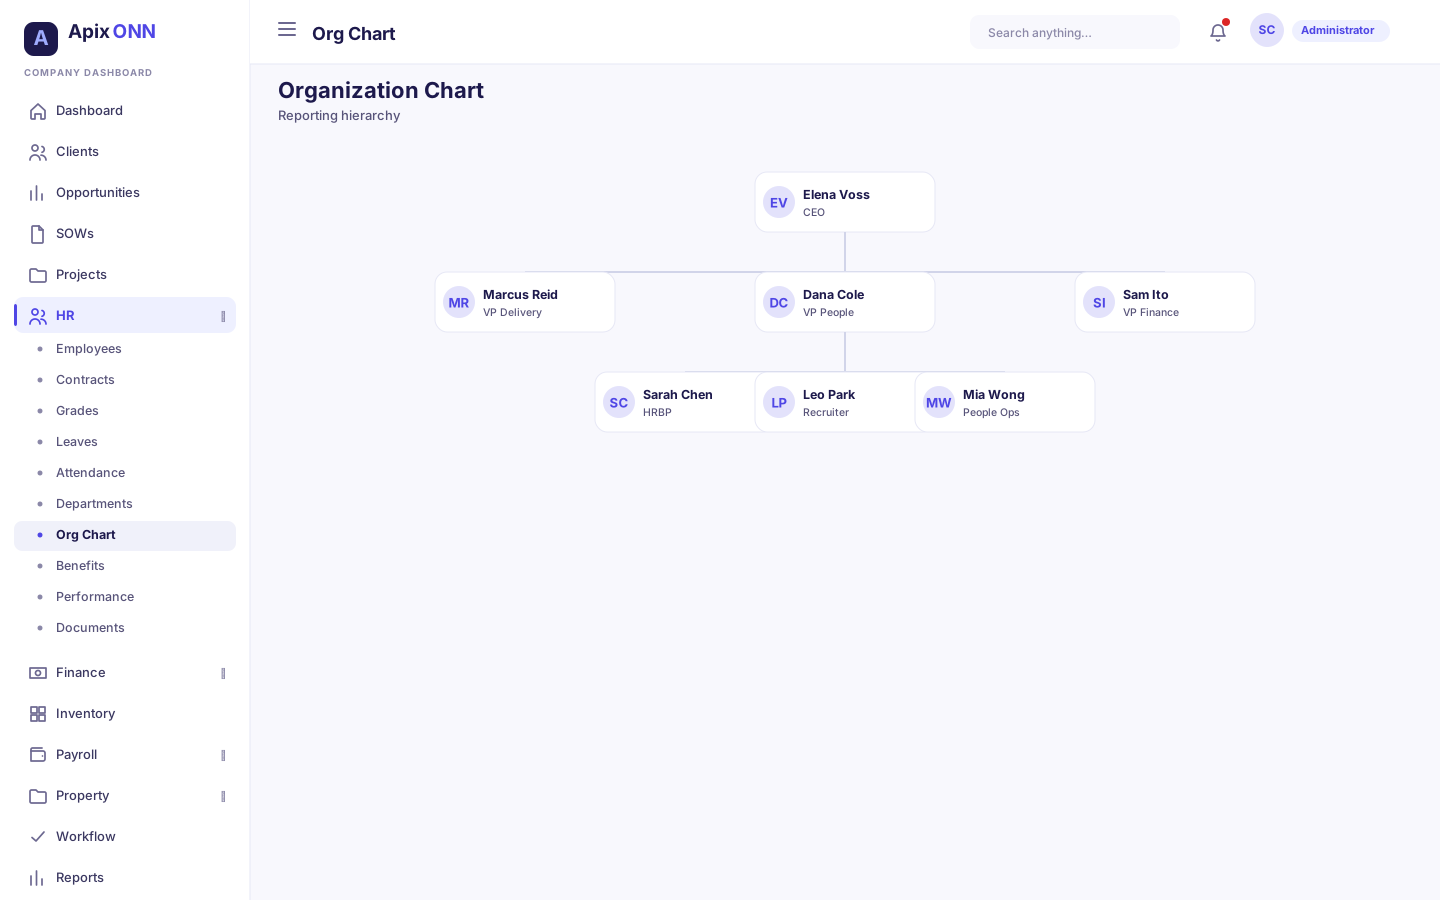
Tip: If someone appears in the wrong place (or is missing), fix their Manager on their profile — the chart follows those links.
#Benefits
Where to find it: HR → Benefits
Define the benefits your company offers (insurance, retirement, wellness, and more). Enrolling individual employees happens on the Benefits tab of their profile.
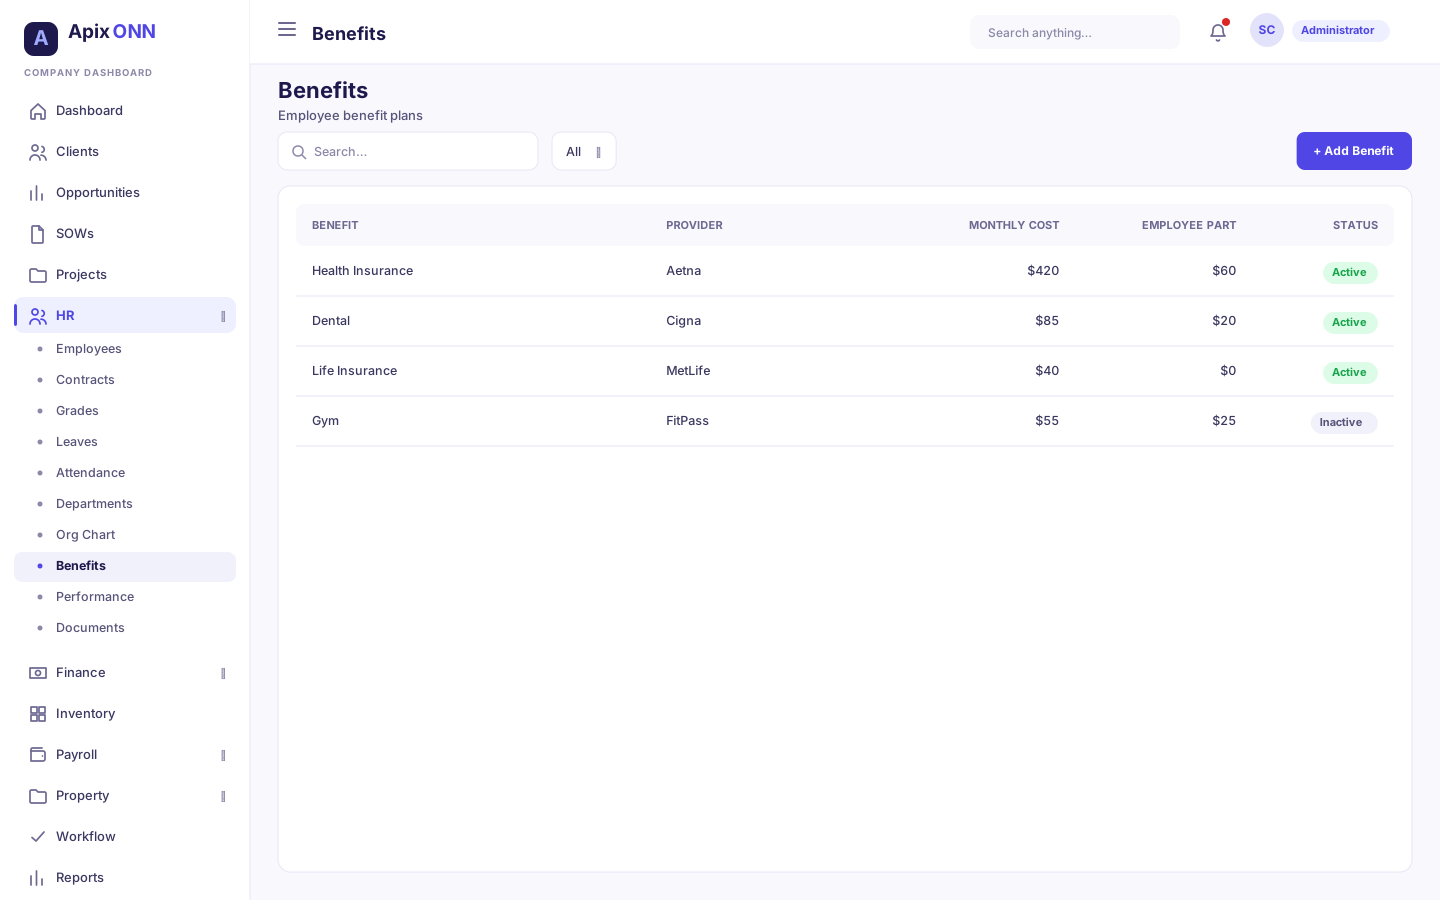
#How to add a benefit
- Go to HR → Benefits and click Add.
- Enter the benefit's name and choose its Type and Provider Type.
- Set the monthly cost and, if shared, the employee contribution percentage.
- Save.
#Field guide — Benefit
| Field | What it means | Notes |
|---|---|---|
| Name | Benefit label | Required |
| Type | Health Insurance, Life Insurance, Retirement, Stock Options, Wellness, Education, Other | — |
| Provider Type | Company Paid, Employee Paid, or Shared | Drives who bears the cost |
| Cost per month | Monthly cost | Optional |
| Employee Contribution % | Employee's share (for Shared benefits) | Optional |
| Active | Whether it's currently offered | — |
Tip: To enroll a specific person, open their profile → Benefits tab. This screen is only for defining the catalogue of benefits.
#Skills (skills matrix)
Where to find it: HR → Skills
Maintain the library of skills your organization tracks. Skills are grouped by category and can be assigned to employees to build a skills matrix used for staffing and capability planning.
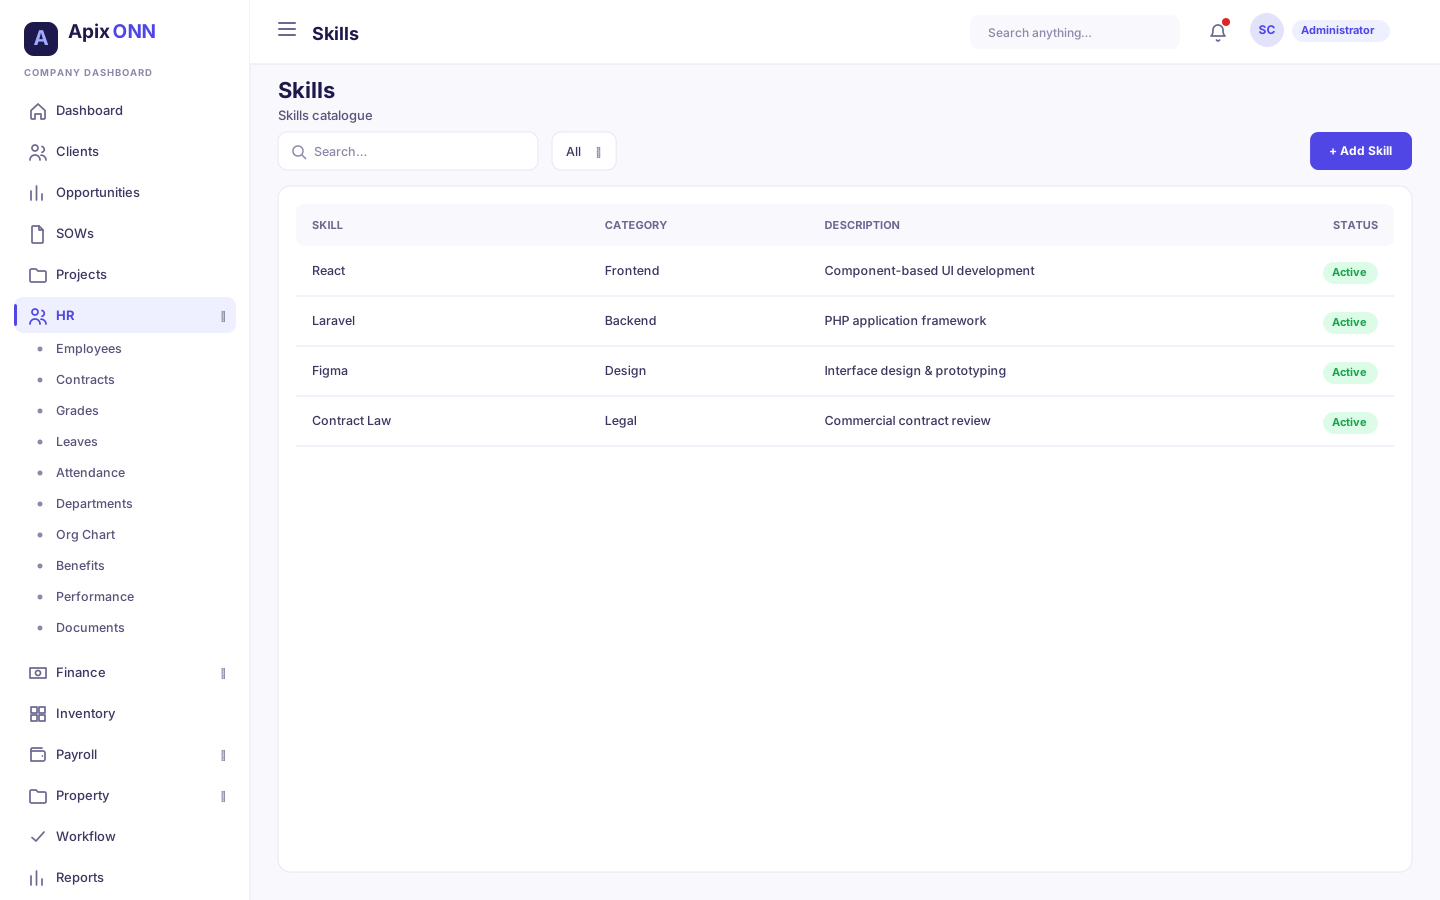
#How to add a skill
- Go to HR → Skills and click Add Skill.
- Enter the Name and choose a Category (Technical, Soft Skills, Language, Certification, Other).
- Add an optional description; set it active.
- Save.
Tip: Once skills exist here, assign them to individual employees on the employee's Skills tab so they show up in capability searches and resource planning. Keeping categories consistent makes filtering far more useful.
#Performance & Evaluations
Where to find it: HR → Performance
Run structured performance reviews as cycles. Each cycle covers a group of participants over a period and can include self-evaluation, peer feedback, and 360° feedback, plus a Nine-Box talent view.
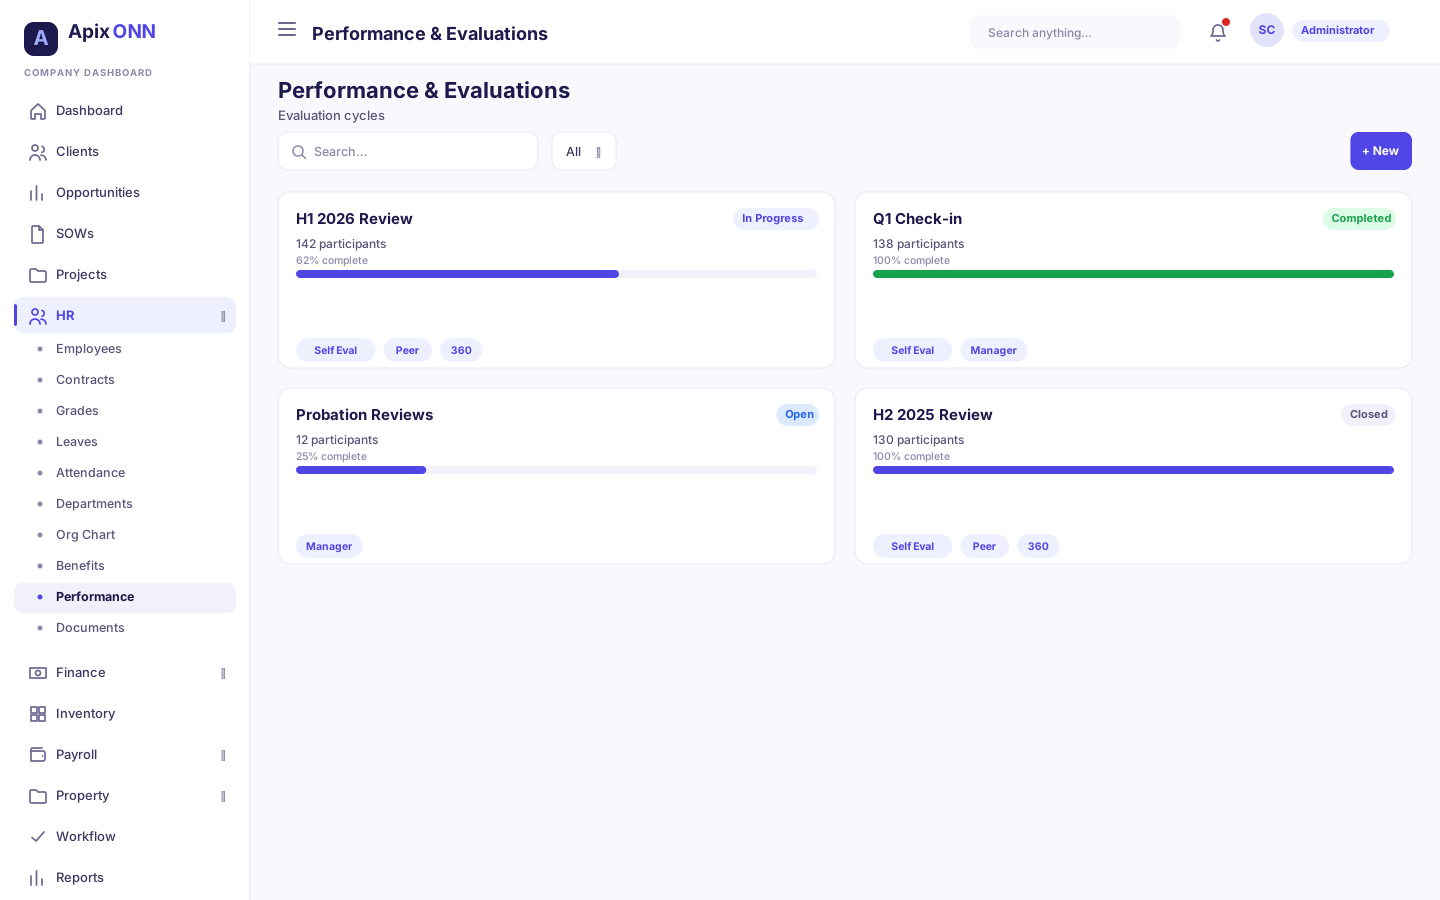
#What you can do here
- Filter cycles by status, type, and year.
- Create a new evaluation cycle.
- Open a cycle to manage its evaluations and Nine-Box grid.
#How to create an evaluation cycle
- Go to HR → Performance and click Create Cycle.
- Name the cycle and pick a Cycle Type (Annual, Mid-Year, Quarterly, Probation, Project End, Ad-hoc).
- Set the start and end dates and choose which feedback types to include (self, peer, 360°).
- Save. New cycles start in Draft.
#Cycle statuses
| Status | What it means |
|---|---|
| Draft | Being set up; not yet started |
| Active | Open and running |
| In Progress | Evaluations underway |
| Review | In calibration/review |
| Completed | Finished (cannot be undone) |
| Cancelled | Called off |
#Inside a cycle
Open a cycle to find three tabs:
- Overview — cycle details and completion stats; here you can launch the cycle and update its status.
- Evaluations — the list of participant evaluations and their progress.
- 9-Box Grid — the talent grid (see below).
Note: Marking a cycle Completed is final. Make sure all evaluations are done first.
#Nine-Box (talent grid)
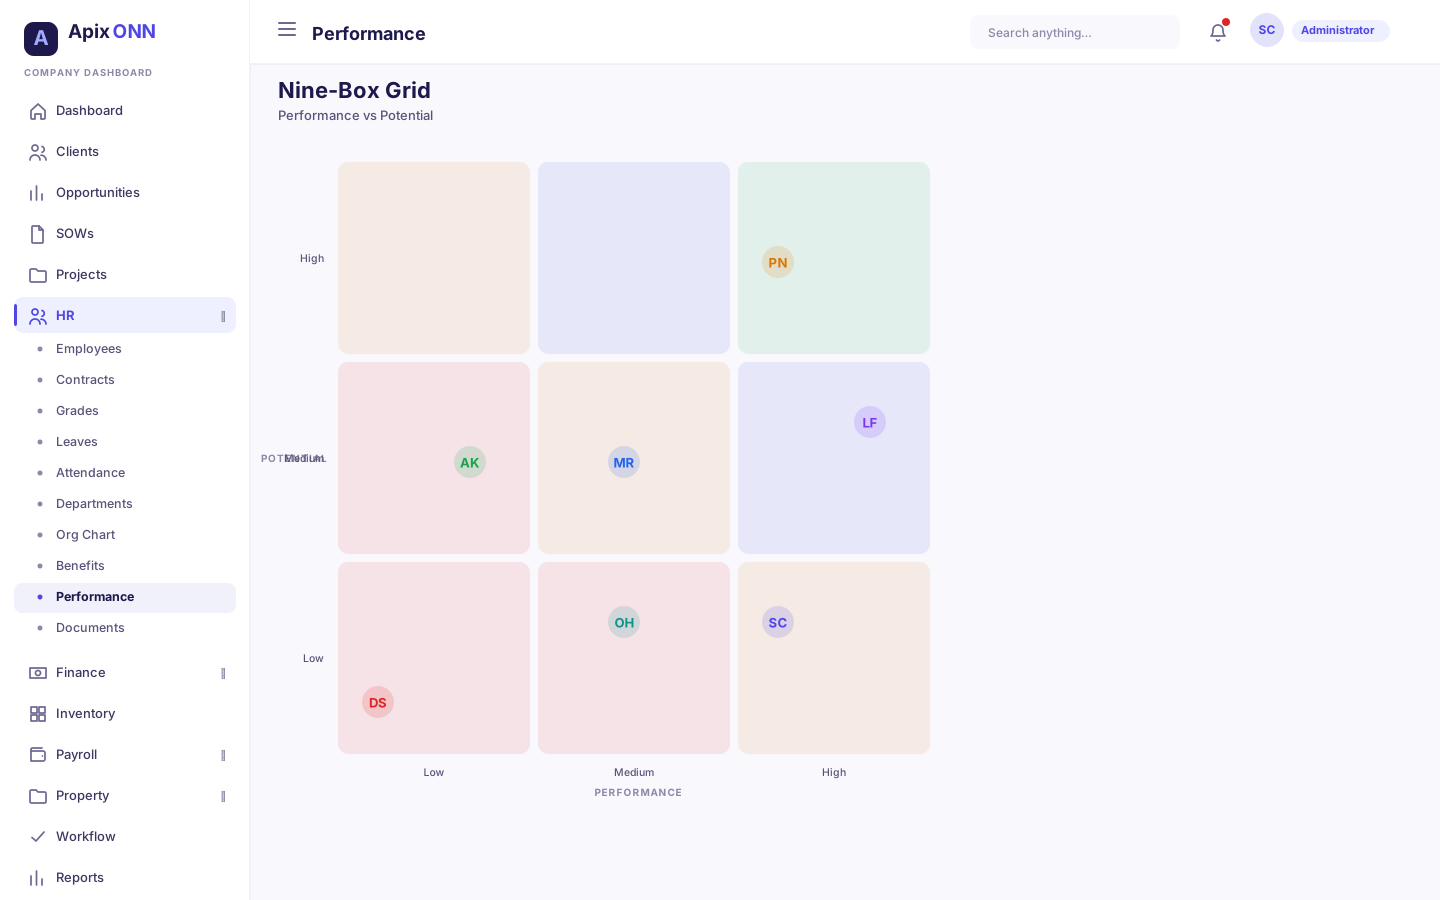
The Nine-Box plots each employee on a 3×3 grid of Performance (horizontal) against Potential (vertical), each rated Low (1), Medium (2), or High (3). Every cell maps to a talent segment:
| Segment | Performance × Potential |
|---|---|
| Star | High × High |
| High Performer | High × Medium |
| High Potential | Medium × High |
| Core Performer | Medium × Medium |
| Potential Gem | Low × High |
| Talent Risk | High × Low |
| Inconsistent | Medium × Low |
| Enigma | Low × Medium |
| Underperformer | Low × Low |
To place someone, add them to the Nine-Box and set their Performance and Potential ratings; the grid then shows where each person sits and summary stats (average performance, average potential, count of high performers).
#Employee Documents & Document Requests
Where to find it: HR → Employees → open a person → Documents tab
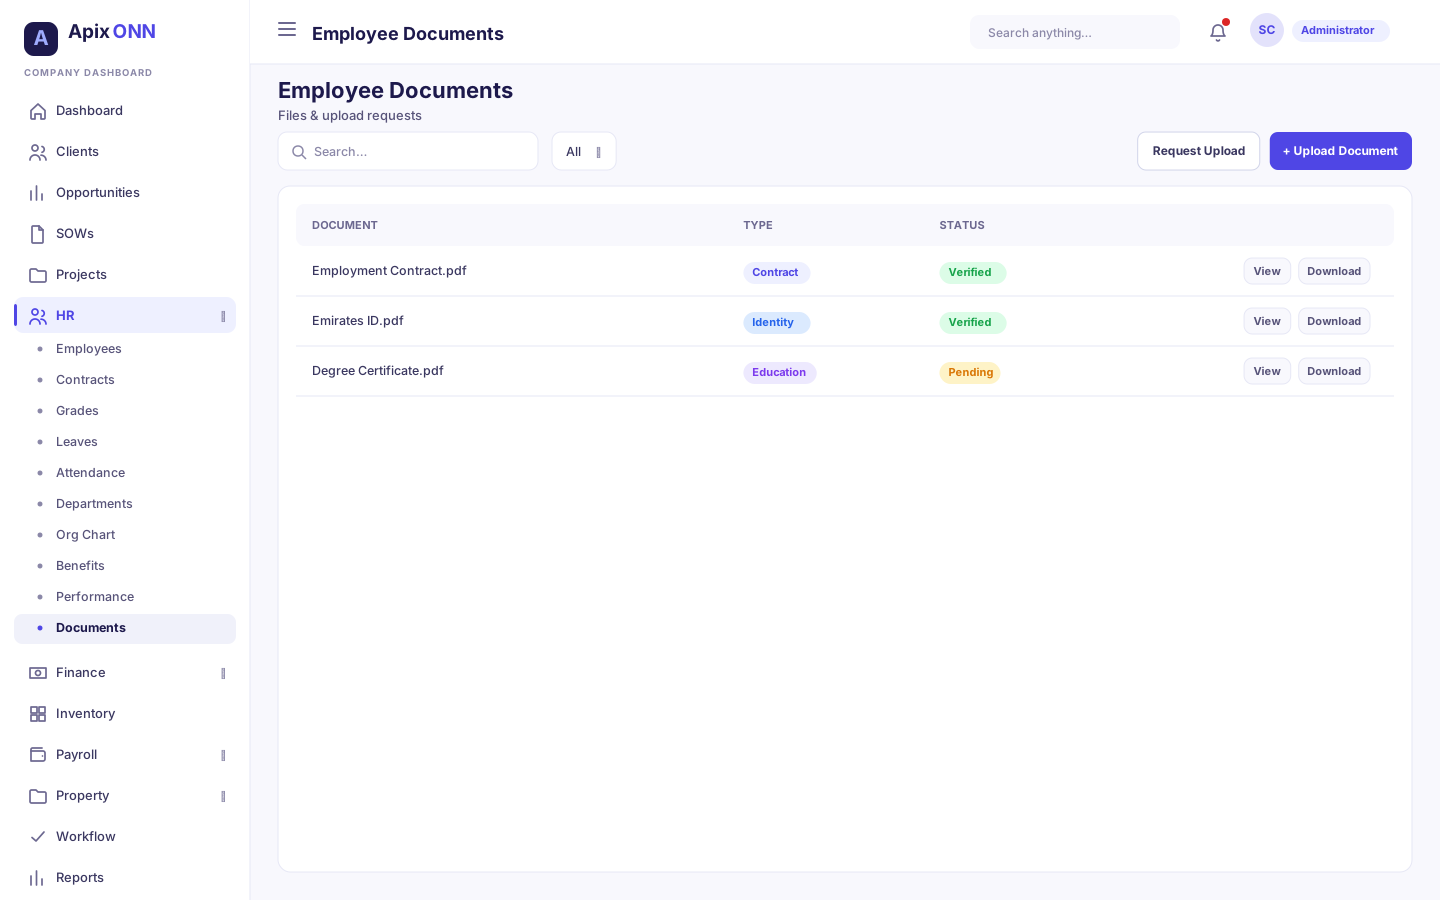
Store an employee's documents (passport, contract, certificates, and more), track expiry, verify them, or ask the employee to upload something themselves.
#What you can do here
- Upload a document on the employee's behalf.
- Request that the employee upload a specific document.
- Verify uploaded documents.
- Filter by document type and status.
- Download or delete documents.
- See expiry warnings (Expiring Soon / Expired).
#How to upload a document
- On the Documents tab, click + Upload Document.
- Choose a File (PDF, Word, or image).
- Enter a Document Name and pick a Document Type.
- Optionally set Issue Date, Expiry Date, and Notes.
- Click Upload.
#How to request a document from the employee
- Click Request Upload.
- Enter the Document Name and Document Type you need.
- Add a Message to Employee explaining what's required and any deadline.
- Click Send Request. The employee is notified to upload it themselves.
#How to verify a document
When a document has been uploaded and is awaiting review, click ✓ Verify on its row. Verified documents show a green Verified badge.
#Document statuses
| Status shown | What it means |
|---|---|
| Awaiting Upload | You requested it; the employee hasn't uploaded yet |
| Under Review | Uploaded and waiting to be verified |
| Verified | Reviewed and confirmed |
| Expiring Soon | Has an expiry date coming up |
| Expired | Past its expiry date |
#Document types
Passport, National ID, Visa, Work Permit, Contract, Certificate, Degree, Resume, Medical, and Other.
Note: A separate Document Requests workspace (under Resources → Document Requests) handles company-issued documents like generated letters and their signing/sending workflow. The Documents tab here is for the employee's own files and upload requests.
Tip: Set an Expiry Date on time-sensitive documents (visas, work permits, certificates) so the system can flag them as expiring before they lapse.
#Related screens
A few HR-adjacent items round out the module:
- HR → Doc Templates — reusable templates for generating HR documents and letters.
- HR → Signatures — save and manage the signature used when documents are signed.
- Resources → Document Requests — request, generate, sign, and send company documents to employees.
- Resources → HR Requests — employee-initiated HR requests that route through manager and HR approval.
Tip: Many HR actions that change pay or grade (salary amendments, grade upgrades) don't take effect immediately — they're submitted for approval and applied once signed off. If a change "isn't showing," check whether it's still awaiting approval.