Finance & Accounting
Finance is where your company turns work into money: you bill clients, collect payments, pay suppliers, and keep a complete, self-balancing set of books behind the scenes. Finance staff (Finance Manager, Accountant), admins, and project managers use this area to raise invoices, record receipts and payments, manage the chart of accounts, run budgets, and close each fiscal year. Every document you create here — an invoice, a receipt, a bill — quietly writes a matching accounting entry to the general ledger, so your financial reports are always in sync with what actually happened.
Company Dashboard42 min read25 sections
On this page25 sections
- How money flows through the ledger (read this first)
- Quotations
- Sales Orders
- Invoices
- Receipts (Receipts & Payments)
- Journals
- Inventory
- GL Accounts (Chart of Accounts)
- Account Mappings
- AR Clients
- AP Suppliers
- Fiscal Years
- Bills
- Purchase Requisitions
- Purchase Orders
- Bank Accounts
- Bank Reconciliation
- Expenses
- Budgets
- Fixed Assets
- Credit Notes
- Debit Notes
- Vendors
- Tax Rates
- Where to get help
You reach everything below from the Finance section in the left sidebar.
Note: Most Finance screens are gated by permission. As a rule of thumb, Finance Manager and Accountant have full day-to-day access, Admin and Super Admin can do everything, Project Manager can see project-related billing, and Read Only users can view but not change. Where a specific role matters, it is called out in that section.
#How money flows through the ledger (read this first)
Before the individual screens, here is the big picture. ApixONN keeps double-entry books: every transaction has an equal debit and credit, so the accounts always balance.
- Quotations, sales orders, and purchase requisitions post nothing. They are the paperwork before the money: an offer, a confirmed order, a request to buy. Only the invoice (or, on the buying side, the goods receipt and the bill) reaches your books.
- An invoice becomes revenue when you send it. Creating an invoice as a draft does nothing to your books. The moment you send it, the system posts an accounting entry: it debits the client's receivable (the client now owes you the full amount), credits revenue (your earnings, net of any discount), and credits tax payable (any VAT you collected on the company's behalf). This is also the moment the client's credit limit is checked.
- Stock you sell leaves inventory on the same send. If an invoice line is a product with Track stock switched on, sending the invoice also takes that quantity out of stock at its average cost and posts Dr Cost of Revenue / Cr Inventory — so the sale and its cost of sales land together. See Selling stock items.
- A receipt clears the receivable. When the client pays and you record a receipt, the system debits cash/bank (money in) and credits the client's receivable (they owe you less). Once the receivable is fully cleared, the invoice flips to Paid.
- The same logic runs in reverse for suppliers. A bill credits accounts payable (you owe the supplier); paying it debits payable and credits cash.
- The "the document posts the entry" rule runs everywhere else too. Receiving stock (debit Inventory / credit GRNI), matching the supplier bill (debit GRNI / credit Payable), issuing stock (debit Cost of Revenue / credit Inventory), finalizing payroll (debit salary expense / credit net pay, tax, and social-insurance payables), and buying or disposing of a fixed asset all post their own balanced entries automatically. Each is explained in its own section below.
You never have to write these entries by hand — the documents do it for you. The Account Mappings screen is what tells the system which accounts to use, so setting those up correctly is what makes all of this work.
Tip: If an invoice or receipt ever seems not to affect your reports, the usual cause is a missing account mapping. See Account Mappings below.
#Quotations
A quotation is a price offer to a customer. It lists what you'd sell, at what price, and until when the offer stands. Nothing is posted to the ledger — a quotation only becomes money once it turns into an invoice and that invoice is sent.
Where to find it: Finance → Quotations
What you can do here
- Draft a quotation, mark it as sent, and record whether the customer accepted or rejected it.
- Turn a sent or accepted quotation into a sales order, or straight into a draft invoice.
- Extend the validity of an expired quotation.
- Print a quotation for the customer.
- Filter by status and search by number or client.
Four cards at the top count your quotations: Open (draft + sent), Accepted, not yet converted, Converted, and Rejected / expired. Click any row to open the quotation in a side panel — all actions live there.
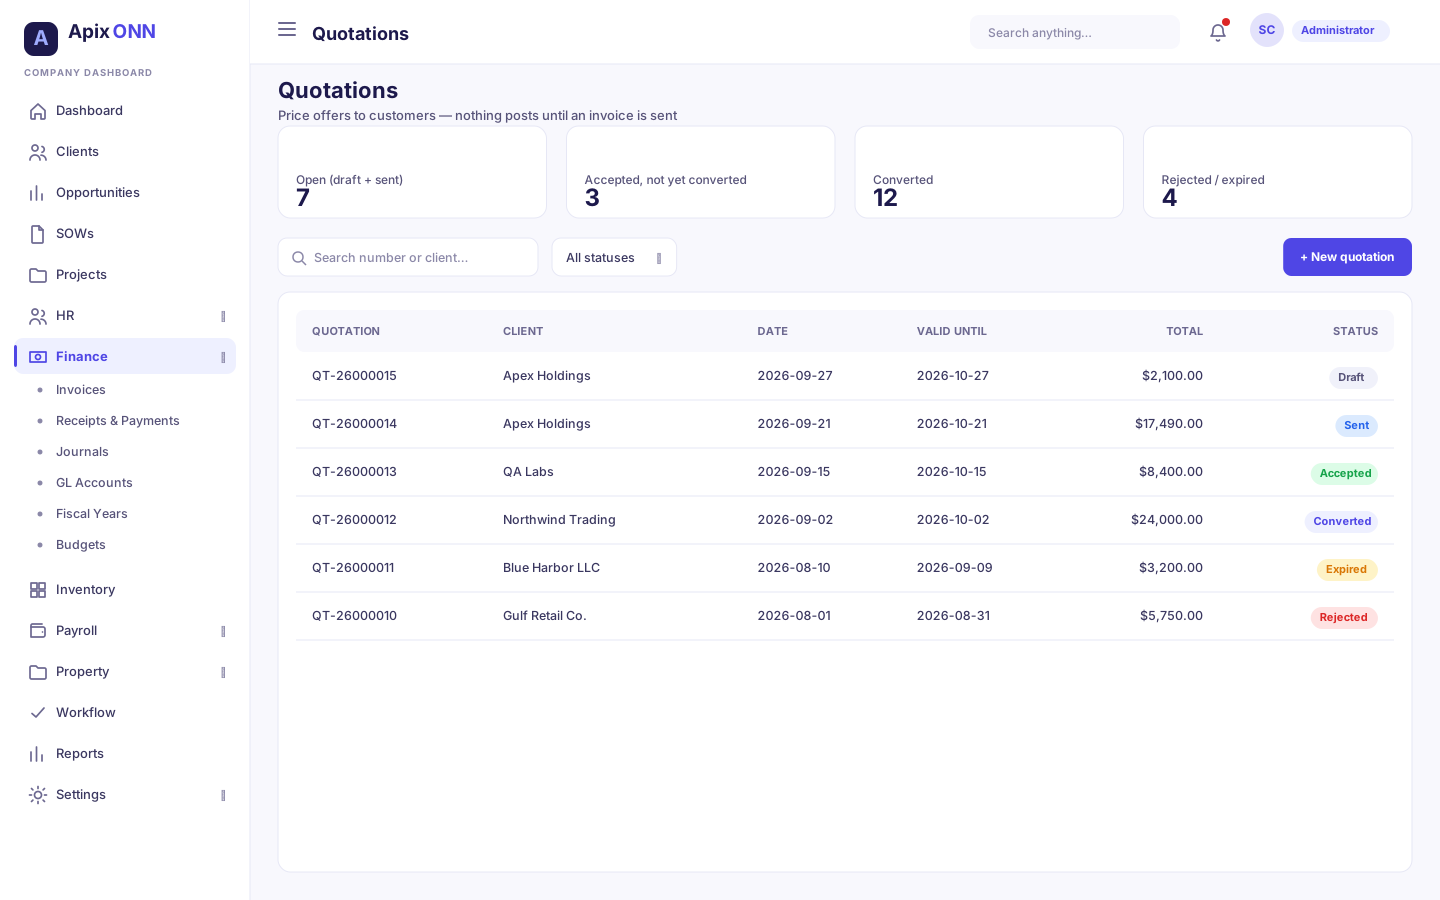
#How to create a quotation
- Click + New quotation.
- In Client, search for the customer's receivable account by name or serial (or use Add Client to create one). The Client name fills in; you can also type a name without picking an account.
- Add a Client email if you like.
- Set the Quote date and Valid until (defaults to 30 days out), and pick the Currency.
- Add Lines: pick a Product to fill in the description, price, and tax, or type a Description, Qty, and Unit price yourself and pick the Tax % from your tax rates (or No tax). Use + Add line for more.
- Enter a Discount if any — Subtotal, Tax, and Total update as you type.
- Add Notes and Terms (the terms start as "Prices valid until the date shown.").
- Click Create quotation. It's saved as a Draft.
#From draft to order or invoice
- Open the quotation. While it's a Draft you can Edit it or Delete it.
- When you've given it to the customer, click Mark as sent.
- Record the customer's answer: Accept, or Reject (you're asked for an optional reason, which then shows on the quotation).
- Turn it into the next document:
- Create sales order — for orders you'll deliver or bill over time. You're taken to the new order, which starts as a Draft.
- Invoice directly — when there's nothing to track in between. This creates a draft invoice with the same lines (dated today, due in 30 days) and takes you to Invoices.
Either way the quotation becomes Converted and shows a link to what it turned into. Both buttons work on a Sent quotation too, so you don't have to click Accept first — as long as it hasn't expired.
#When a quotation expires
Once the Valid until date has passed, a draft or sent quotation shows as Expired:
- An expired sent quotation can't be accepted or converted — Accept, Create sales order, and Invoice directly are all disabled, and the system refuses them with "This quotation expired on … Extend its validity or issue a new one." To carry on:
- Click Extend validity.
- Pick the new Valid until date (today or later, and not before the quotation date).
- Click Save new date (or Cancel). The quotation is back to Sent and the buttons work again.
- An expired draft can simply be edited — use Edit and move the Valid until date.
- An accepted quotation was accepted in time, so it never expires: you can still turn it into a sales order or invoice after its date.
Tip: If you delete the draft invoice made with Invoice directly, the quotation goes back to Accepted so you can convert it again.
#Statuses — Quotations
| Status | What it means |
|---|---|
| Draft | Being prepared. Can be edited or deleted. |
| Sent | Given to the customer; waiting for an answer. |
| Accepted | The customer said yes. Ready to convert. |
| Rejected | The customer said no. Can be deleted. |
| Converted | Turned into a sales order or an invoice. |
| Expired | Shown instead of Draft or Sent once the Valid until date has passed. Can't be accepted or converted until you extend it. |
Who can use it: anyone with the quotations permissions — viewing, creating, editing (which covers sending, accepting, rejecting, and extending), and deleting are separate. Converting also needs permission to create sales orders or invoices respectively.
#Sales Orders
A sales order is a confirmed customer order. You invoice it when you deliver — all at once or in parts — and the order keeps track of how much of each line is still left to bill. Like a quotation, a sales order posts nothing to the ledger; only its invoices do, once sent.
Where to find it: Finance → Sales Orders
What you can do here
- Create a sales order directly, or get one from a quotation.
- Confirm an order, then invoice it in one go or line by line over time.
- See, per line, what was Ordered, what's been Invoiced, and what's Left.
- Cancel, delete, or print an order.
The cards at the top count Drafts, To invoice (confirmed or partly invoiced), Fully invoiced, and Cancelled. The list shows each order's Their ref. (the customer's PO number), Total, and how much has been Invoiced so far.
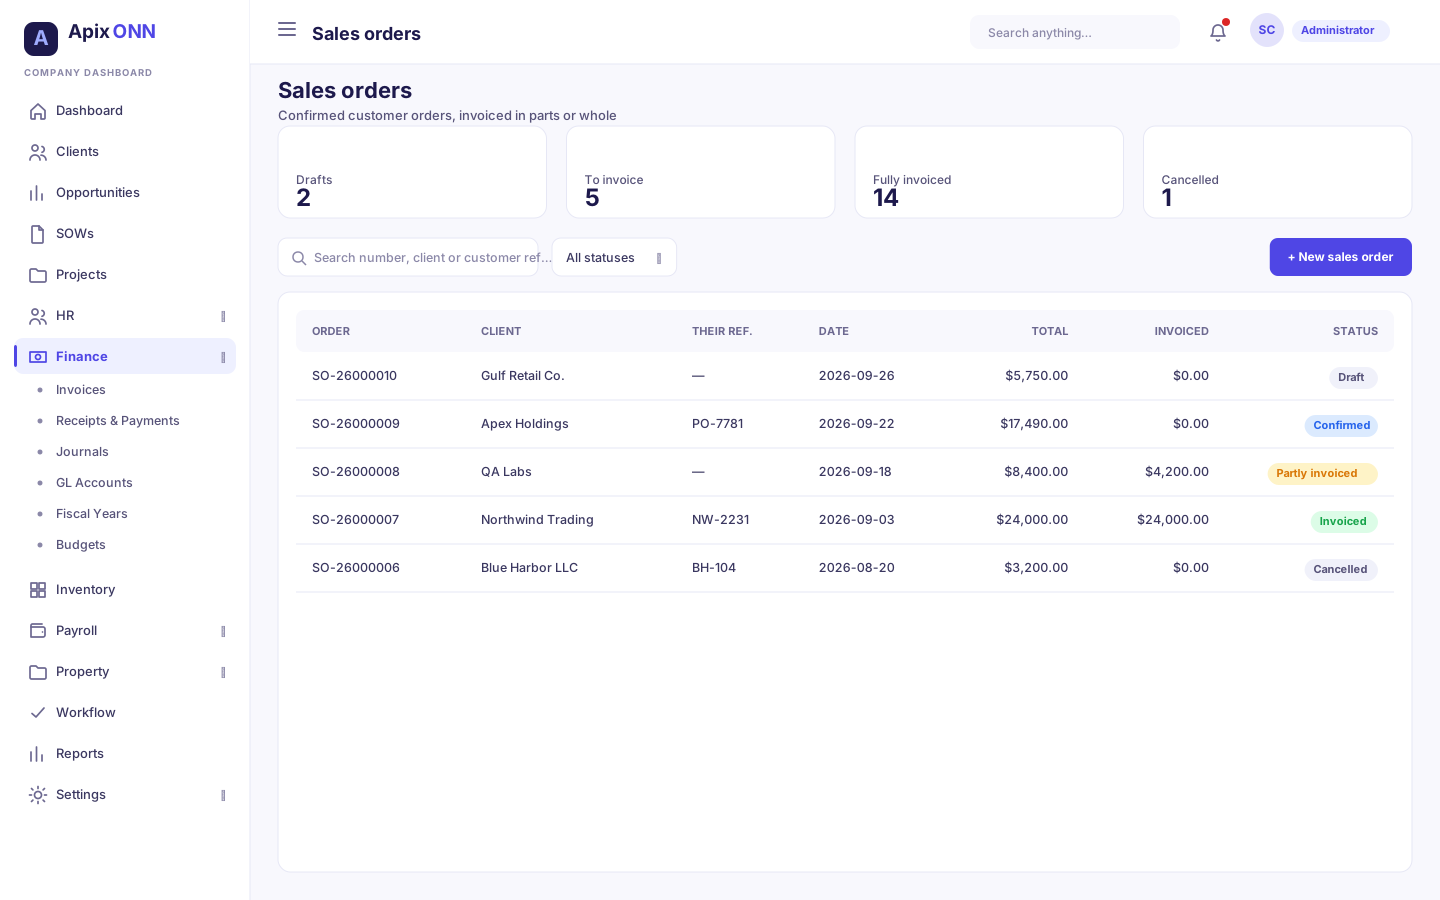
#How to create a sales order
- Click + New sales order (or use Create sales order on a quotation).
- Choose the Client, set the Order date, an optional Expected delivery date, the Currency, and the customer's Customer PO / ref.
- Add Lines exactly as on a quotation (pick a product or type the line), a Discount, Notes, and Terms.
- Click Create sales order. It starts as a Draft — you can still Edit it.
- Click Confirm order when the order is agreed. Only confirmed orders can be invoiced.
#How to invoice a sales order (in parts or whole)
- Open a Confirmed or Partly invoiced order and click Invoice….
- A panel lists every line that still has quantity left, pre-filled with the full remaining quantity (shown as "n left"). Change the quantities to bill only part now, or set a line to 0 to leave it for later.
- Click Create draft invoice. The invoice appears under Invoices from this order.
- Go to Finance → Invoices and Send the draft to post it — invoices from an order start as drafts like any other.
You can never invoice more than was ordered: each line's Left column is what remains. The order moves to Partly invoiced, then Invoiced once nothing is left. If the order had a discount, each invoice takes its share of it in proportion to what it bills.
Note: Quantities count as invoiced as soon as the draft invoice is created. If you delete that draft invoice, its quantities go back to the order's Left column and the order's status updates to match.
Tip: Lines that are stock products carry the product through to the invoice, so sending the invoice takes the stock out and records its cost. An order doesn't reserve stock, but confirmed orders do show up as Committed in Inventory Reports.
#Cancelling and deleting
- Cancel order is available on a Draft or Confirmed order that has no invoices yet. If it already has invoices, delete or credit them first.
- Delete is available on Draft and Cancelled orders.
#Statuses — Sales Orders
| Status | What it means |
|---|---|
| Draft | Being prepared. Can be edited, confirmed, cancelled, or deleted. |
| Confirmed | Agreed with the customer. Ready to invoice. |
| Partly invoiced | Some quantity has been invoiced; the rest is still left. |
| Invoiced | Every line has been fully invoiced. |
| Cancelled | Called off before any invoicing. Can be deleted. |
#Invoices
Invoices are the bills you send to your clients. Sending one is what puts revenue on your books.
Where to find it: Finance → Invoices
What you can do here
- Create an invoice from scratch, or generate one automatically from approved timesheets.
- Send an invoice to lock it and post it to your books.
- Record payments against a sent invoice.
- Print a client-ready invoice PDF or the underlying accounting entry.
- Export the whole list to Excel or a printable PDF.
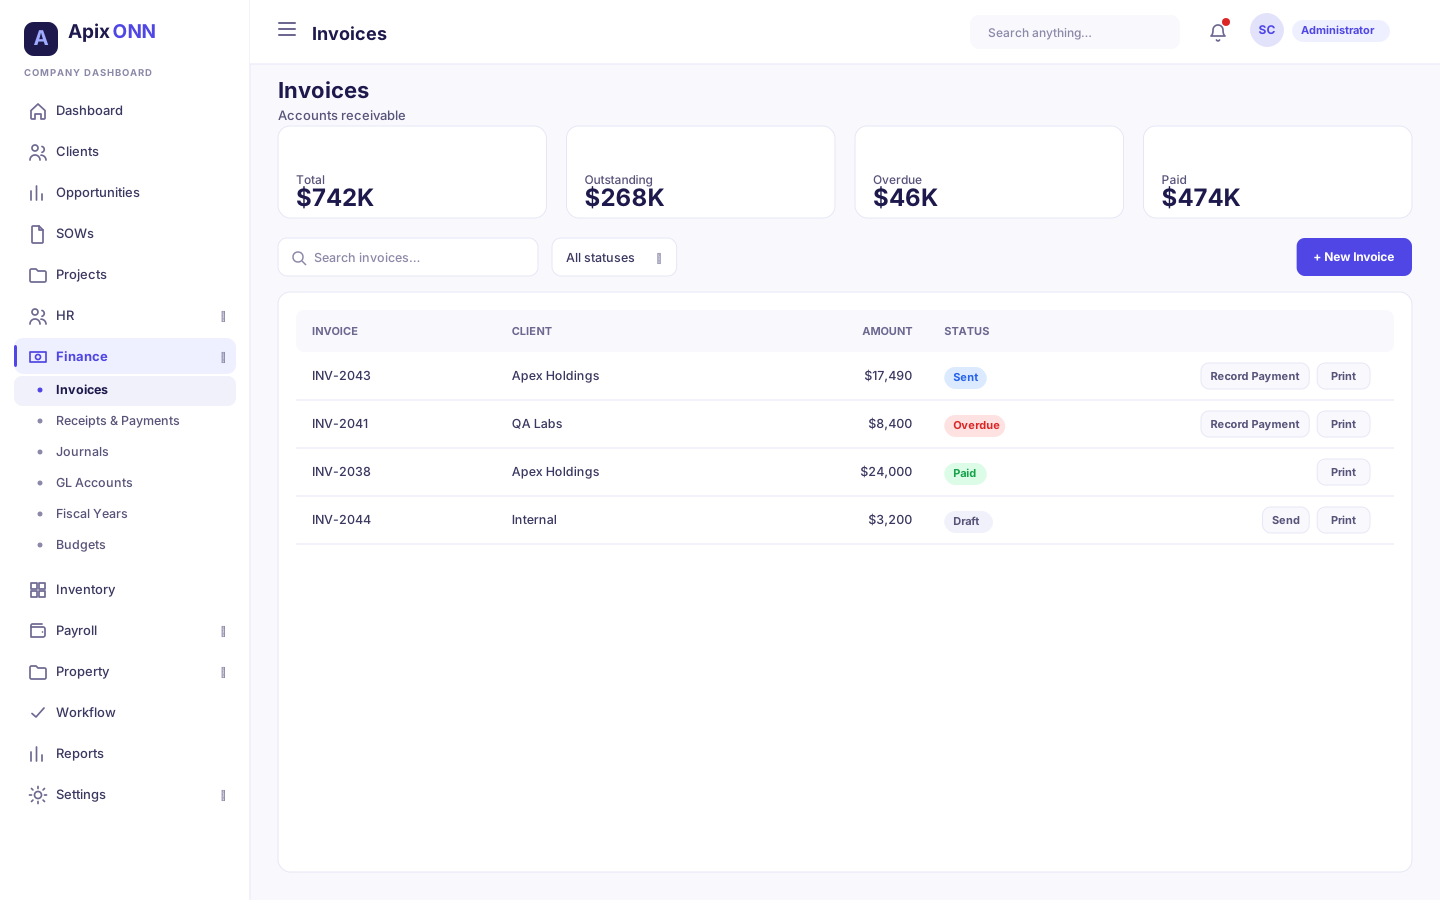
#How to create an invoice
- Click Create (top right).
- In Select Client, search for the client by name or serial and pick them. This is the client's receivable account — it decides who gets billed and where the entry lands.
- Optionally choose a Project to tie the invoice to.
- The Client Name fills in automatically; add Client Email and Client Address if you want them on the PDF.
- Set the Invoice Date and Due Date (the due date defaults to 30 days out) and pick the Currency.
- Add your line items. For each row you can pick a Product from the catalog to auto-fill it, or type a Description, Qty, and Unit Price yourself. Pick the line's Tax % from your tax rates, or No tax (see Tax on document lines). Use + Add Item for more rows. If the product is a stock item, a hint under it shows how many are in stock (see Selling stock items).
- Enter a Discount amount if any — the running Subtotal, Tax, and Total update as you type.
- Add Notes and Payment Terms if needed.
- Click Create Invoice. The invoice is saved as a Draft — nothing hits your books yet.
#How to edit a draft invoice
While an invoice is still a Draft, you can change anything on it.
- Find the draft in the list and click Edit (next to Send and Delete).
- In Edit draft …, change what you need: the client (click Change), Project, Client Name, contact details, dates, Currency, Discount, Notes, Payment Terms — and the line items: change a line, remove it with ✕, or add one with + Add Item. The totals update as you go.
- Click Save Draft.
A draft raised from a sales order keeps the order's client and currency, and the order's lines keep the order's product, price and tax — those are greyed out. You can still change such a line's quantity (up to what the order has left to invoice) and description, remove it (its quantity goes back to the order), or add other lines. To change the client or currency, delete the draft and invoice the order again.
Note: Edit only appears on drafts, and only if your role can edit invoices. Once an invoice is sent, it's part of your books — correct it with a Credit Note instead.
#How to create an invoice from timesheets
This turns billable, approved hours into invoice lines automatically — ideal for time-and-materials projects.
- Open the Generate Invoice from Timesheets tool from a project's billing (Projects → open a project → Generate Invoice). It isn't launched from the Finance → Invoices list.
- Choose the Project and the Period From / Period To dates.
- Click Fetch Billable Timesheets. The system pulls every approved, billable timesheet in that window and lists each employee with their hours, rate, and amount.
- Tick the line items you want to bill (all are selected by default; use Select all / Deselect all). The running total updates.
- Optionally set a Due Date and Notes.
- Click Create Invoice.
Note: Only approved and billable timesheets appear. If you get "No approved billable timesheets found", either the hours aren't approved yet or the allocation isn't marked billable.
#How to send an invoice
- Find the invoice in the list (it must be in Draft).
- Click Send and confirm.
- The invoice moves to Sent and the accounting entry is posted (receivable debited, revenue and tax credited). Any stock items on it are taken out of stock and their cost of sales is posted at the same time.
Note: Sending is the point of no return for your books — it posts the ledger entry. Marking sent and posting happen together, so if anything fails (for example, not enough stock) the invoice safely stays a draft.
#Selling stock items (cost of sales)
When an invoice line is a product with Track stock switched on (set on the product in Inventory), the invoice doesn't just record the sale — it also moves the goods out of stock.
While you build the invoice. Pick the product in the line's Product column. A small hint under it shows what's on hand, for example "12 pcs in stock". If this invoice's lines for that product add up to more than that, the hint turns red: "Only 12 pcs in stock — sending will be refused". You can still save the draft; the check that counts happens on send.
When you send it. In the same step that posts the revenue, the system:
- Takes the quantity out of stock at the product's average cost (the weighted average of what you paid for the units on hand — not the selling price).
- Posts Dr Cost of Revenue / Cr Inventory for that cost, so the sale and its cost of sales land together.
- Records it as a goods issue with reason Sale and the invoice number as reference — you'll see it in Inventory → Goods Issued and in the stock ledger.
If there isn't enough stock, the send is refused with a message naming the product, what's on hand, and what's needed (for example "Not enough stock of Office Chair: 3 pcs on hand, 5 pcs needed."). Nothing is posted and the invoice stays a draft — receive more stock or reduce the quantity, then send again.
Note: Lines without a product, and products that don't track stock (services), have no cost of sales — they post revenue only. The recorded cost is what the Cost and Margin columns of the Sales reports use.
Credit-limit behavior on send. If the client has a credit limit set and sending this invoice would push their total outstanding balance over it, the send is blocked. You'll see the client's credit limit, current exposure, this invoice's amount, the projected exposure, and how much it goes over by. To send anyway you must confirm an override — and only a user with invoice-approval authority (typically Finance Manager, Admin, or Super Admin) is allowed to override. The override is logged. If a client has no limit set, there is no check.
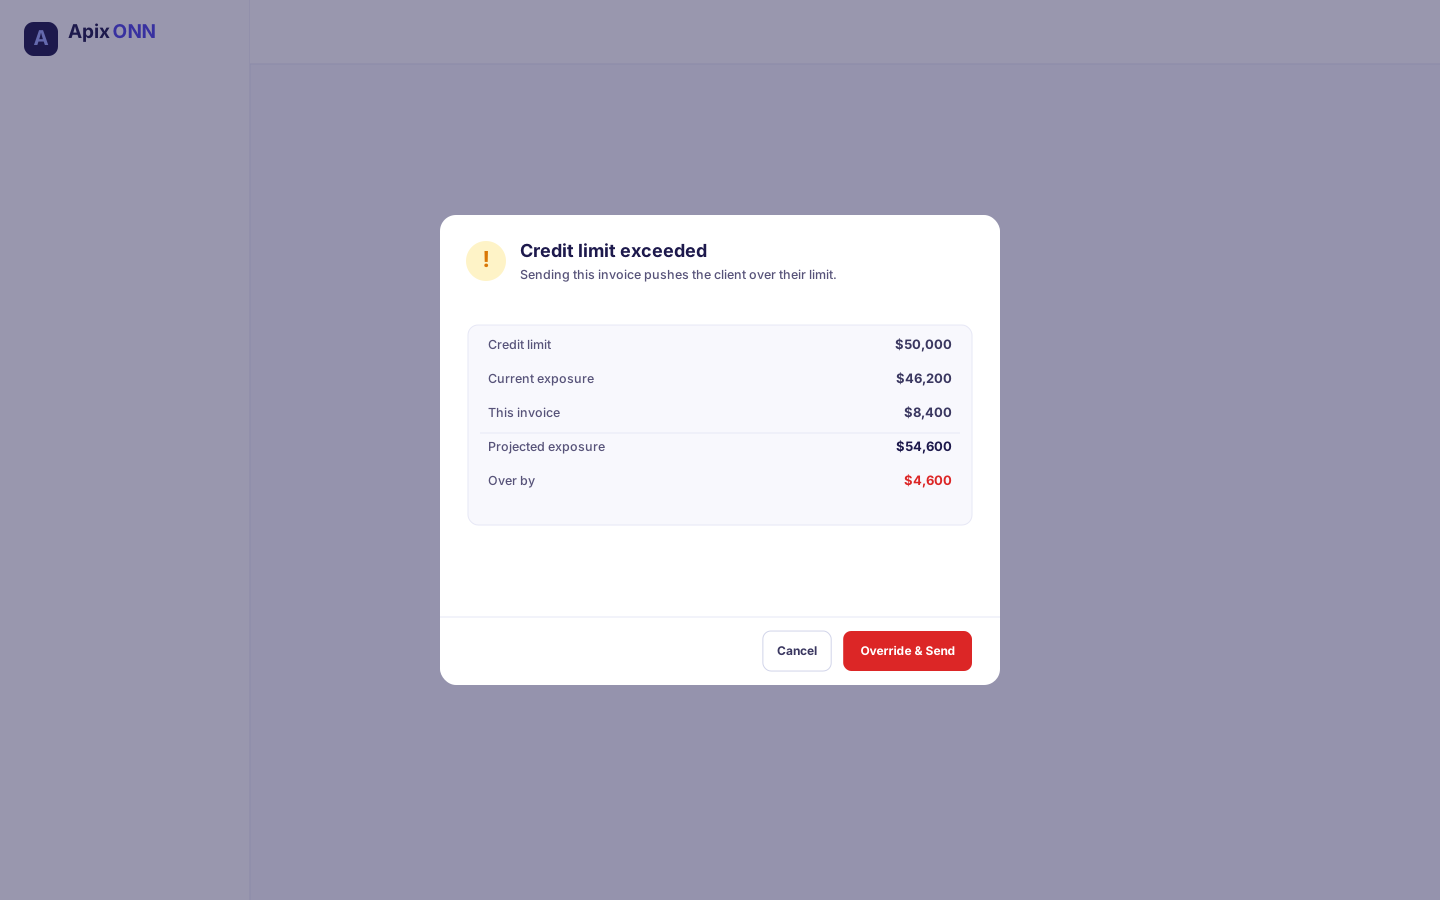
#How to record a payment
- On a Sent or Overdue invoice, click Record Payment.
- The Outstanding Balance is shown; the amount defaults to it (you can enter a partial amount).
- Confirm the Date, choose a Payment Method (Bank Transfer, Cheque, Card, Cash, or Other), and optionally add a Reference / Txn ID and Notes.
- Click Record Payment. Cash is debited, the receivable is credited, and a receipt entry is generated. When the invoice is fully paid it becomes Paid.
#Exporting and printing
- Excel and PDF buttons (top right) export the current filtered list.
- On any invoice row, Invoice prints a client-ready PDF and قيد prints the accounting entry for your records — both work in any status.
#Field guide — Create Invoice
| Field | What it means | Notes |
|---|---|---|
| Select Client | The client being billed (their receivable account) | Required. Search by name or serial. Add new via AR Clients. |
| Project | Links the invoice to a project | Optional. |
| Client Name / Email / Address | Details printed on the PDF | Name auto-fills from the client; email and address are optional. |
| Invoice Date | The date of the invoice | Required. |
| Due Date | When payment is expected | Required. Defaults to 30 days ahead. |
| Currency | Currency of the invoice | USD, EUR, GBP, SAR, AED. |
| Line items | What you're billing for | Product, Description, Qty, Unit Price, Tax %. Pick a product to auto-fill; stock products show what's on hand. Tax % is picked from your tax rates, or No tax. |
| Discount | A flat amount off the total | Optional. Reduces revenue, not tax. |
| Notes / Payment Terms | Free text on the invoice | Optional. |
#Statuses — Invoices
| Status | What it means |
|---|---|
| Draft | Created but not yet sent. No effect on your books. Everything on it can be edited, and it can be deleted. |
| Sent | Issued to the client and posted to the ledger. Awaiting payment. |
| Paid | Fully paid; the receivable is cleared. |
| Overdue | Sent, past its due date, and still unpaid. |
| Cancelled | Voided. |
#Tips & FAQ
- Why can't I edit or delete this invoice? Only Draft invoices can be deleted. Once sent, an invoice is part of your books — issue a Credit Note instead of deleting it.
- The Record Payment button is missing. It only appears on Sent or Overdue invoices. Drafts must be sent first; paid invoices have nothing left to collect.
- Send is blocked. The client is over their credit limit — ask an approver (Finance Manager or Admin) to review and override, or collect on older invoices first.
- Send is refused with "Not enough stock of …". A stock product on the invoice needs more than is on hand. Record the goods receipt for incoming stock, or lower the quantity, then send again.
- I deleted a draft invoice that came from a sales order or quotation. That's safe: the quantities go back to the sales order's Left column, or a quotation invoiced directly goes back to Accepted, ready to convert again.
#Receipts (Receipts & Payments)
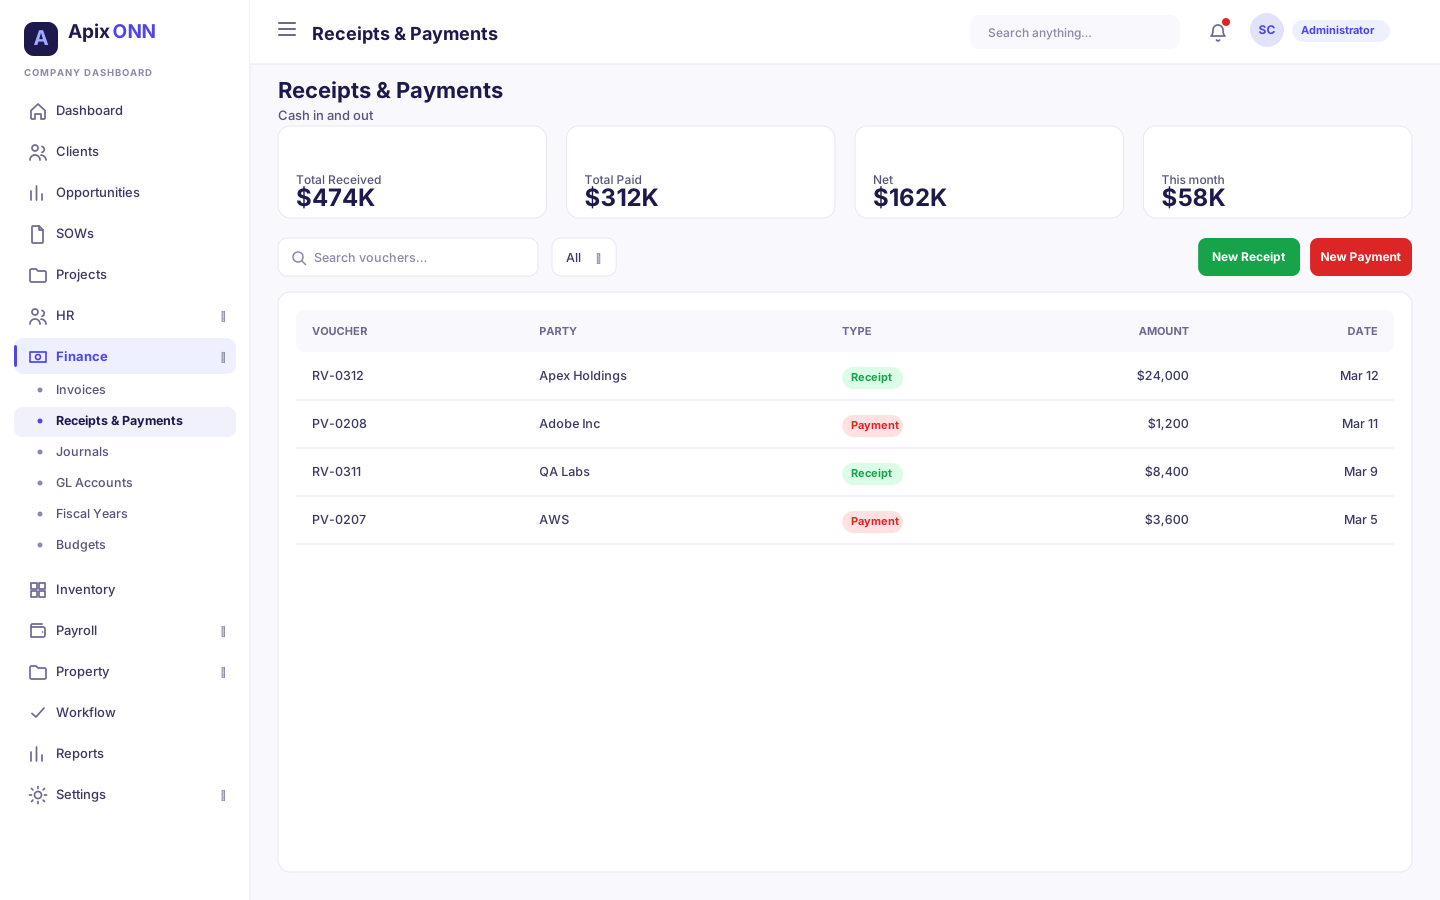
This screen records money in (receipts from clients) and money out (payments to suppliers) as standalone vouchers, separate from a specific invoice. It's the general-purpose cash-in/cash-out ledger for AR and AP.
Where to find it: Finance → Receipts
What you can do here
- Record a Receipt — cash or bank coming in from a client (debits cash/bank, credits the client's receivable).
- Record a Payment — cash or bank going out to a supplier (debits the supplier's payable, credits cash/bank).
- Filter by type and date range, and export to Excel or PDF.
- Print the accounting entry for any voucher.
#How to record a receipt or payment
- Click + New Receipt (green) or + New Payment (red).
- Set the Date and Currency.
- Choose the Cash / Bank account the money moves through.
- Choose the Client (for a receipt) or Supplier (for a payment).
- Enter the Amount.
- Pick a Payment Method (Cash, Bank Transfer, Cheque, Card, Other) and add a Reference (cheque number, transfer ID) and Notes if useful.
- Click Save Receipt / Save Payment.
#Field guide — Voucher
| Field | What it means | Notes |
|---|---|---|
| Date | When the money moved | Required. |
| Currency | Currency of the voucher | USD, SAR, AED, EUR, GBP. |
| Cash / Bank account | Where cash lands (receipt) or leaves from (payment) | Required. Drawn from your mapped cash/bank accounts. |
| Client / Supplier | The party on the other side | Required. Add new via AR Clients / AP Suppliers. |
| Amount | How much moved | Required. |
| Payment Method | How it was paid | Cash, Bank Transfer, Cheque, Card, Other. |
| Reference | Cheque #, transfer ID, etc. | Optional. |
Tip: To settle a specific invoice and mark it Paid, use Record Payment on the invoice itself. Use this screen for general or on-account receipts and supplier payments.
#Journals
Journals are manual accounting entries — the accountant's direct line into the general ledger for adjustments, accruals, corrections, and year-end entries that no document creates on its own.
Where to find it: Finance → Journals
What you can do here
- Create a balanced manual journal entry.
- Review a draft entry and post it to the ledger.
- Export the journal list.
Who can use it: Accountant, Finance Manager, Admin.
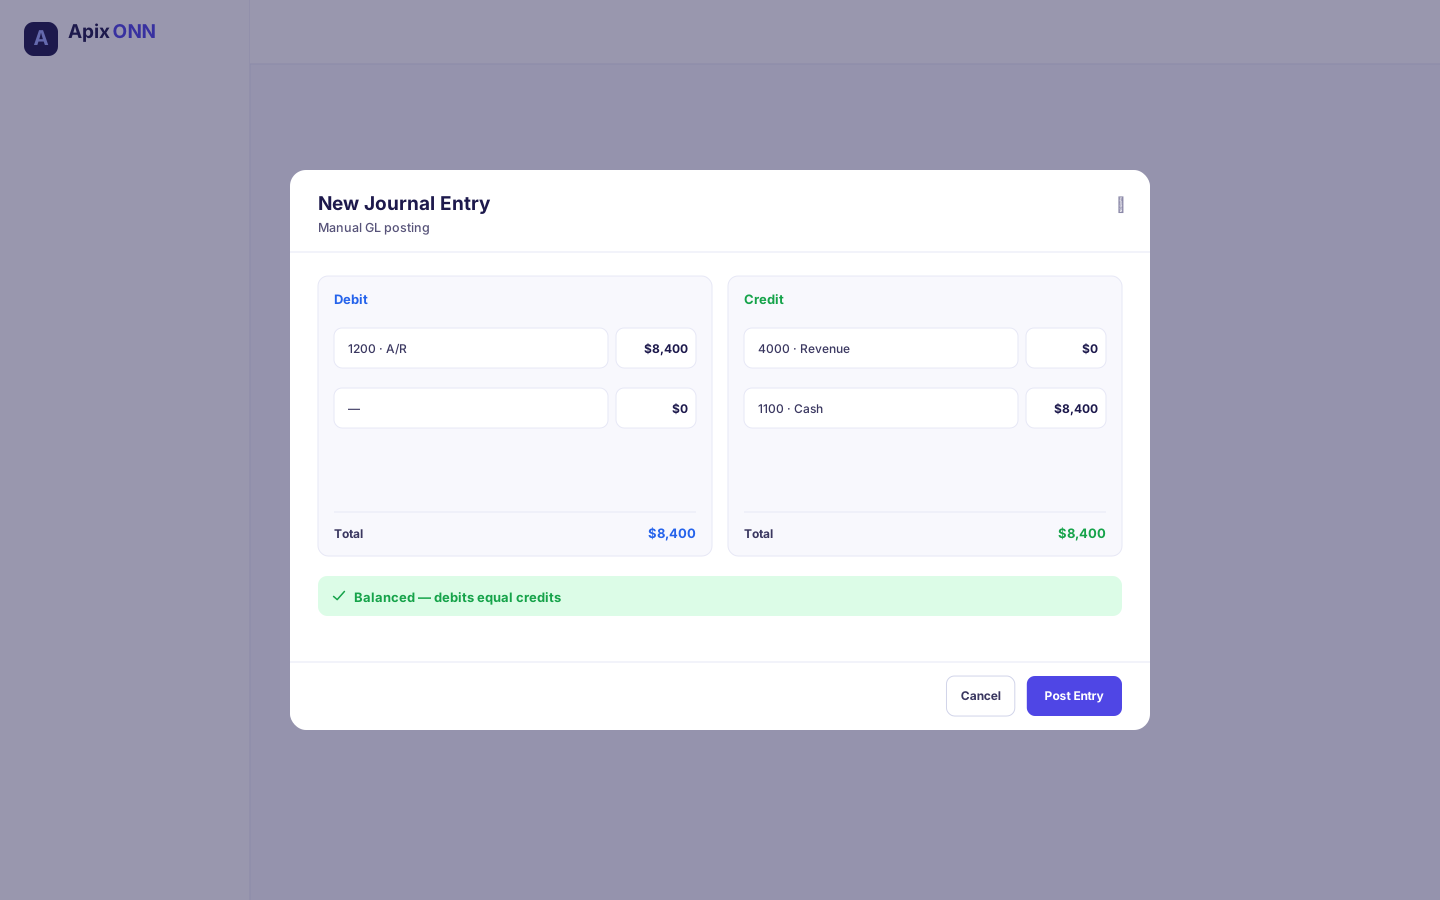
#How to create a journal entry
- Click New Entry.
- Set the Date, choose a Type (Manual, Reversing, or Closing), and add a Reference and a Description.
- On the Debit side, add one or more lines: pick an account, enter an amount, and optionally a note. Use + Add Line for more.
- Do the same on the Credit side.
- Watch the balance bar: total debits must equal total credits. A green check means it's balanced; a red mark shows the difference.
- When balanced, click to save the entry as a Draft.
#How to post a journal entry
- Open a Draft entry from the list (it shows Review & Post →).
- Review the lines in the detail view.
- Click Post to GL and confirm.
Note: Posting updates your GL balances and cannot be undone. To reverse a posted entry, create a Reversing entry.
#Statuses — Journals
| Status | What it means |
|---|---|
| Draft | Entered but not yet in the ledger. Editable. |
| Posted | Committed to the GL. Affects balances and reports. |
| Reversed | Undone by a later reversing entry. |
#Journal types
| Type | Use it for |
|---|---|
| Manual | Everyday adjustments and corrections. |
| Reversing | An entry that automatically undoes a prior one. |
| Closing | Year-end entries that close income into equity. |
| Automatic | Created by the system from invoices, receipts, etc. (you won't create these by hand). |
Tip: You can only post to leaf accounts (the lowest level of the chart). If posting fails, you likely chose a parent/header account — pick the specific sub-account instead.
#Inventory
Buying, receiving, and consuming stock has its own workspace — Inventory (المخزن) in the sidebar — but every movement posts to this same ledger. In short: recording a goods receipt (GRN) debits Inventory / credits GRNI; linking the supplier's bill debits GRNI / credits Accounts Payable (the three-way match); and a goods issue debits Cost of Revenue / credits Inventory. Sending an invoice with stock items on it does the same as a goods issue, at average cost (see Selling stock items). The products are the same catalogue you pick on quotations, sales orders, invoices, bills, and purchase orders, and the Inventory, GRNI, and Cost-of-Revenue accounts are created automatically the first time they're used.
Full details: see the dedicated Inventory page — products & suppliers (including Track stock and reorder settings), PO receipts (GRN), goods issued, the stock report, the Link Bill flow, and the Inventory Reports.
#GL Accounts (Chart of Accounts)
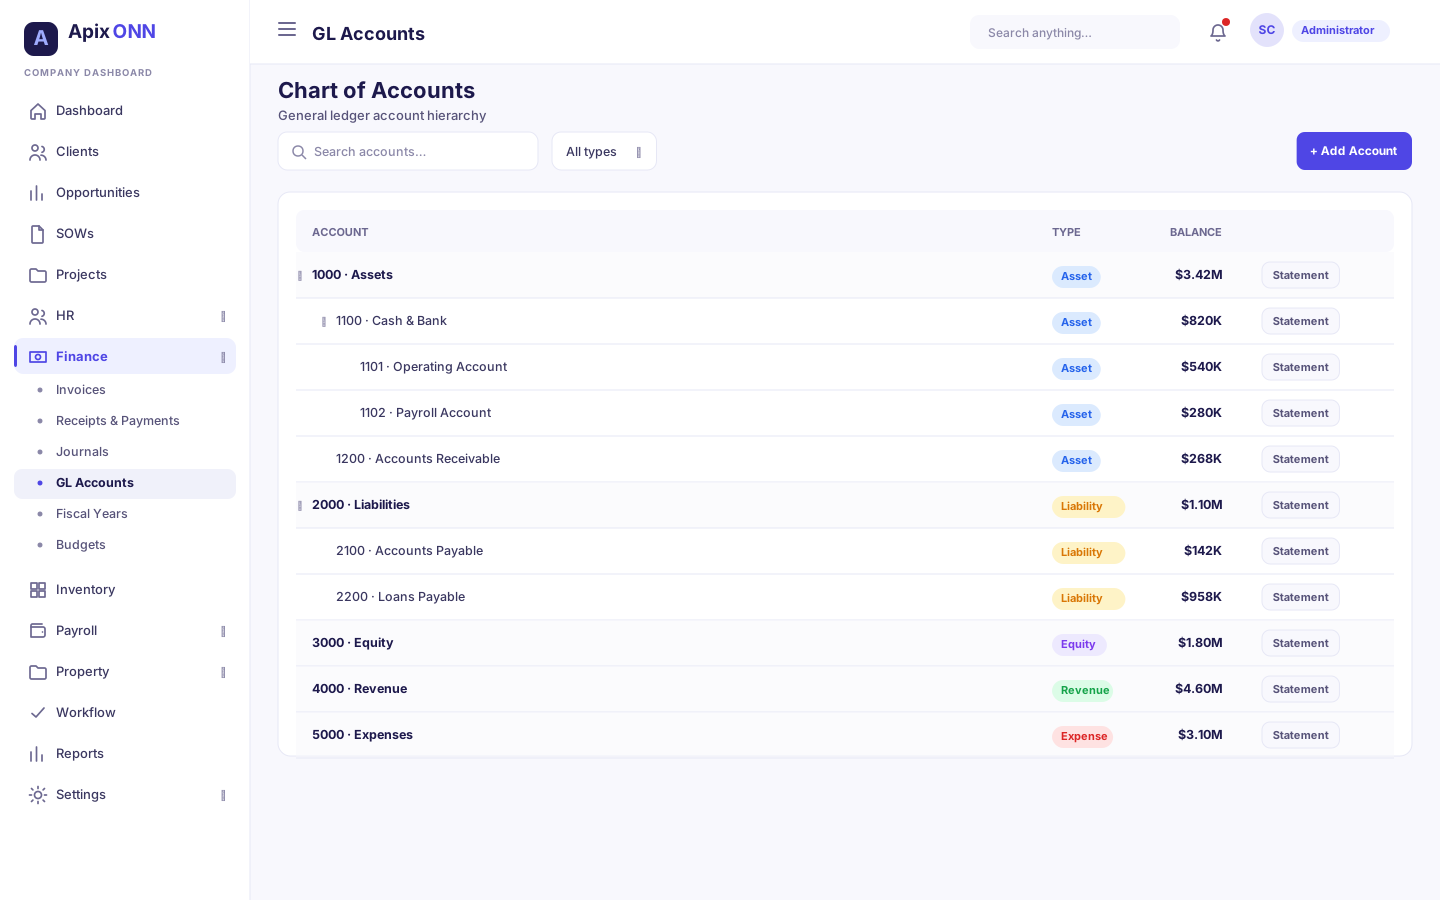
The chart of accounts is the backbone of your books — the full list of accounts every transaction posts into. This screen manages that structure and gives you the trial balance and per-account statements.
Where to find it: Finance → GL Accounts
What you can do here
- Create and edit accounts, organized into a parent/child tree.
- Seed a standard default chart in one click.
- View the Trial Balance and export it (general or detailed with AR/AP sub-accounts).
- Open an Account Statement for any account.
- Mark an account as intercompany — one that records dealings with another of your companies — so it's eliminated in the Consolidated Statements.
Who can use it: Accountant, Finance Manager, Admin. Creating or restructuring accounts is typically Finance Manager or Admin.
#Leaf vs parent accounts
Accounts form a tree. Parent accounts (headers like "Revenue" or "Accounts Receivable") are rollups — they total up their children but you cannot post transactions directly to them. Leaf accounts (the lowest level, like a specific revenue line or a single client's receivable) are where transactions actually land. When you map roles or build entries, always point at a leaf account.
#How to create an account
- Click + New Account (the form opens as "New GL Account").
- Enter a unique Account Code and an Account Name.
- Choose the Type (Asset, Liability, Equity, Revenue, or Expense) and the matching Sub Type.
- Optionally choose a Parent Account (of the same type) to nest it under.
- Set the Currency and an Opening Balance if the account starts with one.
- If the account records dealings with another of your companies, choose that company under Intercompany (see below). Otherwise leave it on Not an intercompany account.
- Add a Description and click Create Account.
Note: After an account exists, you can still change its code, name, description, active flag, and Intercompany company. Its currency can be changed only while nothing has ever been posted to the account — once it has any posting, even if the postings net to zero, the field is locked and shows "Locked — this account has ledger activity." Type, sub-type, parent, and opening balance are locked so historical postings stay consistent.
#Intercompany accounts
If your organization runs more than one company in ApixONN, some accounts exist purely because of dealings between those companies — money one company lent another ("Due from" / "Due to"), or fees one charges the other. When you look at the group as a whole, those balances cancel out and must not be counted. Marking such an account as intercompany tells the Consolidated Statements report to remove it.
How to mark an account as intercompany
- In Finance → GL Accounts, click + New Account, or Edit on an existing account.
- Under Intercompany, pick the other company this account deals with. The hint reads: "Pick the group company this account deals with (e.g. "Due from", or fees charged to it). Its balance is removed when both companies are consolidated."
- Save. In the list, the account now carries an Intercompany · company name tag.
Do this on both sides: in Company A, mark "Due from Company B" with Company B; in Company B, mark "Due to Company A" with Company A. The same goes for income and expense — A's management-fee income and B's management-fee expense. If only one side is marked, or the two sides hold different amounts, the consolidated balance sheet shows an Intercompany difference and the report tells you which pair doesn't agree.
Note: The Intercompany field only appears when you have access to more than one company. An account's balance is eliminated only when both companies are included in the consolidation — consolidate Company A on its own and the account shows at its full balance.
#How to seed a default chart
A new company starts with an empty chart of accounts. Set it up in one step:
- Go to Finance → GL Accounts.
- Click Seed Default Chart (the amber button shown while the chart is empty). Once accounts exist, the same action is the smaller Seed Defaults button.
- Confirm. The system creates a standard chart of about 50 accounts (cash, receivables, payables, revenue, expenses, tax, equity, and so on) and sets up the default account mappings. A message tells you how many accounts and mappings were created.
Note: Seeding never overwrites accounts that already exist, so it's safe to run on a chart you've started yourself.
#Field guide — GL Account
| Field | What it means | Notes |
|---|---|---|
| Account Code | Unique number for the account | Required. |
| Account Name | Human-readable name | Required. |
| Type | Asset, Liability, Equity, Revenue, Expense | Required. Locked after creation. |
| Sub Type | Finer category (e.g. current asset, COGS) | Required. Locked after creation. |
| Parent Account | The header this rolls up into | Optional. Same type only. Locked after creation. |
| Currency | Account currency | Locked once anything has been posted to the account (even if it nets to zero). |
| Opening Balance | Starting balance | New accounts only. |
| Intercompany | The other group company this account deals with | Optional; shown only if you have access to more than one company. Editable anytime. Eliminated in consolidation. |
| Active | Whether it can be used | Editable anytime. |
#Account types
| Type | Represents |
|---|---|
| Asset | What the company owns (cash, receivables, equipment). |
| Liability | What the company owes (payables, tax, loans). |
| Equity | Owners' stake and retained earnings. |
| Revenue | Income the company earns. |
| Expense | Costs the company incurs. |
Tip: The Statement button on any account prints or exports a full transaction history (a ledger) for that account — useful for reconciling or answering "where did this balance come from?".
#Account Mappings
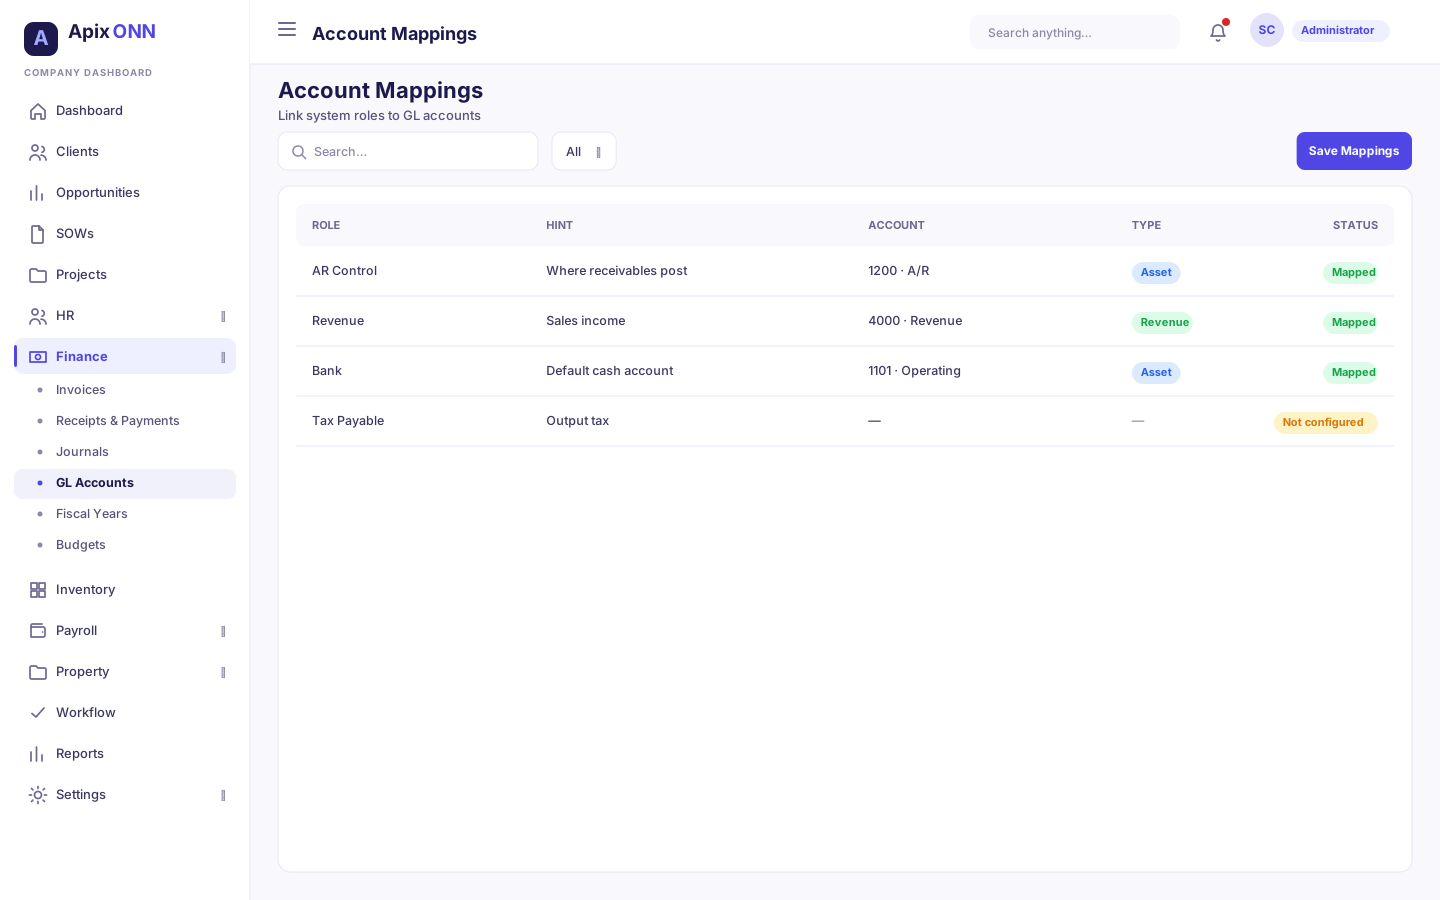
Account mappings are the glue between your documents and your ledger. They tell the system, for each accounting role, which GL account to use — so when you send an invoice or record a receipt, it knows exactly where to post.
Where to find it: Finance → Account Mappings
What you can do here
- Assign a GL account to each predefined role.
- Add custom mappings for anything beyond the standard set.
- See at a glance which roles are still unconfigured.
Who can use it: Finance Manager, Admin, Super Admin. This is setup you do once and rarely touch.
#How to configure a mapping
- Find the role in the list.
- In its dropdown, choose the GL account that role should use.
- The status changes to Mapped. Save your changes.
#The roles you map
The screen lists these predefined roles:
| Role | What it's used for |
|---|---|
| Cash & Bank | Default cash account for receipts, payments, and cash-funded purchases. |
| Bank Account | Main bank account. |
| Accounts Receivable | Customer invoices owed to the company. |
| Accounts Payable | Vendor bills owed by the company. |
| Sales Revenue | Revenue from sales invoices. |
| Service Revenue | Revenue from services rendered. |
| Tax Payable (VAT) | Tax collected and owed to the authorities. |
| Tax Recoverable (Input VAT) | VAT you can reclaim on purchases. |
| Payroll Expense | Gross salary and wage expense. |
| Salaries Payable | Net pay owed to employees. |
| Employer Social Insurance | The employer's share of social insurance (an expense). |
| PAYE / Withholding Payable | Income tax withheld from pay, owed to the authorities. |
| Social Insurance Payable | Social insurance owed (employee + employer share). |
| Other Payroll Deductions Payable | Loans, advances, and other deductions owed. |
| Cost of Revenue | Direct cost of stock consumed or services delivered (posted on a goods issue, and when a stock item is sold on an invoice). |
| Purchase / Vendor Expense | Expenses for purchased goods and services. |
| Inventory | Stock on hand — debited when goods are received, credited when issued. |
| GRNI | Goods Received Not Invoiced — the holding account between receipt and bill. |
| Fixed Asset | Where asset purchases land (fallback when the asset has no account of its own). |
| Accumulated Depreciation | The running total of depreciation taken (a contra-asset). |
| Depreciation Expense | The periodic depreciation charge. |
| Gain on Disposal | Gain when an asset sells for more than its book value. |
| Loss on Disposal | Loss when an asset sells for less than its book value. |
| Retained Earnings | Accumulated profit or loss carried forward. |
| Income Summary | Temporary account used during year-end closing. |
You can also add custom mappings beyond this predefined set if you need to point a specific document type at a particular account.
Note: You don't have to map every role up front. The inventory and fixed-asset accounts, in particular, are created and mapped automatically the first time you receive goods, issue stock, or register an asset — so they'll fill in on their own if you leave them blank.
Note: If invoices post but revenue or receivables land in the wrong place — or don't post at all — check that Accounts Receivable and Sales/Service Revenue are mapped to the correct leaf accounts. This is the single most common finance setup issue.
Note: Finalizing payroll is fail-closed: if a required account (for example Payroll Expense or Salaries Payable) isn't mapped, the finalize is refused — nothing posts — with a message naming the exact role to configure. Map your payroll roles before running a cycle.
#AR Clients
AR Clients are your customers, each held as a sub-account under Accounts Receivable so every client has their own running balance.
Where to find it: Finance → AR Clients
What you can do here
- Add and edit client receivable accounts.
- See each client's serial, opening balance, and current balance.
- Activate or deactivate clients.
#How to add a client
- Click to add a new client.
- Enter the client Name, choose a Currency, and set an Opening Balance if they already owe you something.
- Add Notes if useful and save.
#Field guide — AR Client
| Field | What it means | Notes |
|---|---|---|
| Client Name | The customer's name | Required. Becomes a sub-account of Accounts Receivable. |
| Currency | The client's billing currency | |
| Opening Balance | Any balance carried in from before | Optional. |
| Notes | Free text | Optional. |
Tip: New clients created while building an invoice ("Add Client") land here too.
#AP Suppliers
AP Suppliers are the mirror image of AR Clients: your vendors, each a sub-account under Accounts Payable with its own balance.
Where to find it: Finance → AP Suppliers
What you can do here
- Add and edit supplier payable accounts.
- Track each supplier's opening and current balance.
- Activate or deactivate suppliers.
#Field guide — AP Supplier
| Field | What it means | Notes |
|---|---|---|
| Supplier Name | The vendor's name | Required. Becomes a sub-account of Accounts Payable. |
| Currency | The supplier's currency | |
| Opening Balance | Any balance carried in | Optional. |
| Notes | Free text | Optional. |
Note: AP Suppliers are the accounts your bills and supplier payments post against. The Vendors screen holds richer company/contact details; the two work together.
#Fiscal Years
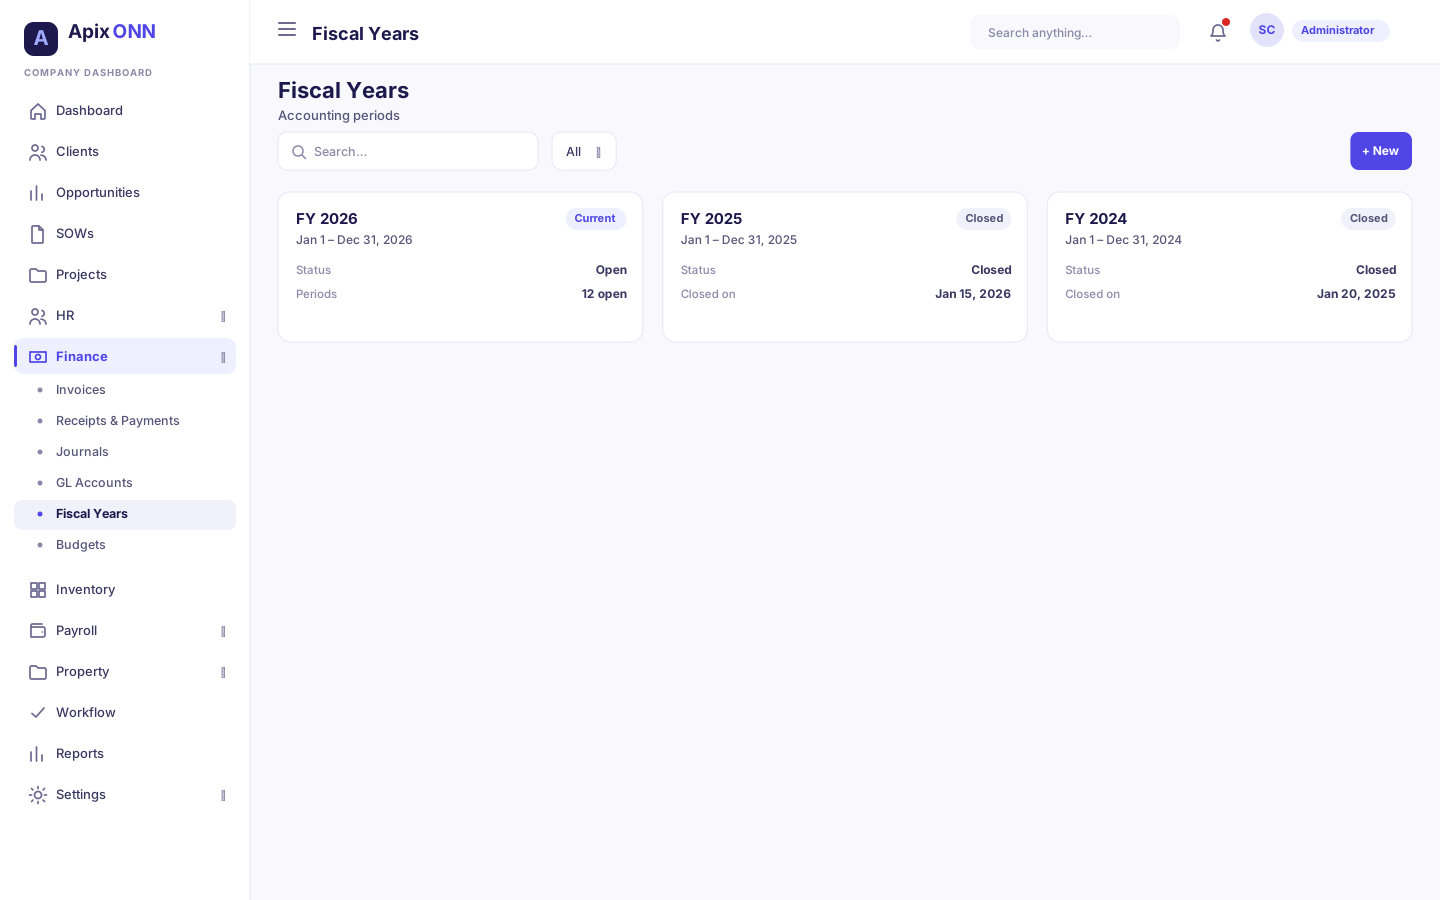
Fiscal years define your accounting periods and let you lock the books once a year is finished.
Where to find it: Finance → Fiscal Years
What you can do here
- Create a fiscal year.
- See which periods are Open and which are Closed.
- Close a completed year to snapshot balances and lock it.
Who can use it: Finance Manager, Admin, Super Admin.
#How to close a fiscal year
- On an open year, click Close Year.
- Read the warning: all GL balances will be snapshotted and the period locked.
- Tick the confirmation checkbox to confirm you want to close it.
- Add optional notes and click Close Fiscal Year.
#Statuses — Fiscal Years
| Status | What it means |
|---|---|
| Open | The period is active; transactions can post to it. |
| Closed | Balances are snapshotted and the period is locked. No new postings. |
| Current | The period marked as today's active year (also open). |
Note: Closing is a deliberate, irreversible year-end step. Make sure all invoices, bills, and adjusting journals for the year are posted first.
#Bills
Bills are the invoices you receive from suppliers — your accounts payable.
Where to find it: Finance → Bills
What you can do here
- Enter a supplier bill with line items.
- Approve a bill and record payment against it.
- Track outstanding and overdue payables; export to Excel or PDF.
#How to enter and pay a bill
- Click to create a bill.
- Select the Supplier (their payable account) — the vendor name fills in.
- Optionally link a Project.
- Set the Bill Date and Due Date, choose the Currency, and add a Reference and Notes.
- Add line items (Description, Qty, Unit Price, and a Tax % picked from your tax rates, or No tax) and save. The bill starts as Draft.
- Click Approve to move it forward.
- Click Pay, set the Payment Date and Payment Method, and record the payment. When fully paid the bill becomes Paid.
#Statuses — Bills
| Status | What it means |
|---|---|
| Draft | Entered but not approved. |
| Approved | Cleared for payment. |
| Paid | Fully paid; payable cleared. |
| Overdue | Approved, past due, still unpaid. |
| Cancelled | Voided. |
Tip: To dispute or reduce a supplier bill, raise a Debit Note against it rather than editing the bill.
#Purchase Requisitions
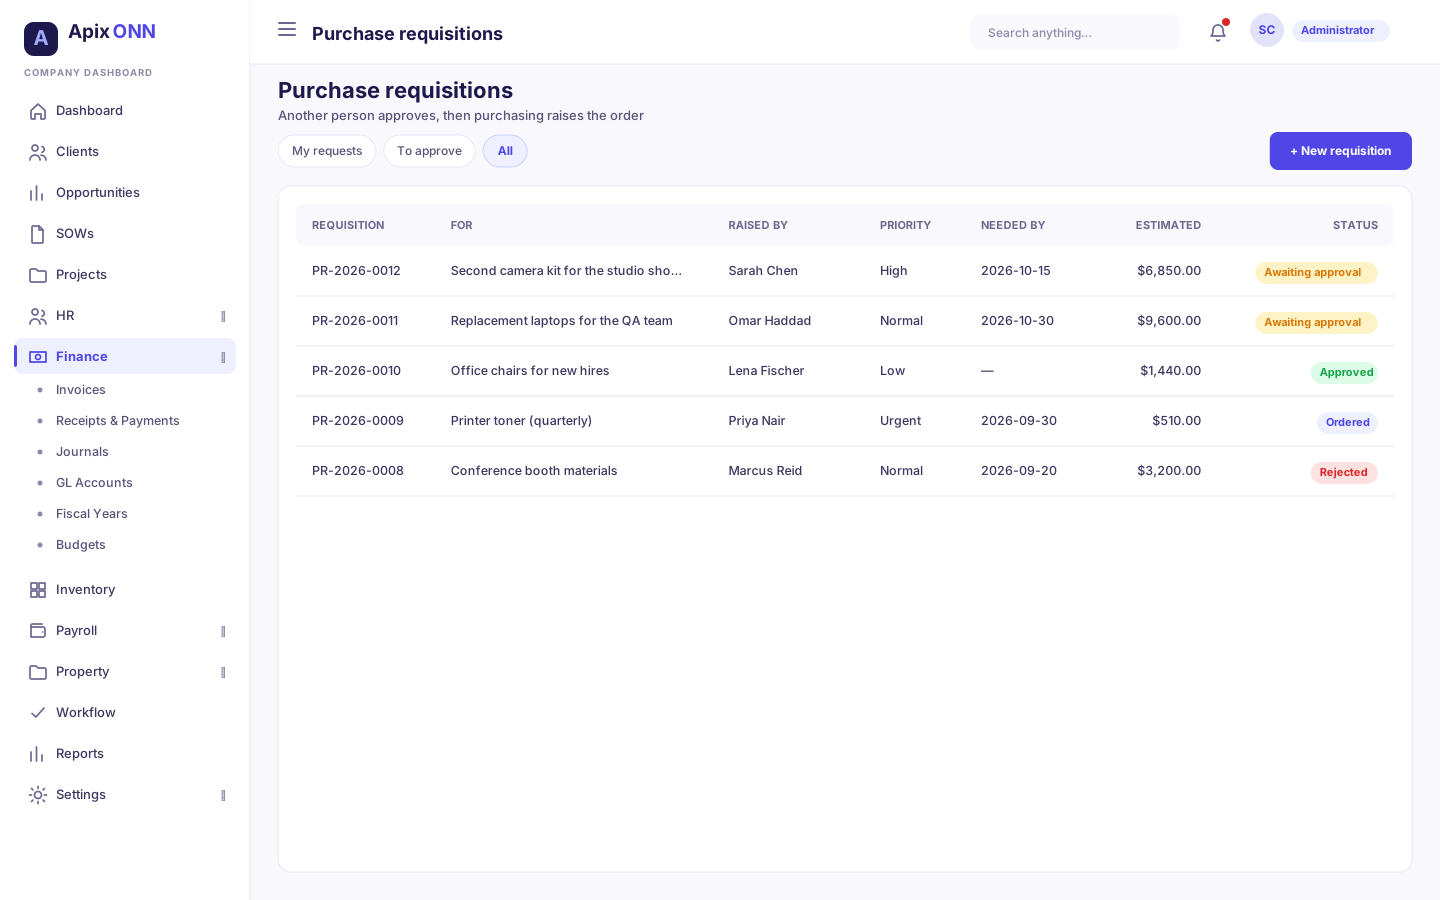
A purchase requisition is an internal request to buy something. Anyone with access can raise one; someone else approves it; then purchasing turns it into a purchase order. Nothing is posted to the ledger.
Where to find it: Finance → Purchase Requisitions
What you can do here
- Raise a requisition saying what's needed, why, how urgently, and roughly what it will cost.
- Submit it for approval, and approve or reject other people's requests.
- Turn an approved requisition into a draft purchase order.
The page has three tabs: My requests (the ones you raised), To approve (requests waiting for a decision, excluding your own — shown only if you can approve), and All. The list shows each requisition's purpose (For), Raised by, Priority, Needed by, Estimated total, and status. Click a row to open it.
#How to raise a requisition
- Click + New requisition.
- Fill in What is it for? (required) — for example, "Second camera kit for the studio shoots in November".
- Set the Priority (Low, Normal, High, Urgent), an optional Needed by date, and an optional Suggested supplier.
- Under Items, pick a Product (stock products show how many are in stock) or type a Description, then the Qty and an Est. unit price. Use + Add item for more. The Estimated total updates as you type, in your company's base currency.
- Click Create requisition. It's saved as a Draft.
- Open it and click Submit for approval. It now shows as Awaiting approval.
#How to approve or reject
- Open the To approve tab and click the requisition.
- Click Approve, or Reject and type the reason. A reason is required — if you leave it empty you'll see "Give a reason, so the requester knows what to change." — and it's shown on the requisition.
You can't approve your own request — on your own submitted requisition you'll see "Waiting for another approver — you can't approve your own request." The panel records who approved or rejected it and when.
#How to turn it into a purchase order
- Open an Approved requisition and click Create purchase order….
- Pick the Supplier. If the requester suggested one, it's already selected. If the vendor isn't set up as a supplier, leave the list empty and type the vendor's name instead.
- Confirm the price for each item — each starts at the estimated unit price.
- Click Create draft PO. You're taken to Purchase Orders, where the new PO waits as a Draft for the normal approve-and-receive steps. The requisition becomes Ordered and links to the PO.
#Editing, cancelling, and deleting
The requester (or anyone who can approve) can Edit a draft, Cancel request while it's a draft, awaiting approval, or approved, and Delete it once it's a draft, rejected, or cancelled.
#Statuses — Purchase Requisitions
| Status | What it means |
|---|---|
| Draft | Being prepared by the requester. |
| Awaiting approval | Submitted; waiting for someone other than the requester to decide. |
| Approved | Signed off. Ready to become a purchase order. |
| Rejected | Declined, with the approver's reason. |
| Ordered | Turned into a purchase order. |
| Cancelled | Withdrawn. |
Who can use it: viewing, raising (Raise Purchase Requisitions), and approving (Approve Purchase Requisitions) are separate permissions, and only people who can approve see the To approve tab. The Finance Manager role has all three, so finance managers are the approvers out of the box — and like everyone else, a finance manager's own request has to be approved by someone else. Anyone else who needs to raise or approve requisitions can be given those permissions through their role. Creating the purchase order also needs permission to create purchase orders.
#Purchase Orders
Purchase Orders (POs) are your formal commitments to buy from a supplier, ahead of the bill. Receiving a PO records the goods and can feed inventory.
Where to find it: Finance → Purchase Orders
What you can do here
- Raise a PO to a supplier with line items — or get a draft PO from an approved purchase requisition.
- Approve, receive (record a goods-received note), or cancel a PO.
#How to raise and receive a PO
- Click to create a purchase order.
- Select the Supplier.
- Set the PO Date and an Expected Delivery date, choose the Currency, and add Terms and Notes.
- Add line items and save (status Draft).
- Click Approve to authorize it.
- When goods arrive, click Receive and record what was received (a GRN — goods received note). The PO becomes Received.
#Statuses — Purchase Orders
| Status | What it means |
|---|---|
| Draft | Created, not yet approved. |
| Approved | Authorized and sent to the supplier. |
| Received | Goods received against the PO. |
| Cancelled | Voided. |
Note: A received PO can be linked to a supplier bill so what you ordered, received, and were billed for all reconcile.
#Bank Accounts
Bank Accounts are your company's real-world bank and cash accounts, used for payments, receipts, and reconciliation.
Where to find it: Finance → Bank Accounts
What you can do here
- See every bank account as a card with its currency, Ledger account, and Current Balance, plus your Total Cash Position across accounts.
- Add a bank account with + Add Bank Account, and link it to its ledger account.
- Edit an account, or mark it inactive.
#The ledger account
Each bank account links to a ledger account: the GL account where its receipts and payments post, and whose lines you tick in Bank Reconciliation.
- Pick it in the Ledger account field by searching your asset accounts by code or name.
- If you leave it empty, the company's mapped Bank Account is used (see Account Mappings). The card then shows Company bank mapping as its ledger account.
Tip: If you have more than one bank account, give each its own ledger account. That way each one's postings, balance, and reconciliation stay separate.
#Field guide — Bank Account
| Field | What it means | Notes |
|---|---|---|
| Bank Name | The bank | Required. |
| Account Name | The name on the account | Required. |
| Account Number | The account number | Required. Shown masked on the card (last four digits). Can't be changed once the account exists. |
| IBAN | The international account number | Optional. |
| Currency | The account's currency | Can't be changed once the account exists. |
| Opening Balance | Starting balance | Can't be changed once the account exists. |
| Opening Date | Date the opening balance applies from | Defaults to today. Can't be changed once the account exists. |
| Ledger account | Where this account's receipts and payments post | Optional. Leave empty to use the company's mapped Bank account. |
| Active | Whether the account is in use | Shown when you edit an account. |
#Bank Reconciliation
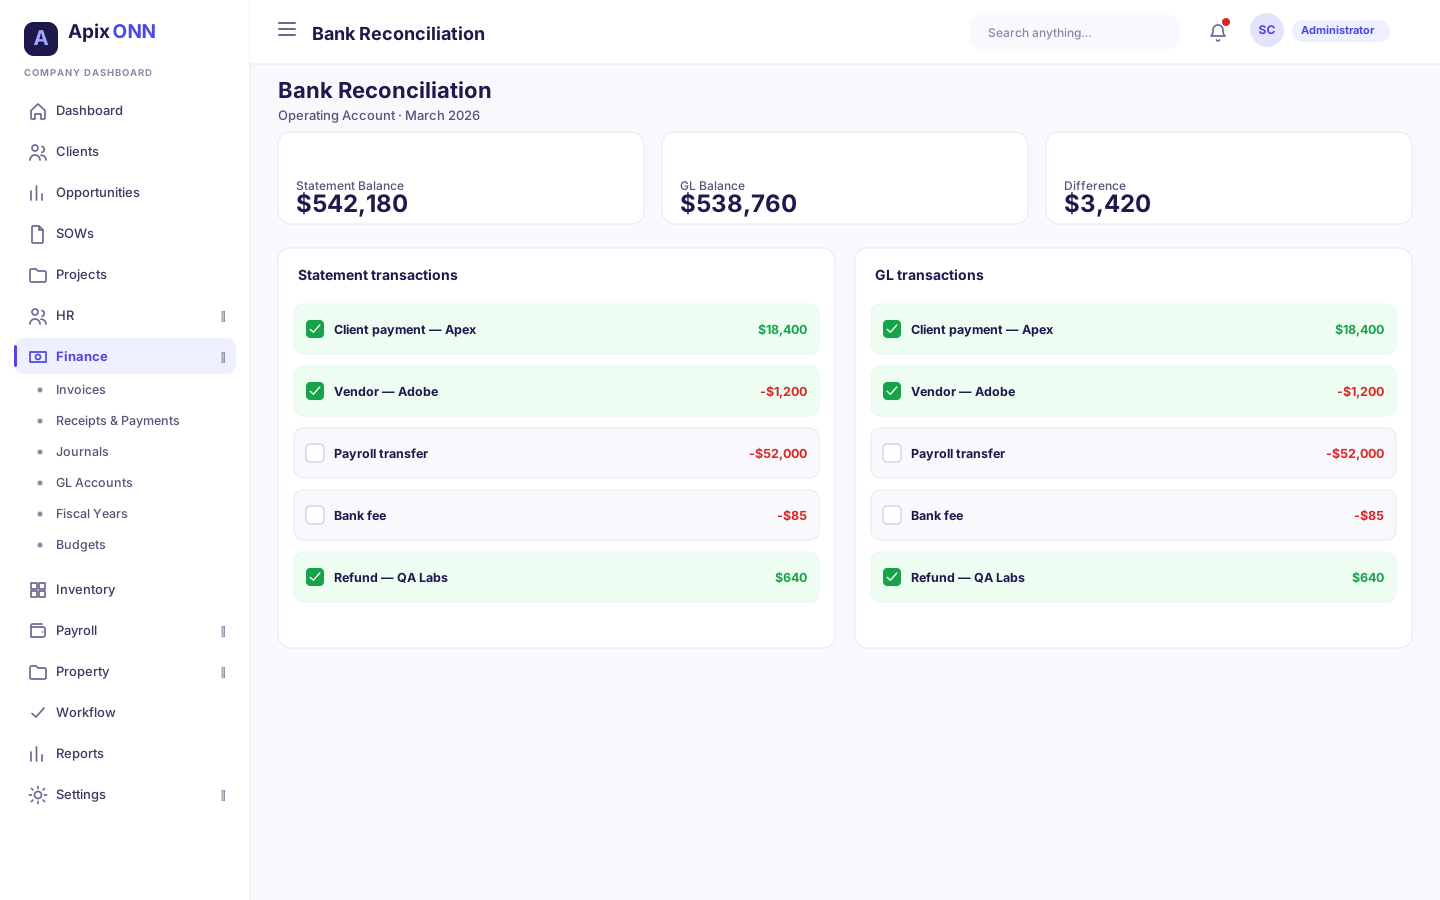
Bank reconciliation checks your ledger against your bank statement, line by line, so you can prove your recorded cash equals the bank's cash.
Where to find it: Finance → Bank Reconciliation
What you can do here
- Start a reconciliation for a bank account from a bank statement's date and ending balance.
- Tick every ledger line that appears on the statement.
- Finalize once the difference is 0.00, or discard an unfinished reconciliation.
- Review past reconciliations in Reconciliation history.
#How to reconcile
-
Choose the Bank account. Its Reconciliation history appears below.
-
Click Start reconciliation. Enter the Statement date and the Ending balance on the statement, exactly as printed on your bank statement, then click Start.
-
The list shows every deposit and payment posted to the account's ledger up to the statement date that hasn't been reconciled yet. Tick each line that also appears on the statement. You can click anywhere on a row to tick it. Your ticks are saved as you go.
-
Watch the summary at the top:
Card What it shows Beginning balance The last reconciled balance. + Cleared deposits The deposits you've ticked. − Cleared payments The payments you've ticked. = Cleared balance Beginning balance plus cleared deposits minus cleared payments. Statement balance The ending balance you entered. Difference Statement balance minus cleared balance. It must be 0.00. -
When the Difference is 0.00, click Finalize and confirm. The ticked lines are marked as reconciled and won't appear again. Unticked lines (for example, cheques that haven't cleared yet) stay open for the next statement.
Important: A finalized reconciliation can't be reopened. Check your ticks against the statement before you click Finalize.
#Rules to know
- Where each statement starts. The next statement's beginning balance is the last reconciled balance. For an account's first reconciliation, it's the account's opening balance. Each new statement date must be after the last reconciled one.
- One at a time. Only one reconciliation can be open per bank account. While one is open, the button reads Continue statement of … instead of Start reconciliation. Finish it or discard it before you start the next.
- Discarding. To abandon an unfinished reconciliation, click Discard reconciliation and confirm. Your ticks are dropped, and nothing in the ledger changes.
- Which ledger account. The lines come from the bank account's own ledger account. If it has none, the company's mapped Bank account is used, and the screen tells you so.
- Permissions. Ticking, finalizing, and discarding need the bank reconciliation edit permission. Without it, you can view a reconciliation but not change it.
Statuses (in Reconciliation history)
| Status | What it means |
|---|---|
| In progress | Started but not finalized. Click Continue to carry on. |
| Finalized | Done. Click View to see the lines it reconciled. |
Tip: A difference that won't go to zero usually means a bank charge, interest, or transfer on the statement that isn't in the ledger yet. Post it (for example as a journal entry), then come back and tick it.
#Expenses
Expenses are direct company costs — travel, supplies, subscriptions — that flow through an approval workflow before payment.
Where to find it: Finance → Expenses
What you can do here
- Record an expense against an expense account.
- Approve or reject submitted expenses.
- Pay an approved expense, which posts the ledger entry.
#How to record and process an expense
- Click to create an expense.
- Choose the Expense Account (what it's for) and the Payment Account (where the cash will come from).
- Optionally link a Project.
- Set the Expense Date, Amount, and Currency, and write a Description.
- Save it. It moves through Submitted for review.
- A reviewer clicks Approve (or Reject with a reason).
- Once approved, click Pay to record payment — the expense is debited and the payment account credited. The expense becomes Paid.
#Statuses — Expenses
| Status | What it means |
|---|---|
| Draft | Being prepared. |
| Submitted | Awaiting approval. |
| Approved | Cleared for payment. |
| Rejected | Declined (with a reason). |
| Paid | Paid and posted to the ledger. |
Note: Approving and paying are usually separate roles — a manager approves, finance pays. A rejected expense shows the reviewer's reason.
#Budgets
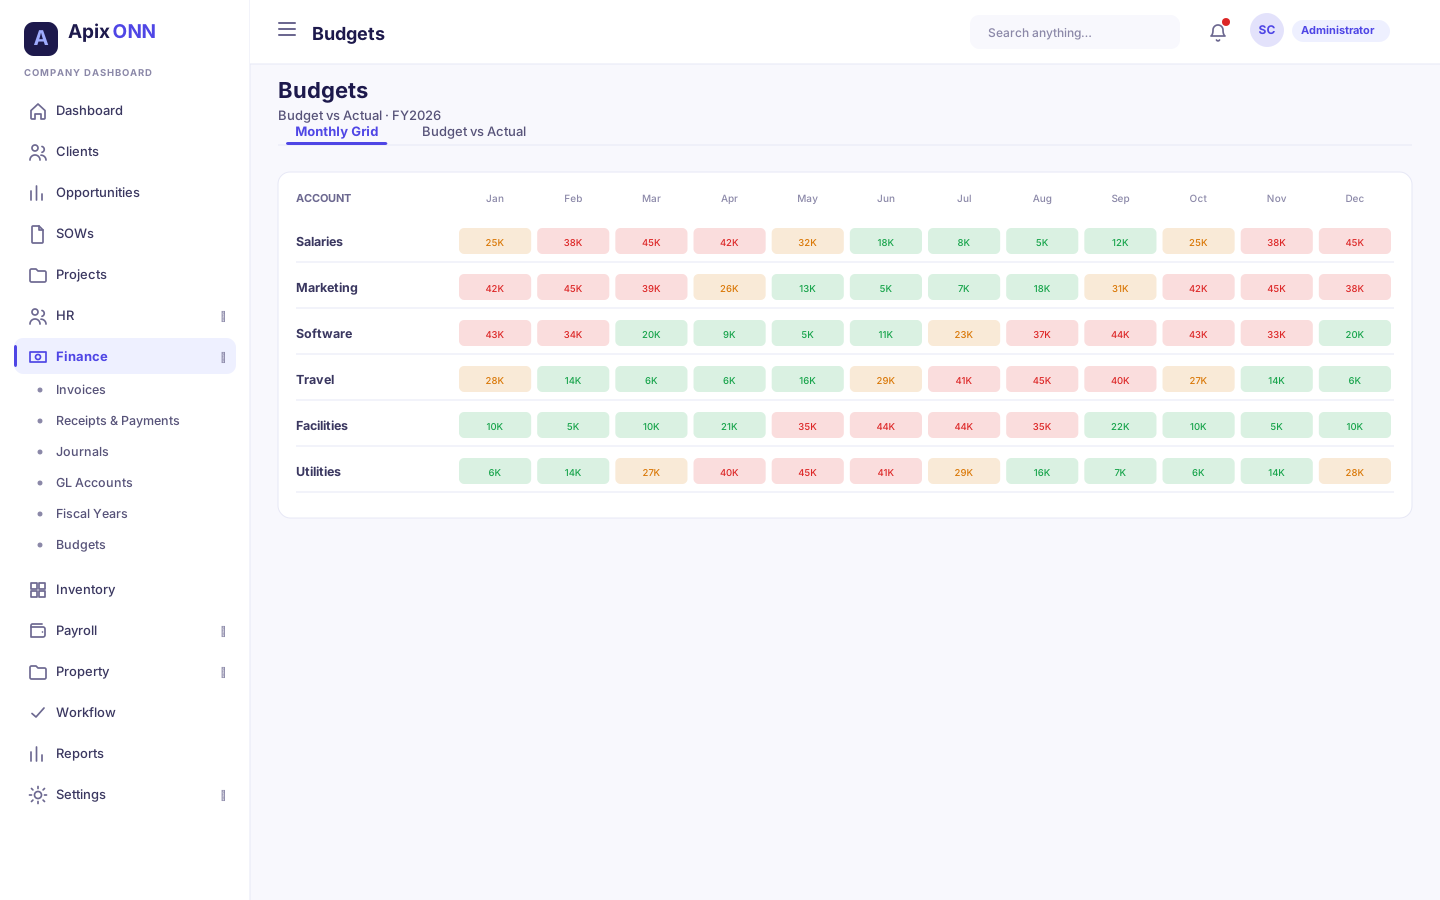
Budgets let you set planned figures per account, month by month, for a fiscal year, then compare them against actuals.
Where to find it: Finance → Budgets
What you can do here
- Enter a monthly budget for each GL account within a fiscal year.
- Save the budget.
- View Budget vs Actual to see variances.
#How to build a budget
- Choose the Fiscal Year (the current year is selected by default).
- The grid lists your accounts with a column for each month.
- Enter planned amounts per account per month. (Tip: double-click a cell to copy that value across all months.)
- Click Save.
- Switch to Budget vs Actual to compare your plan against what actually posted.
#Fixed Assets
Fixed Assets tracks long-lived company property (equipment, vehicles, furniture), posts its purchase and disposal to the ledger, and depreciates it over time.
Where to find it: Finance → Fixed Assets
What you can do here
- Register an asset with its cost and depreciation schedule — this posts the purchase to your books.
- Run depreciation for a period across all assets.
- Dispose of an asset when it's sold or retired — this posts the disposal, including any gain or loss.
#How to register an asset (and how it posts)
- Click to add an asset.
- Enter its details (name, category, purchase date, cost, residual value), choose a Depreciation Method, and set the Useful Life (months) — the screen previews the monthly and annual depreciation. Optionally point it at a specific asset GL account.
- Choose the Funding Source — Cash, Bank, or On account (payable). This sets the credit side of the entry.
- Save the asset (status Active).
When you register the asset, the system posts the purchase for you: it debits the Fixed Asset account (the asset's own account if you picked one, otherwise the mapped Fixed Assets account) and credits the funding account. The asset's cost is on your balance sheet from day one — not only once depreciation starts.
#How to run depreciation
Periodically click Run Depreciation, choose the period, and confirm — the system depreciates every eligible asset and posts one entry for the run: debit Depreciation Expense, credit Accumulated Depreciation.
#How to dispose of an asset (and how it posts)
- On an Active asset, click Dispose.
- Enter the disposal date, any proceeds (what you sold it for) and where they land (Cash, Bank, or Receivable), and a reason.
- Confirm. The asset moves to Disposed.
The disposal entry takes the asset off your books cleanly: it credits the Fixed Asset account (removes the original cost), debits Accumulated Depreciation (removes the depreciation taken), debits the proceeds account for anything you received, and books the difference as a gain (credit) or loss (debit) on disposal.
#Statuses — Fixed Assets
| Status | What it means |
|---|---|
| Active | In service and depreciating. |
| Disposed | Sold or retired; no longer depreciating. |
Note: Registering and disposing both post to the ledger, using the Fixed Asset, Accumulated Depreciation, gain/loss-on-disposal, and a cash/bank/payable account. You don't need to set these up first — the system creates and maps any that are missing the first time you register or dispose of an asset.
#Credit Notes
A credit note reduces what a client owes you — for a return, an overcharge, or a goodwill credit. It's the correct way to adjust a sent invoice without deleting it.
Where to find it: Finance → Credit Notes
What you can do here
- Issue a credit note against a customer invoice.
- Apply it to an invoice to reduce the outstanding balance.
#How to issue and apply a credit note
- Click to create a credit note and select the invoice it relates to, plus the amount and reason.
- Save it — it starts as Pending.
- To use it, click Apply, choose the invoice to apply it to and the amount, and confirm. The invoice's outstanding balance drops accordingly.
#Statuses — Credit Notes
| Status | What it means |
|---|---|
| Pending | Issued but not yet applied. |
| Applied | Used against one or more invoices. |
| Voided | Cancelled. |
#Debit Notes
A debit note is the supplier-side equivalent: it reduces what you owe a vendor — for returned goods, an overcharge, or a rebate.
Where to find it: Finance → Debit Notes
What you can do here
- Raise a debit note against an approved supplier bill.
- Approve it, then apply it to a bill.
- Cancel one that's no longer needed.
#How to raise, approve, and apply a debit note
- Click to create a debit note, select the bill it's against, choose a reason (Return, Overcharge, Rebate, Other), and add line items. It starts as Draft.
- Click Approve to authorize it.
- Click Apply, choose the bill and amount, and confirm — your payable to that supplier is reduced.
#Statuses — Debit Notes
| Status | What it means |
|---|---|
| Draft | Being prepared. |
| Submitted | Awaiting approval. |
| Approved | Authorized, ready to apply. |
| Applied | Used against a bill. |
| Cancelled | Voided. |
#Vendors
Vendors holds the company and contact details for the suppliers you buy from — names, emails, phone numbers, and payment terms. It complements the AP Suppliers accounts.
Where to find it: Finance → Vendors
What you can do here
- Add and edit vendor records with default payment terms.
- Activate or deactivate a vendor.
#Field guide — Vendor
| Field | What it means | Notes |
|---|---|---|
| Vendor details | Name, email, phone | |
| Payment Terms | Default terms for their bills | Net 30, Net 60, Net 90, Due on Receipt, or Custom. |
| Currency | The vendor's currency | |
| Status | Active or Inactive | Toggle with Deactivate / Activate. |
#Tax Rates
Tax Rates defines the tax percentages you apply on invoices, bills, and products.
Where to find it: Finance → Tax Rates
What you can do here
- Create tax rates of different kinds.
- Turn a rate on or off.
#Field guide — Tax Rate
| Field | What it means | Notes |
|---|---|---|
| Code | Short unique code for the rate | Required. |
| Name | Label for the rate | e.g. "Standard VAT 15%". |
| Type | Kind of tax | VAT, GST, Sales Tax, Withholding, or Custom. |
| Rate | The percentage | |
| Compound | Whether it stacks on top of other taxes | Optional. |
| Active | Whether it's selectable | Toggle on the list. |
Tip: Deactivate rather than delete a rate that's been superseded, so historical documents keep their original tax.
#Tax on document lines
On quotations, sales orders, invoices, bills, credit notes, and debit notes, each line's Tax % is picked from a list of your tax rates rather than typed in. The list shows each rate as its name and percentage, for example "Standard VAT (15%)", with No tax at the top. Products have the same list in their Tax Rate % field.
- Rates of 0% and withholding rates aren't offered on lines. Choose No tax for a line with no tax.
- If a saved document has a percentage that doesn't match any current rate, it shows as "n% (other)".
- If no tax rates are set up yet, or your role can't view them, the field is a plain box where you type the percentage.
#Where to get help
- Setup questions (accounts, mappings, fiscal years): your Finance Manager or Admin.
- A blocked invoice send (credit limit): a Finance Manager or Admin who can approve the override.
- Postings landing in the wrong account: check Account Mappings first, then the specific document's client/supplier account.
- Locked period ("can't post to this date"): the fiscal year is closed — talk to your Finance Manager.