Payroll
Payroll is where you run your company's monthly pay: you create a pay cycle, calculate everyone's pay, send it for approval, produce a bank transfer file, and record that people were paid. This area also holds the building blocks that feed every run — salary components, deductions, adjustments, loans, salary changes, tax brackets, and country-specific rules. It is used mainly by your Payroll Manager and Finance Manager, with HR Manager and Admin support, while everyday employees only ever see their own payslips.
Company Dashboard25 min read17 sections
On this page17 sections
- How payroll is organized
- The monthly payroll run, end to end
- Payroll Cycles
- Payslips
- Salary Components
- Deductions
- Adjustments
- Loans and Salary Advances
- Salary Changes
- Tax Brackets and Country Rules
- Social Insurance
- End of Service (Gratuity)
- Bank Files (salary transfer file)
- Payments (payment status & reconciliation)
- Payroll Reports
- Who does what (roles)
- Common questions
Note: Payroll is a licensed module. If you don't see Payroll in the sidebar, your company may not have the module enabled, or your role may not include payroll permissions. Contact your Admin.
#How payroll is organized
Where to find it: the Payroll section in the left sidebar.
Every payroll screen has its own link in the sidebar:
| Sidebar link | What it opens |
|---|---|
| Cycles | The monthly payroll runs — your main workspace. |
| Payslips | Every individual payslip across all cycles. |
| Loans | Employee loans and salary advances. |
| Tax Brackets | The income-tax bands used to calculate tax. |
| End of Service | The gratuity / severance calculator. |
| Salary Components | Recurring allowances and deductions per employee. |
| Adjustments | One-off bonuses, penalties, and corrections on a payslip. |
| Salary Changes | Raises, promotions, and other basic-salary changes. |
| Bank Files | The salary transfer files for your bank. |
| Payments | Whether each employee's transfer succeeded. |
| Payroll Reports | The payroll report library. |
| Payroll Settings | Country rules, social insurance, and compliance. |
Bank Files and Payment Status also open from buttons on an approved or paid cycle.
Tip: Think of it in two layers. The setup layer (components, tax brackets, country rules, social insurance) rarely changes. The run layer (cycles, bank files, payments) is what you touch every month.
#The monthly payroll run, end to end
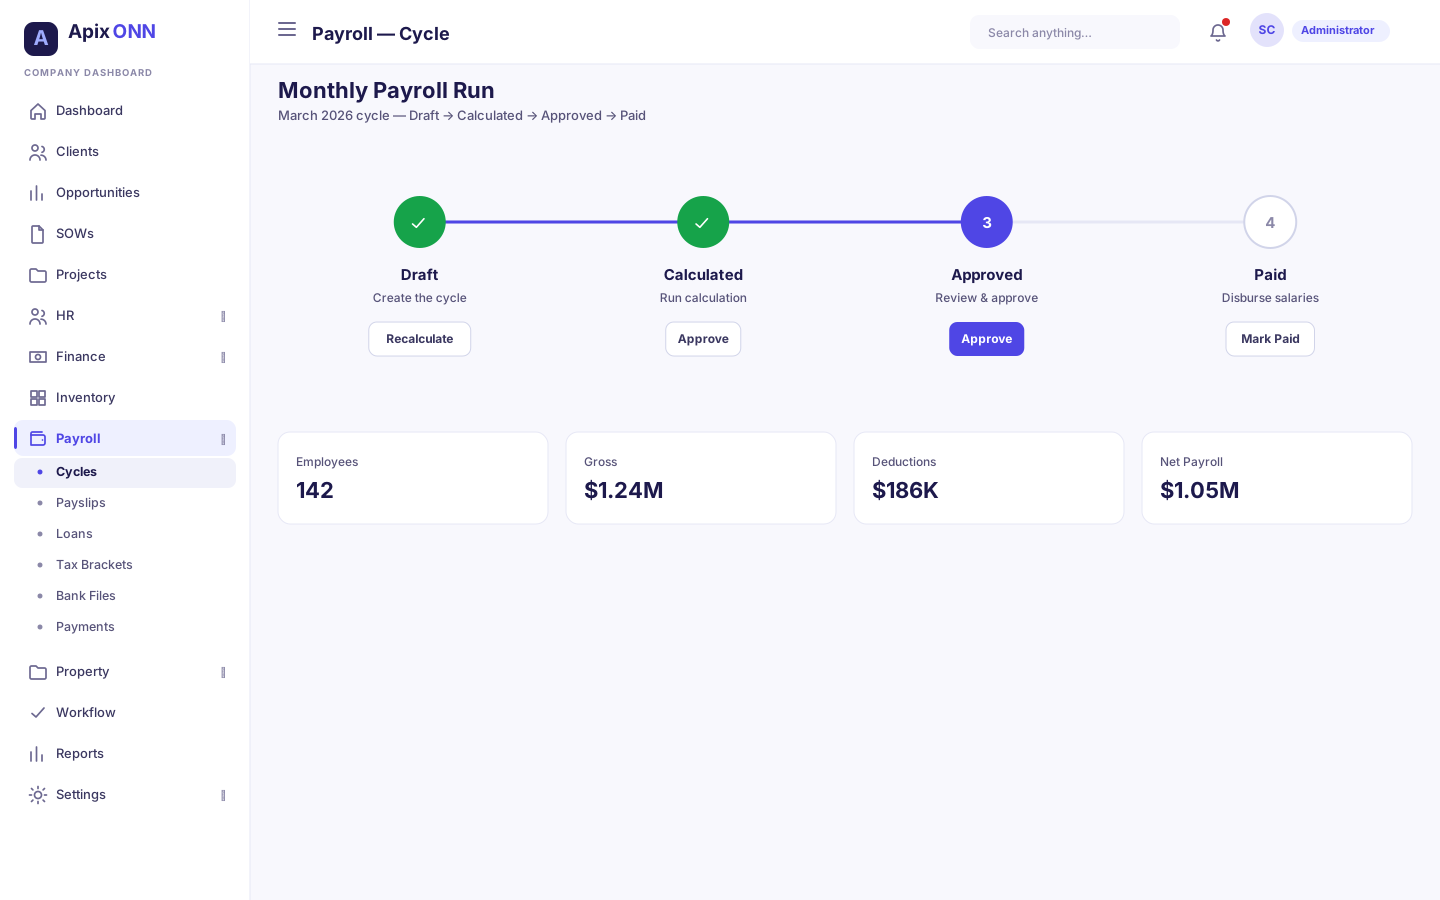
Before diving into each screen, here is the whole run in one picture. A cycle moves through four states, and each state unlocks the next action.
| Step | You do this | Cycle status becomes | Who does it |
|---|---|---|---|
| 1. Create the cycle | Set the period and payment date. Payslips are auto-created for every active employee. | Draft | Payroll Manager |
| 2. Calculate | The system works out basic pay, overtime, allowances, deductions, loan repayments and tax for everyone. | Calculated | Payroll Manager |
| 3. Approve | A reviewer signs off the calculated run. | Approved | Finance Manager (or a role with approval rights) |
| 4. Finalize & pay | All payslips are marked paid, loan repayments confirmed, and the payroll accounting entry is posted to the general ledger. | Paid | Payroll Manager / Finance Manager |
| 5. Bank file | Generate the salary transfer file, validate it, download it and send it to your bank. | (file has its own statuses) | Payroll Manager |
| 6. Reconcile payments | Record which transfers succeeded or failed. | — | Payroll Manager / Finance Manager |
Important: Calculating a cycle locks the approved timesheets for that period so pay can't drift after the fact. Approving a cycle cannot be undone. Do your checking at the Calculated stage.
#Payroll Cycles
Where to find it: Payroll → Cycles
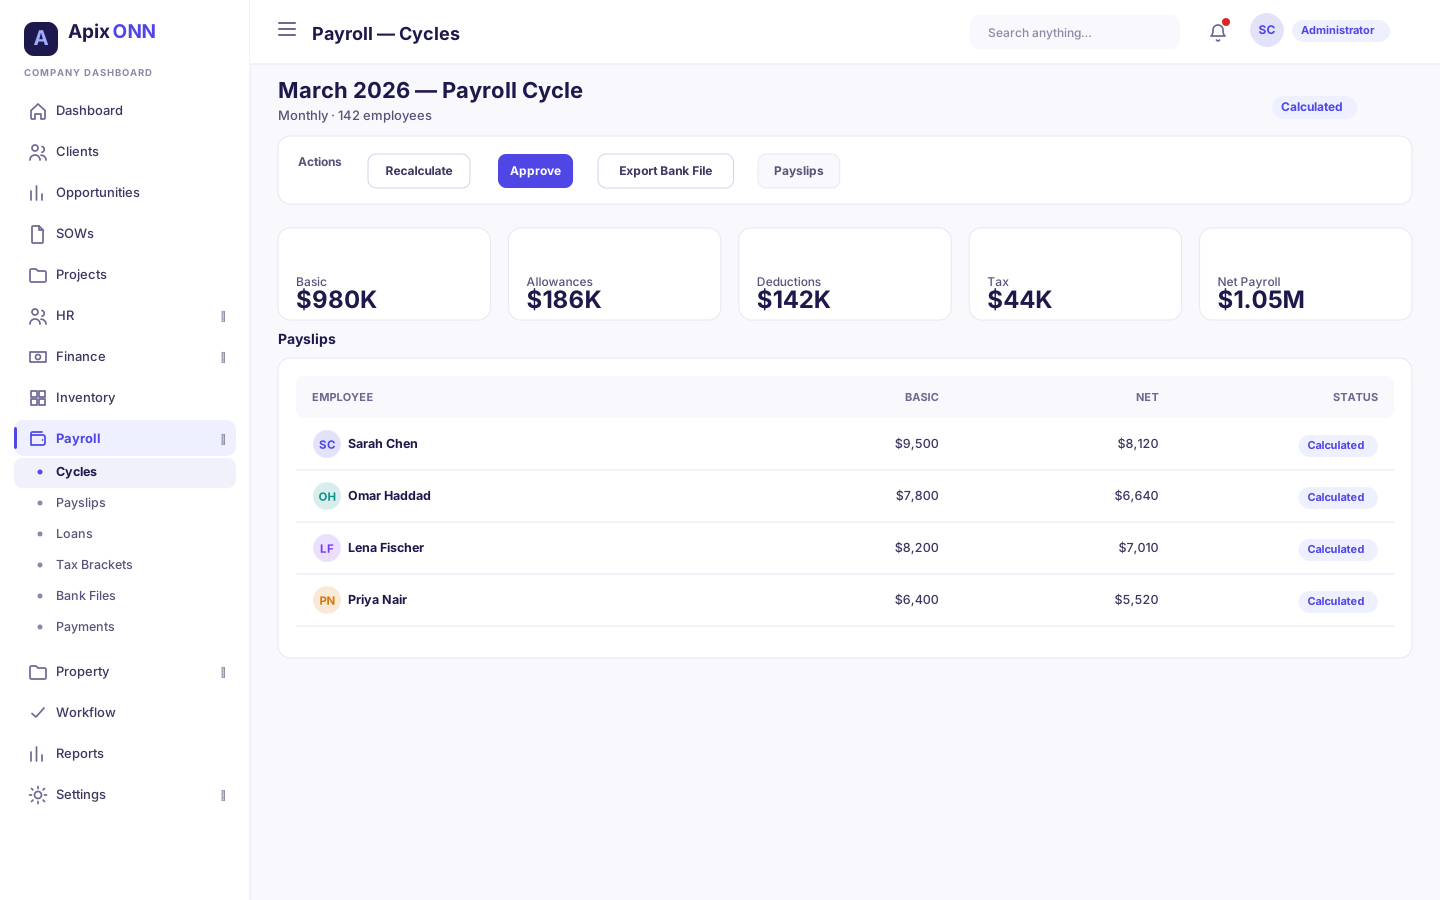
A cycle is one payroll run — usually one calendar month. This is the screen you'll live in during a pay run.
#What you can do here
- See every cycle as a card with its net payroll, basic pay, allowances, deductions and tax.
- Filter by status and year.
- Create a new cycle.
- Open a cycle to calculate, approve, finalize, download payslips and generate the bank file.
#How to create a payroll cycle
- Go to Payroll → Cycles.
- Click + Create Cycle (top right).
- Either fill the form or click Quick Fill to auto-populate the current month.
- Enter a Cycle Name (e.g. "January 2026 Payroll").
- Set the Start Date and End Date for the pay period.
- Set the Payment Date (when staff should be paid).
- Optionally add Notes.
- Click Create Cycle.
The moment the cycle is created, a draft payslip is generated for every active employee automatically — you don't add people one by one.
Note: The currency and country of a cycle come from your company settings, not from this form. That country decides which tax brackets, social-insurance rules and default bank-file format apply.
Field guide — Create Cycle
| Field | What it means | Notes |
|---|---|---|
| Cycle Name | A label for the run | Required. Use a clear month/year name. |
| Start Date | First day of the pay period | Required. |
| End Date | Last day of the pay period | Required. Must be after the start date. |
| Payment Date | The day employees are paid | Required. Must be on or after the end date. |
| Notes | Free-text remarks | Optional. |
#How to run a cycle (calculate → approve → finalize)
- From Cycles, click the cycle card to open it.
- In the Actions panel, click the button that matches the current status:
- Calculate Payroll (when Draft) — computes every payslip and submits the run for approval. You'll be warned that this locks approved timesheets.
- Approve Payroll (when Calculated) — signs off the run. This can't be undone.
- Finalize & Pay (when Approved) — marks all payslips as paid.
- Confirm the prompt each action shows.
Once approved or paid, extra buttons appear: Download PDF (all payslips in one file), Generate Bank File, and — after paying — Payment Status.
#What "Finalize & Pay" posts to the ledger
Finalizing is the point where payroll reaches your books. In one balanced accounting entry, the system:
- Debits Salary & Wages Expense with the total gross pay, and debits Employer Social Insurance with the employer's share.
- Credits Salaries Payable (net pay owed to staff), PAYE / Withholding Payable (income tax withheld), Social Insurance Payable (employee + employer contributions), and Other Deductions Payable (loans and other withholdings).
Paying the salaries out of the bank (via the bank file and Payment Status) settles the Salaries Payable balance separately — the payroll entry accrues what's owed; the bank payment clears it.
Important — fail-closed. If any account the entry needs isn't mapped, finalizing is refused and nothing is recorded — the cycle stays Approved — with a message naming the exact role to configure (for example "no GL account is mapped for the 'payroll_expense' role"). Set up the payroll roles under Finance → Account Mappings (Payroll Expense, Salaries Payable, Employer Social Insurance, PAYE Payable, Social Insurance Payable, Other Payroll Deductions Payable) before your first live finalize. This is deliberate — better to block a run than to mark everyone paid with no matching entry in the books.
#Cycle statuses
| Status | What it means | What you can do next |
|---|---|---|
| Draft | Payslips created but nothing calculated yet | Calculate |
| Calculated | Pay worked out and sent for approval | Approve (or review the numbers first) |
| Approved | Signed off, ready to pay | Finalize & Pay, generate bank file, download payslips |
| Paid | Everyone marked paid | Generate/manage bank file, view payment status, download payslips |
#What "Calculate" actually does
For each employee it pulls together:
- Basic pay, prorated by days actually worked in the period (from attendance/leave).
- Overtime — regular, weekend and holiday hours from approved timesheets, each at its own multiplier.
- Allowances (housing, transport, food, other, plus any salary components).
- Deductions, including loan and advance repayments due this cycle, which are added automatically.
- Tax and social insurance, using the rules for the cycle's country.
It then totals the whole cycle and locks the timesheets it used.
Tip: If overtime looks like zero when it shouldn't, the employee's grade or contract may be missing the hours/rate settings the calculation needs. Check the employee's grade before re-running.
#Payslips
Where to find it: Payroll → Payslips (or click a payslip inside a cycle)
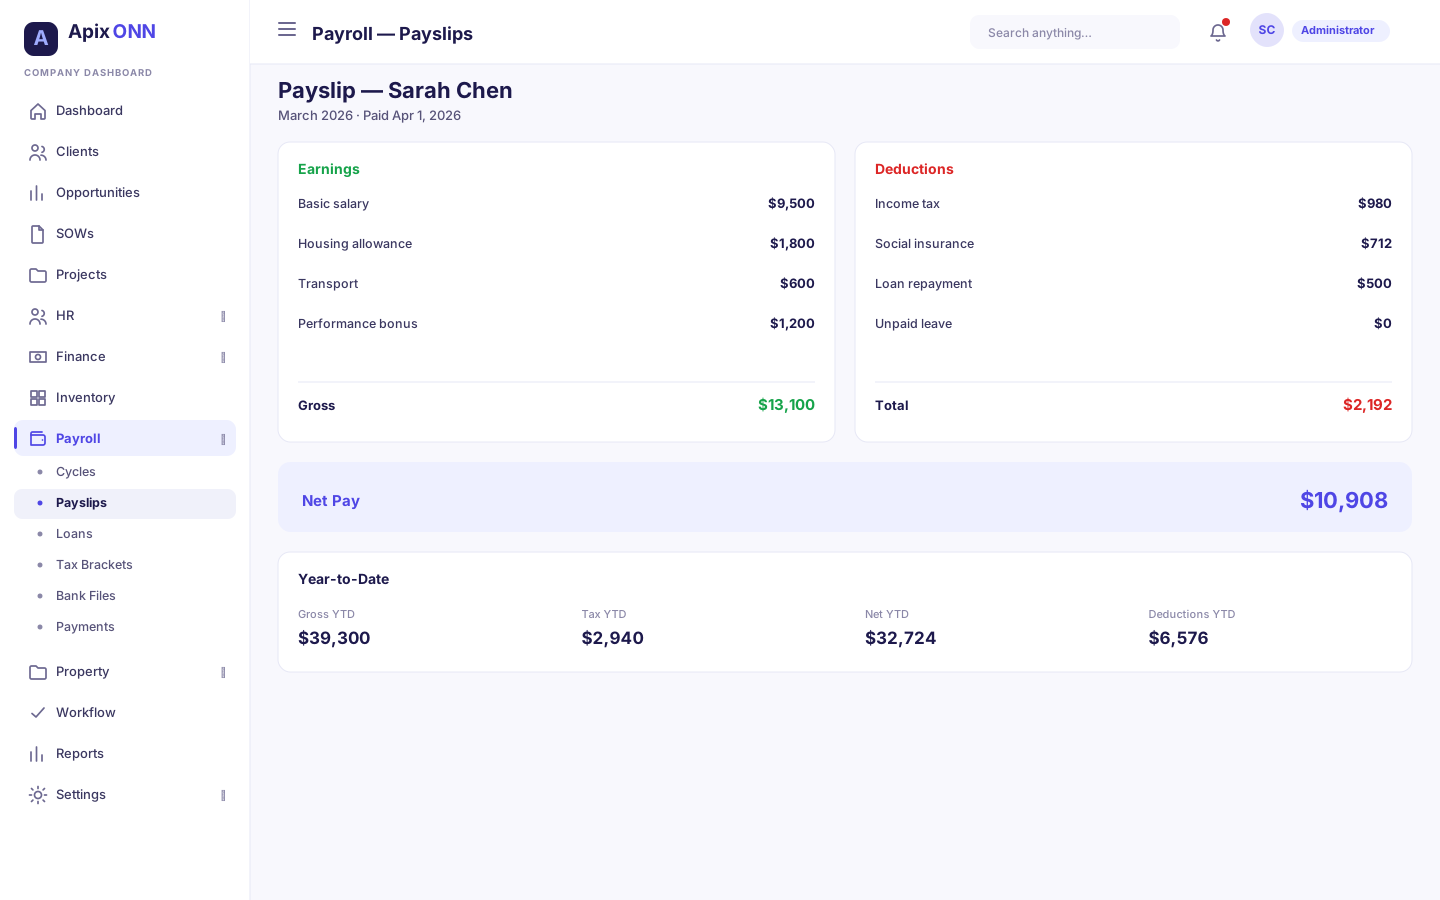
A payslip is one employee's pay for one cycle. It shows the full earnings and deductions breakdown plus year-to-date figures.
#What you can do here
- Open any payslip to see Earnings Breakdown, Deductions Breakdown, Payslip Information and Year-to-Date.
- Send an approved payslip to the employee by email.
#How to send a payslip to an employee
- Open the payslip (from the cycle's payslips table or Payroll → Payslips).
- Make sure its status is Approved.
- Click Send Payslip.
- Confirm the prompt (it shows the employee name and email address).
Note: You can only send a payslip once the cycle has been approved — the Send Payslip button only appears on approved payslips. To email everyone at once, use Download PDF on the cycle for a combined file, or send individually.
#Payslip statuses
| Status | What it means |
|---|---|
| Draft | Belongs to a cycle that hasn't been calculated |
| Approved | The cycle is approved; the payslip can be sent |
| Paid | The cycle was finalized; shows a paid date |
#Salary Components
Where to find it: Payroll → Salary Components
Salary components are the recurring extras on top of an employee's basic pay — an allowance that adds to pay, or a deduction that subtracts from it. They flow into every future cycle automatically.
#What you can do here
- Filter components by type (Allowance / Deduction) and status (Active / Inactive).
- Create a component for a specific employee.
- Edit a component's amount, end date or notes.
- Delete a component.
#How to add a salary component
- Open Salary Components.
- Click Create (Create Salary Component).
- Pick the Employee the component applies to — search by name or employee number.
- Choose the Type — Allowance or Deduction.
- Enter a Name (e.g. "Transportation Allowance").
- Enter the Amount.
- Set the start/end dates and add optional Notes.
- Save.
Field guide — Salary Component
| Field | What it means | Notes |
|---|---|---|
| Employee | Who the component belongs to | Required. Search by name or employee number. |
| Type | Allowance (adds) or Deduction (subtracts) | Required. |
| Name | What the line is called on the payslip | e.g. "Housing Allowance". |
| Amount | The recurring value | Applied every cycle while active. |
| Taxable | Whether the component counts toward taxable income | Checkbox; also shown as a Taxable column on the components list. |
| Start / End date | The window it applies in | Leave the end date open for ongoing items. |
| Notes | Free-text remarks | Optional. |
Tip: Use components for anything that repeats every month. For a one-off bonus or correction on a single run, use an Adjustment instead (below).
#Deductions
Deductions reach a payslip in three ways, and it helps to know which is which:
| Kind of deduction | Where it comes from | How to change it |
|---|---|---|
| Recurring (e.g. a monthly deduction) | A salary component of type Deduction | Salary Components screen |
| Statutory (tax, social insurance) | The country rules and tax brackets | Tax Brackets and Payroll Settings |
| Loan / advance repayments | Active loans, auto-added each cycle | Loans screen |
| One-off (a correction this month only) | A payroll Adjustment set to Deduct from pay | Adjustments screen |
You don't enter tax or social insurance by hand — the calculation applies them from your configured rules.
#Adjustments
Where to find it: Payroll → Adjustments
Adjustments are one-time changes to a single employee's pay — a bonus, a deduction, or a correction. Each one goes on the employee's payslip in a specific payroll cycle that isn't approved yet, and changes that payslip only once it's approved.
#What you can do here
- See every adjustment with its employee, cycle, type, payslip line, amount, and status.
- Filter by Status, Payroll cycle, and Employee.
- Create an adjustment with + New Adjustment.
- Approve or Reject a pending adjustment.
#How to create an adjustment
- Go to Payroll → Adjustments and click + New Adjustment.
- Choose the Payroll cycle. Only cycles still in Draft or Calculated are listed — approved and paid cycles are locked.
- Pick the Employee. You're choosing that employee's payslip in the cycle, so the list shows only the people in it, each with their current net pay.
- Choose the Type — Bonus, Penalty, Arrears (back pay), Reimbursement, or Correction.
- Check Effect on pay — Add to pay or Deduct from pay. It switches to Deduct for a Penalty, but you can change it.
- Enter the Payslip line — the wording the employee sees on their payslip, for example "Q3 performance bonus".
- Enter the Amount. For an addition, leave Taxable ticked if it should count as taxable income.
- Enter a Reason. The approver sees it.
- Click Create Adjustment. It starts as Pending approval.
Important: Once a payroll is approved, its payslips are locked and its cycle no longer appears in the list. Put the adjustment on the next cycle instead.
#How to approve or reject an adjustment
- Find the adjustment with status Pending approval.
- Click Approve and confirm. The amount is added to (or deducted from) the payslip, the payslip is recalculated, and the payroll's totals update.
- Or click Reject, enter a Reason (the requester sees it), and click Reject.
#Adjustment statuses
| Status | What it means |
|---|---|
| Pending approval | Created, waiting for a decision |
| Applied to payslip | Approved and added to the payslip; the payroll totals are updated |
| Rejected | Discarded, no effect on pay. The reason shows under the status. |
Note: Creating an adjustment needs payroll-edit rights; approving or rejecting one needs payroll-approve rights — typically the Finance Manager or Payroll Manager. This separation means the person who requests a bonus isn't always the person who approves it.
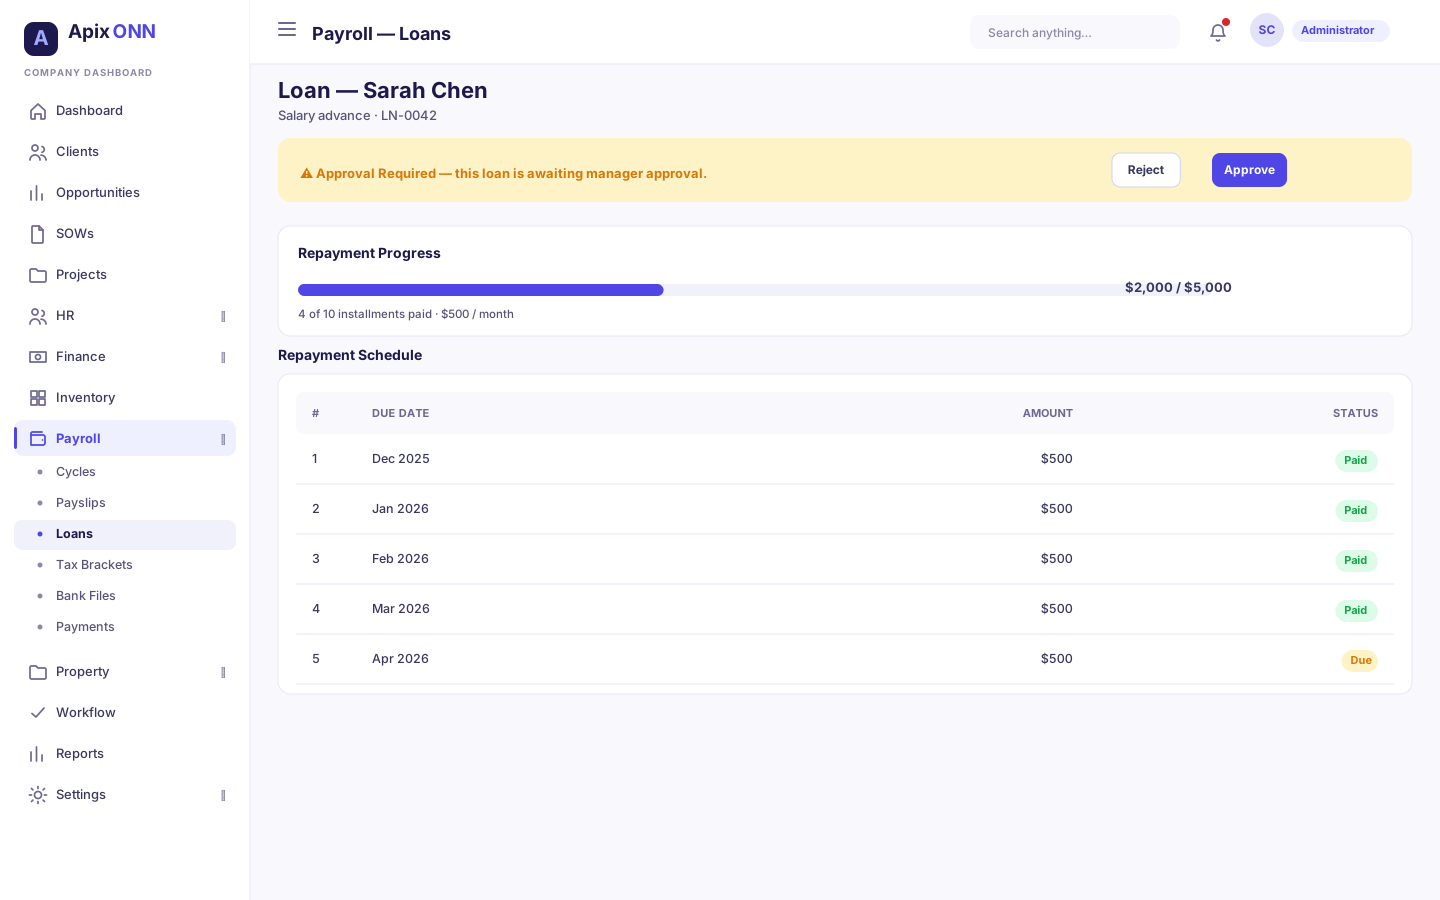
#Loans and Salary Advances
Where to find it: Payroll → Loans
Loans and advances are money lent to an employee and repaid through payroll over a number of installments. A salary advance is simply a loan of type Advance. Once a loan is approved, its repayments are pulled into each cycle's deductions automatically.
#What you can do here
- List loans, filtered by Employee (search by name or number), status and type.
- Create a new loan or advance.
- Open a loan to approve it and to record repayments.
#Loan types
| Type | Typical use |
|---|---|
| Personal | General personal loan |
| Emergency | Urgent, short-notice need |
| Housing | Housing-related |
| Education | Study or training |
| Advance | A salary advance repaid over installments |
#How to create a loan or advance
- Go to Payroll → Loans.
- Click to Create New Loan.
- Search and select the employee by name or number.
- Choose the Loan Type.
- Enter the Loan Amount.
- Enter the Interest Rate (%) (use 0 for interest-free).
- Enter the Number of Installments.
- Set the First Installment Date.
- Optionally add Purpose and Notes. The Loan Summary panel previews the totals.
- Create the loan. It starts as Pending.
#How to approve a loan and record repayments
- Open the loan from the list.
- In the Approval Required panel, click Approve. This generates the repayment schedule and moves the loan to Active.
- As installments come due, open the loan and mark each repayment as paid (repayments are also confirmed automatically when the matching cycle is finalized).
Field guide — Create Loan
| Field | What it means | Notes |
|---|---|---|
| Employee | Who receives the loan | Search by name or number. |
| Loan Type | Category of loan | Choose Advance for a salary advance. |
| Loan Amount | Principal lent | Required. |
| Interest Rate (%) | Annual/flat rate applied | Enter 0 for no interest. |
| Number of Installments | How many payments to spread it over | Required. |
| First Installment Date | When repayment starts | Required. |
| Purpose / Notes | Context for approval | Optional. |
#Loan statuses
| Status | What it means |
|---|---|
| Pending | Created, awaiting approval |
| Approved | Signed off; schedule generated |
| Active | Being repaid through payroll |
| Completed | Fully repaid |
| Cancelled | Stopped, no further repayments |
#Repayment statuses
| Status | What it means |
|---|---|
| Pending | Installment not yet paid |
| Paid | Installment collected |
| Overdue | Installment past its due date |
| Waived | Forgiven, not collected |
Tip: You don't need to enter loan deductions on a cycle by hand. When you calculate a cycle, any repayment due that month is added to the employee's deductions for you, and confirmed when the cycle is finalized.
#Salary Changes
Where to find it: Payroll → Salary Changes
A salary change is a request to move an employee to a new basic salary — a raise, a promotion, an adjustment, or a demotion — from a chosen effective date. It goes through approval before it takes effect, so pay can't be changed silently. Once approved, it updates the employee's active contract on the effective date.
#What you can do here
- See every salary change with the employee, type, current and new salary, the change in %, the reason, the effective date, and the status.
- Filter by Status and Employee.
- Request a salary change with + New Salary Change.
- Approve or Reject a pending request.
#How to request a salary change
- Go to Payroll → Salary Changes and click + New Salary Change.
- Pick the Employee. Their Current basic salary appears underneath. (An employee needs an active contract before a salary change can be requested.)
- Choose the Type — Raise, Promotion, Adjustment, or Demotion.
- Set the Effective date.
- Enter the New basic salary (monthly). The difference shows as you type, for example "+10.0%".
- Enter a Reason (the approver sees it) and any Notes.
- Click Request Salary Change. It starts as Pending approval.
#How to approve or reject
- Find the request with status Pending approval.
- Click Approve and confirm. The confirmation tells you when it takes effect:
- Effective today or earlier — it takes effect now, and the active contract is updated.
- Effective on a later date — it takes effect on that date, and the active contract is updated automatically that day. You don't need to do anything else.
- Or click Reject and give a Reason (the requester sees it).
#Salary-change statuses
| Status | What it means |
|---|---|
| Pending approval | Submitted, awaiting a decision |
| Approved — takes effect on the effective date | Approved, with an effective date still ahead. It applies automatically on that date. |
| Applied to contract | The new salary is on the employee's active contract |
| Rejected | Discarded |
Note: There is a second, more detailed way to change pay — the Amend Salary form on an employee's contract (in HR), which lets you set basic salary plus each allowance separately with an effective date and reason. Both routes go through approval; the Salary Changes screen is the quick single-figure version, the contract amendment is the itemized one. Neither takes effect until approved.
#Tax Brackets and Country Rules
Tax is calculated from income tax brackets plus country payroll rules. These are set up once and reused every cycle.
#Tax Brackets
Where to find it: Payroll → Tax Brackets
Brackets are the income bands and the rate charged on each. There's also a built-in Tax Calculator to test an income figure against the current bands.
How to add a tax bracket:
- Go to Payroll → Tax Brackets and pick the Tax Year at the top.
- Click to Create Tax Bracket.
- Enter a Bracket Name (e.g. "First Bracket").
- Set the Tax Year and Bracket Order (1 for the lowest band, 2 next, and so on).
- Enter the Min Income and max income for the band.
- Enter the Tax Rate (%).
- Choose the Country the bracket applies to from the list. Payroll uses the brackets for the payroll cycle's country.
- Save.
To test a figure: scroll to the Tax Calculator, enter an income amount, and it shows the tax due under the current brackets.
Field guide — Tax Bracket
| Field | What it means | Notes |
|---|---|---|
| Bracket Name | Label for the band | e.g. "Second Bracket". |
| Tax Year | Which year it applies to | Brackets are year-specific. |
| Bracket Order | Position from lowest to highest | Must be sequential. |
| Min Income | Where the band starts | Required. |
| Max Income | Where the band ends | Leave open for the top band. |
| Tax Rate (%) | Rate charged on income in this band | Required. |
| Fixed Amount | A flat amount charged for this band, on top of the rate | Optional. |
| Country | Which country's tax regime the bracket belongs to | Required. Picked from a country list. |
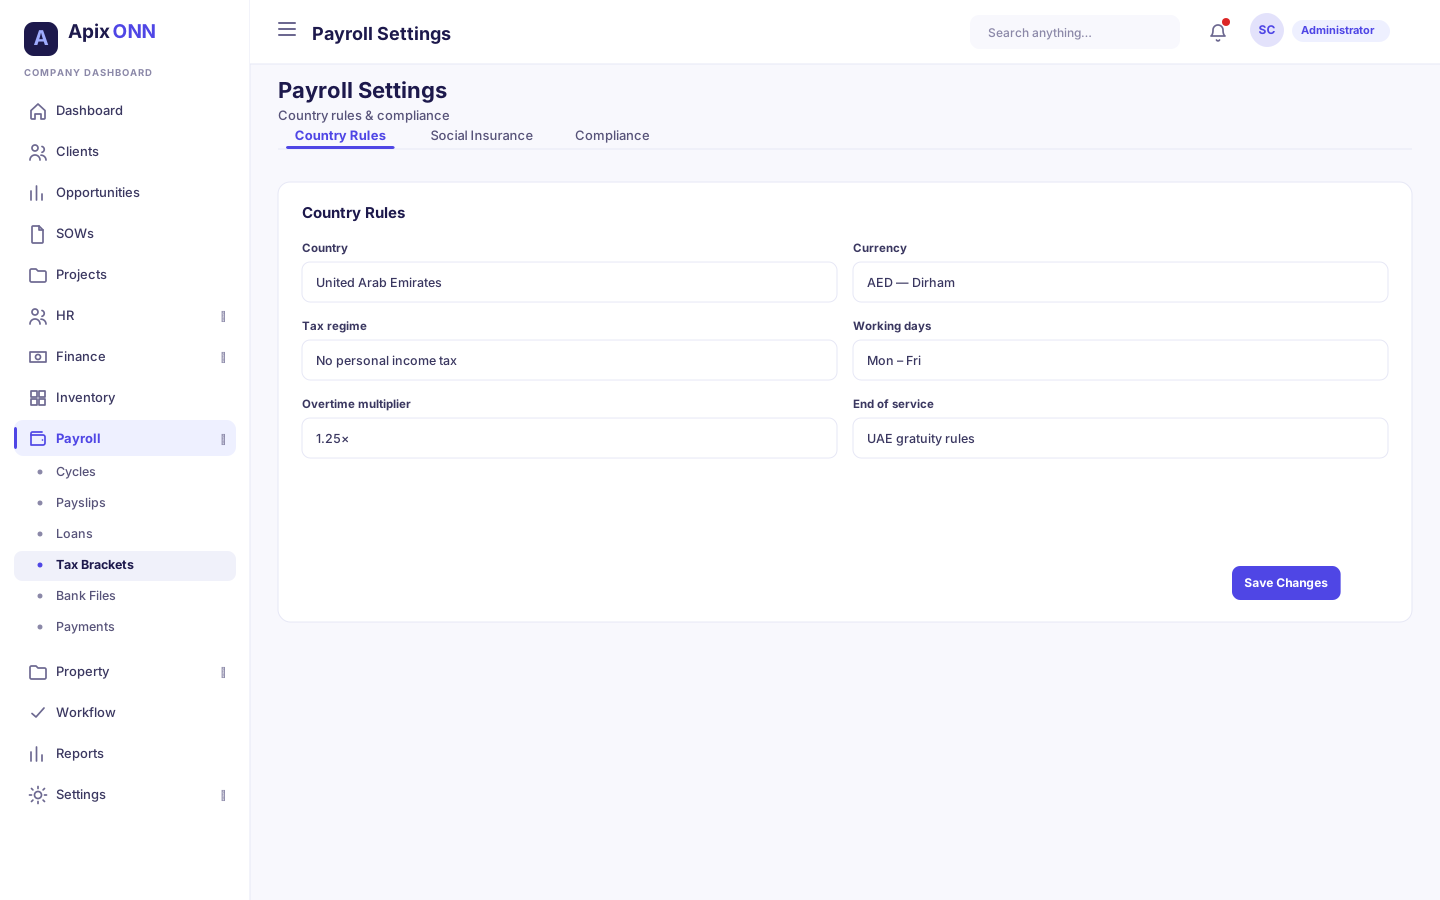
#Country Rules
Where to find it: Payroll → Payroll Settings → Country Rules tab
Country rules capture the statutory items that vary by country — tax, social insurance, mandatory allowances or deductions, end-of-service and other compliance rules.
How to add a country rule:
- Go to Payroll → Payroll Settings and select the Country Rules tab.
- Click + New Rule and give it a Rule Name (e.g. "Income Tax Deduction").
- Choose the Country from the list.
- Choose the Type — Tax, Social Insurance, Mandatory Allowance, Mandatory Deduction, End of Service (gratuity), or Compliance. (The type can't be changed later — create a new rule instead.)
- For any type except End of Service, choose the Calculation Method — Percentage, Fixed Amount, Progressive / Tiered, or Formula — and enter its settings (a Rate (%) or an Amount).
- Choose Applies To — All Employees, Nationals Only, or Expatriates Only.
- Add an optional Description, and click Create Rule.
End-of-service (gratuity) rules have their own labelled fields instead of a calculation method. Gratuity = daily wage × days of pay earned for each year of service, where the daily wage = monthly salary ÷ days per month.
| Field | What it means |
|---|---|
| Minimum service (years) | No gratuity below this length of service. Defaults to 1. |
| Salary used | The salary basis: Basic salary or Total salary (with allowances). |
| Days per month | What the monthly salary is divided by to get the daily wage. Usually 30. |
| Bands | The pay bands. Each band reads "From x to y years: n days of pay per year". Use + Add band for more and Remove to delete one. Leave the last band's "to" empty to cover all remaining years. |
For example, the default bands give 21 days of pay per year for the first 5 years, and 30 days per year after that. In the rules list, an end-of-service rule shows as "Tiered gratuity (n bands)".
#Social Insurance
Where to find it: Payroll → Payroll Settings → Social Insurance tab
Social insurance (social security) rules define the employee and/or employer contributions taken each cycle. There's a Preview Calculator to check contributions for a sample salary before you rely on the rule.
#How to add a social-insurance rule
- Go to Payroll → Payroll Settings → Social Insurance tab.
- Click + New Rule and give it a Rule Name (e.g. "Social Security").
- Choose the Country from the list.
- Choose the Contribution Type — Employee & Employer, Employee Only, or Employer Only.
- Choose the Contribution Base — Basic Salary, Gross Salary, or Total Salary.
- Enter the Employee Rate (%) and Employer Rate (%).
- Optionally set a Salary Cap (leave it empty for no cap).
- Save.
#How to preview a contribution
- In the Preview Calculator, enter a Monthly Salary.
- Optionally choose a Country. Leave it empty to use your company's country.
- Choose the Employee Type — National or Expatriate.
- Click Calculate. The calculator shows the employee, employer, and total contributions.
Field guide — Social Insurance rule
| Field | What it means | Notes |
|---|---|---|
| Rule Name | Label for the rule | e.g. "Social Security". |
| Country | Country it applies to | Required. Picked from a country list. |
| Contribution Type | Who pays | Employee & Employer, Employee Only, or Employer Only. |
| Contribution Base | What the % is applied to | Basic, Gross or Total salary. |
| Employee Rate (%) | Employee's share | Required for employee contributions. |
| Employer Rate (%) | Employer's share | Required for employer contributions. |
| Salary Cap | Salary cap for contributions | Optional; contributions stop above it. Shown as "No Cap" when empty. |
Note: Tax brackets, country rules and social insurance are all edited under payroll tax permissions — usually the Payroll Manager or Finance Manager. Get these right before your first live run, because every calculation depends on them.
#End of Service (Gratuity)
Where to find it: Payroll → End of Service
This calculator works out an employee's end-of-service gratuity (severance) based on their length of service and the gratuity rules configured for their country.
#How to calculate a gratuity
- Go to Payroll → End of Service.
- Select the Employee.
- Optionally enter a termination date and a salary override (leave the salary blank to use the contract salary).
- Read off the result — service years, monthly salary, gratuity days and the gratuity amount.
Note: If gratuity comes back as 0 and the employee has clearly served a long time, the country's end-of-service rule probably hasn't been set up yet under Payroll Settings → Country Rules (a rule of type End of Service (gratuity) — see Country Rules). A zero result means "not configured," not "not entitled." Employees need the rule's Minimum service (years) before any entitlement applies.
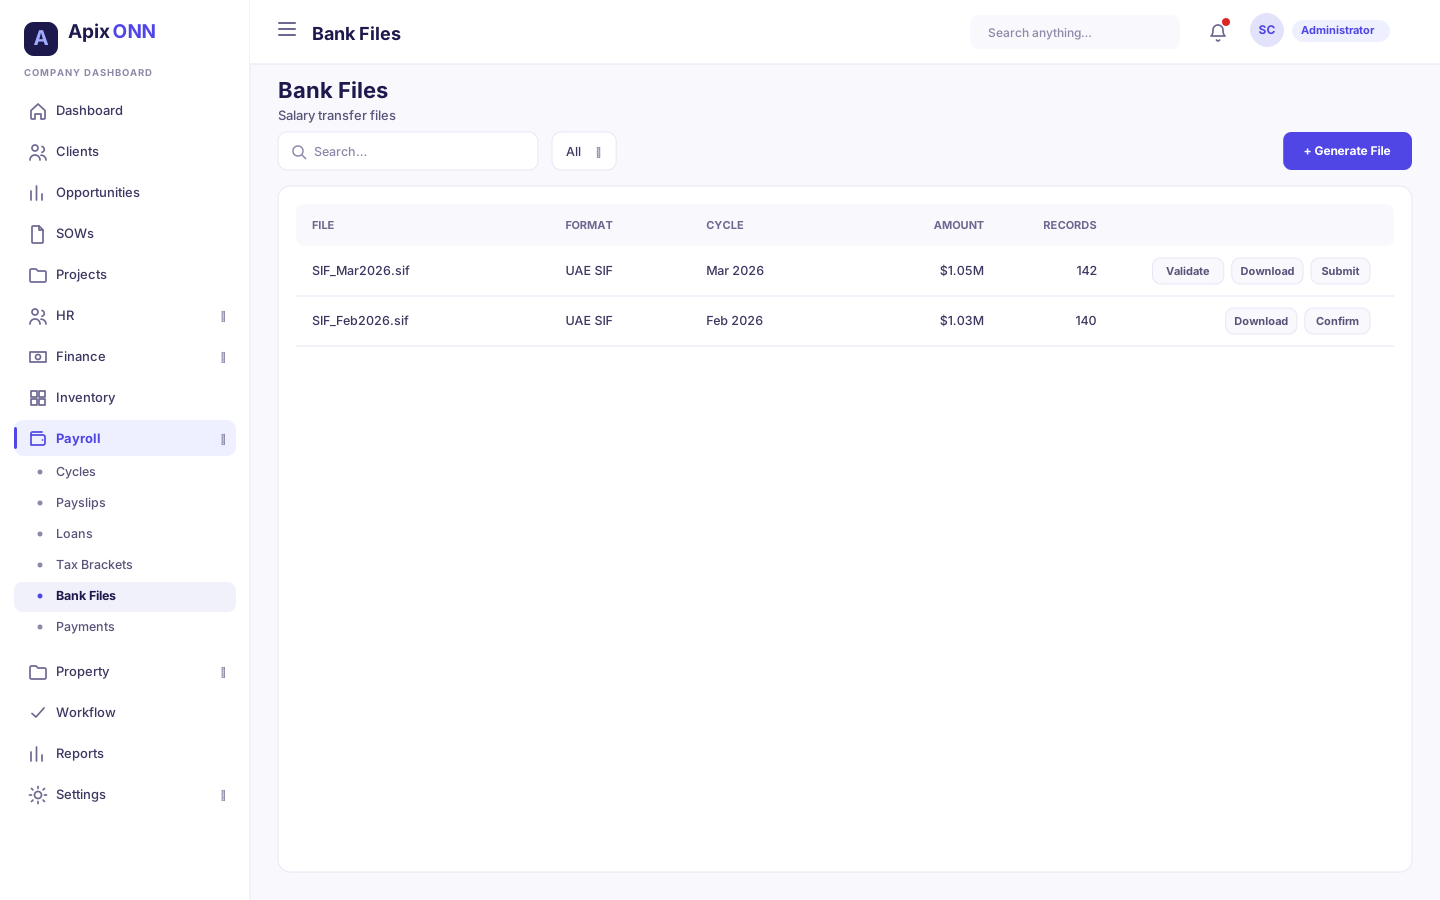
#Bank Files (salary transfer file)
Where to find it: Payroll → Bank Files, or an approved or paid cycle's Generate Bank File button.
A bank file is the transfer file your bank uses to pay everyone in one batch. You generate it from an approved (or paid) cycle, validate it, download it, and upload it to your bank's portal.
#What you can do here
- List all bank files with their format, cycle, currency, total amount, record count and status.
- Filter by status.
- Generate a new bank file.
- Validate, Download, Submit and Confirm a file.
#How to generate a bank file
- From an approved or paid cycle, click Generate Bank File (or open Bank Files and click + Generate Bank File).
- Select the Payroll Cycle. Only approved or paid cycles can produce a bank file.
- Choose a File Format, or leave it on the default for your country.
- Optionally pick the Bank Account the salaries are paid from. The list shows your company bank accounts from Finance → Bank Accounts (you need Finance access to pick one).
- Click Generate.
The system builds one transfer line per employee whose net pay is above zero and who has bank details on file. Employees missing bank details are excluded (with the reason "Missing banking information") rather than blocking the file.
#File formats
The default format is chosen from your company's country. Available formats include a generic CSV plus country-specific formats (for example WPS files for Qatar and Saudi Arabia, SEPA XML, and a Jordan bank format). If your country has no specific format, CSV is used.
#How to validate, download and hand the file to your bank
- In the Bank Files list, click Validate on the file. A message tells you how many records are valid and lists any problems.
- Once valid, click Download to save the file.
- Upload that file to your bank's payment portal (this step happens at the bank, outside ApixONN).
- Back in ApixONN, click Submit to mark the file as sent to the bank.
- When the bank confirms the batch cleared, click Confirm.
#Bank-file statuses
| Status | What it means | Available actions |
|---|---|---|
| Draft | Created but not yet a usable file (often has validation warnings) | Validate |
| Generated | File built and ready | Download, Validate, Submit |
| Submitted | Marked as sent to the bank | Download, Validate, Confirm |
| Confirmed | Bank confirmed the transfers | Download, Validate |
| Failed | Generation failed | Validate, regenerate |
Note: Generating and submitting a bank file needs payroll-edit rights; confirming it needs payroll-approve rights — so the person who sends the file to the bank and the person who confirms it cleared can be different people.
#Payments (payment status & reconciliation)
Where to find it: Payroll → Payments (then pick a cycle), or a paid cycle's Payment Status button.
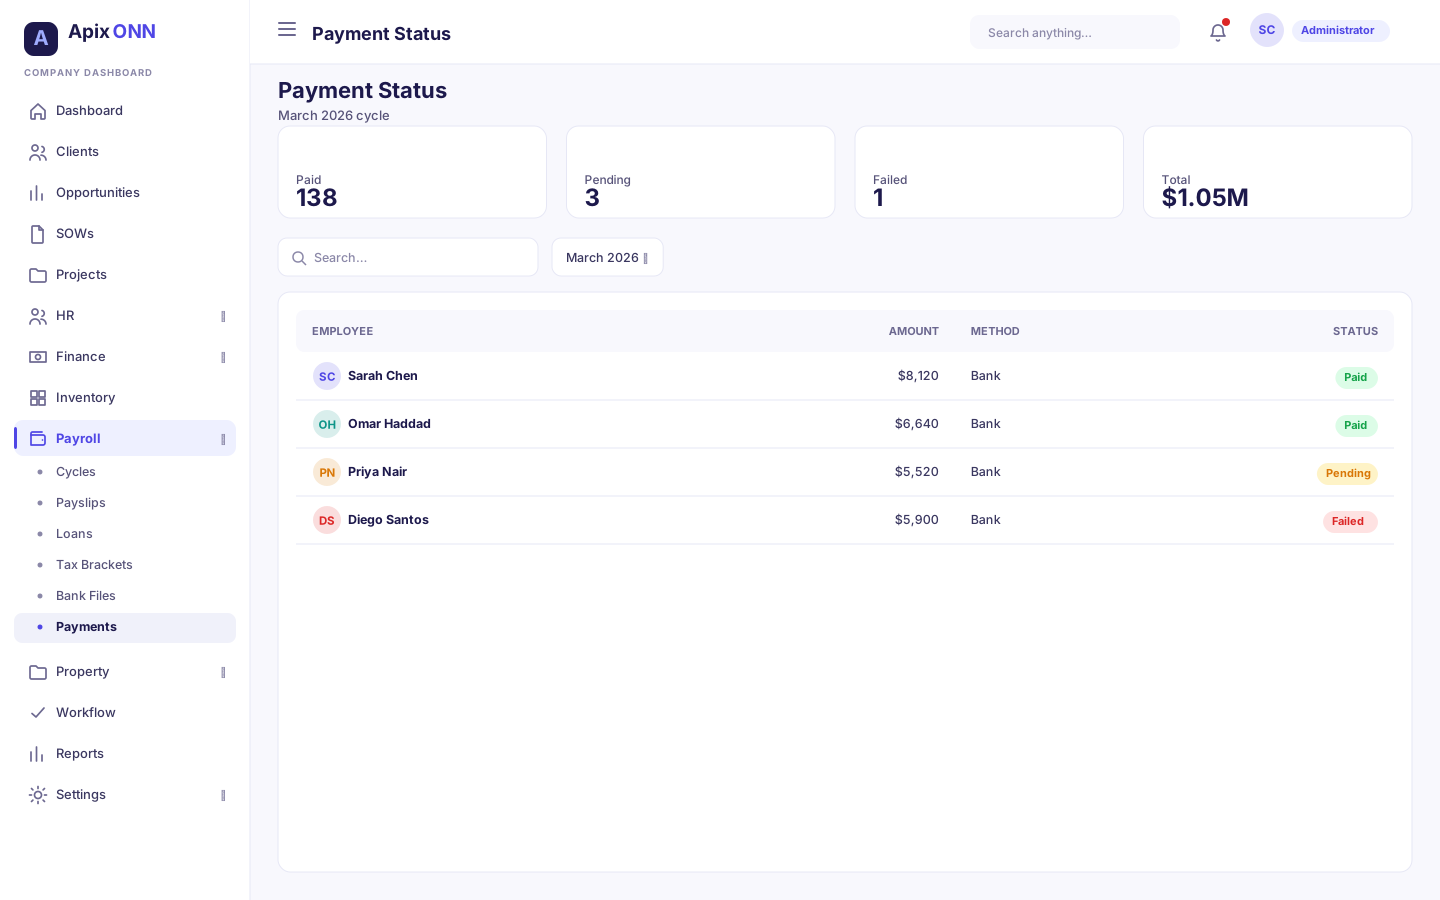
After a cycle is paid and the bank file is out, this screen tracks whether each employee's transfer actually succeeded, and lets you reconcile the run.
#What you can do here
- Choose a payroll cycle and see every payslip's payment status, method, reference and processed date.
- See a progress bar of how many have been paid.
- Bulk Confirm All pending payments at once.
- Per employee: Mark Paid, Mark Failed (with a reason), or Reprocess a failed one.
#How to reconcile a cycle's payments
- Open Payment Status and choose the cycle.
- To confirm the whole batch, click Bulk Confirm All.
- For a single employee, use Mark Paid if their transfer succeeded.
- If a transfer bounced, click Mark Failed and enter the reason.
- Once the issue is fixed, click Reprocess on the failed line to try again.
#Payment statuses
| Status | What it means |
|---|---|
| Pending | Not yet confirmed as paid |
| Processing | In progress |
| Paid | Transfer succeeded |
| Failed | Transfer bounced — reprocess after fixing |
Note: Marking paid/failed and reprocessing need payroll-edit rights; Bulk Confirm All needs payroll-approve rights.
#Payroll Reports
Where to find it: Payroll → Payroll Reports
A library of read-only reports for finance, tax filing and audit. Open any card to run that report.
| Report | What it shows |
|---|---|
| Cost Center Report | Payroll costs by department and cost center |
| Tax Report | Monthly and annual tax-withholding summaries |
| Withholding Return | Tax withheld per employee for a period — the figure you file with the tax authority |
| Employee Tax Card | One employee's month-by-month gross, taxable income and tax withheld for a year |
| Overtime Report | Overtime hours and costs by employee |
| Variance Report | Cycle-over-cycle change analysis |
| Compliance Report | Payroll compliance checks and alerts |
| Summary Report | Annual payroll summary with monthly trends |
| Headcount Report | Employee headcount by department and branch |
| Benefits Report | Allowance and benefits cost analysis |
| Year-End Report | Per-employee annual earnings summary |
| Audit Trail | Payroll change history and audit log |
Tip: For your monthly close, the Summary and Variance reports catch mistakes fast — a big month-over-month swing usually means a missed adjustment or a salary change that didn't get approved.
#Who does what (roles)
Payroll actions are gated by permission, and permissions map to roles. In practice:
| Action | Typical role |
|---|---|
| Create and calculate a cycle | Payroll Manager |
| Approve a cycle | Finance Manager (or another approver role) |
| Finalize & pay | Payroll Manager / Finance Manager |
| Create adjustments, salary components, loans | Payroll Manager |
| Approve adjustments, salary changes, loans | Finance Manager / Payroll Manager |
| Set up tax brackets, country rules, social insurance | Payroll Manager / Finance Manager |
| Generate & submit bank files, reconcile payments | Payroll Manager |
| Confirm bank files, bulk-confirm payments | Finance Manager / Payroll Manager |
| View own payslips | Employee, Consultant, Contractor |
| Read-only across payroll | Read Only |
Note: Exact rights depend on how your Admin configured roles. If a button is missing or greyed out, you likely lack that permission — ask your Admin or Payroll Manager.
#Common questions
My bank file says "no records" or "0 records to transfer." Why? A cycle only produces transfer records for payslips that are approved with a positive net pay and whose employee has bank details on file (IBAN or account number). If nobody in the cycle has bank details, the file has nothing to send. Add bank details to the employees, then regenerate.
How do an employee's bank details end up in the bank file? Each transfer line is built from the employee's saved bank name, account number, IBAN and SWIFT code (set on the employee record in HR) together with their net pay for that cycle. Keep those fields current — the transfer file copies them exactly.
Why is one employee missing from the bank file? Most likely they have no bank details, so they were excluded with the reason "Missing banking information," or their net pay was zero. Everyone else still goes through — one missing person doesn't block the file. Add their bank details and regenerate.
Can I undo an approval? No. Approving a cycle cannot be undone. Review the numbers carefully while the cycle is still Calculated. If something is wrong after approval, correct it with an Adjustment on the next run, or contact your Admin.
Why can't I approve my own cycle? Calculating and approving are separate permissions on purpose (separation of duties). The person who runs the calculation often can't also approve it — that's usually the Finance Manager's job.
A payment bounced at the bank. What do I do? On Payment Status, click Mark Failed and record the reason. Fix the underlying issue (usually wrong bank details), then click Reprocess to try that employee again.
Where do recurring monthly deductions come from? From Salary Components of type Deduction. Tax and social insurance are applied automatically from your configured rules; loan repayments are added automatically from active loans. Use an Adjustment only for a one-off change on a single run.
Do I have to add loan repayments to each cycle myself? No. When you calculate a cycle, any loan or advance installment due that month is added to the employee's deductions automatically and confirmed when the cycle is finalized.
Gratuity shows as 0 for a long-serving employee — is that a bug? Usually it means the end-of-service rule for that country isn't configured yet (add a rule of type End of Service (gratuity) under Payroll Settings → Country Rules), or the employee hasn't passed the rule's minimum service period. A zero result means "not configured / not eligible," not a calculation error.